
Sewing your own bag can be one of the most rewarding projects you take on as a beginner or experienced sewist. Not only do you create something functional, but you also end up with a unique accessory that reflects your personal style. In this tutorial, we will walk through the steps of making a practical yet trendy bag featuring a circular pocket on the front. Using a simple sewing pattern and easy-to-follow instructions, you’ll be able to create a bag that’s both stylish and functional. Let’s dive in!
Materials You Will Need
Before we start, let’s gather everything you’ll need for this sewing project. Having the right materials on hand makes the process smooth and enjoyable. Here’s what you should prepare:
- Fabric: Medium-weight cotton, canvas, or faux leather work best.
- Lining fabric: Choose a contrasting or matching fabric for the inside.
- Interfacing: To give the bag structure and durability.
- Zipper: One long zipper for the main opening and one shorter zipper for the circular pocket.
- Thread: Strong polyester or nylon thread.
- Scissors or rotary cutter: For cutting your pieces.
- Measuring tape or ruler.
- Pins or clips: To hold your fabric in place.
- Sewing machine: Essential for stitching everything together.
Having these materials ready before you begin ensures a smooth sewing process. You can always experiment with fabric types to see how they change the look and feel of your finished bag.
Understanding the Sewing Pattern
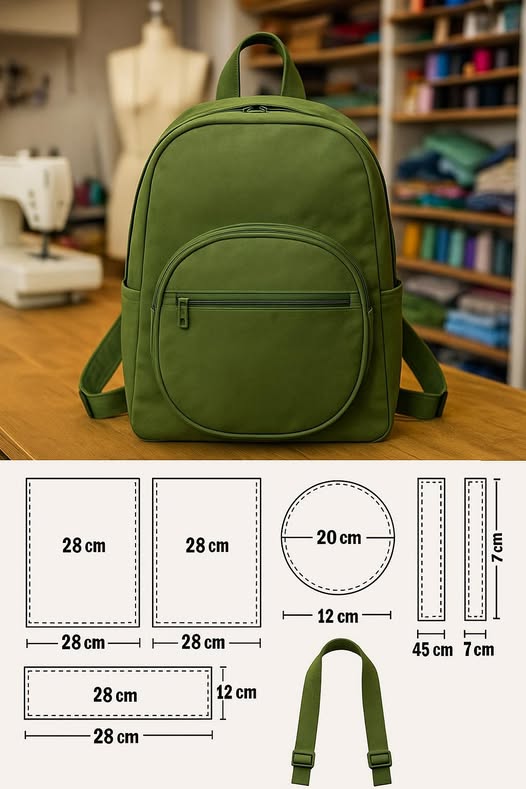
The sewing pattern for this project is straightforward and beginner-friendly. It includes simple rectangles and one circle for the pocket. The main body of the bag is composed of two rectangles measuring 28 cm by 28 cm. These serve as the front and back panels. For the side and bottom panels, you’ll need one piece measuring 28 cm by 12 cm.
The circular pocket is made using a 20 cm diameter circle for the front and a smaller strip of fabric measuring 12 cm by 28 cm for the pocket band. You’ll also cut two strap pieces measuring 45 cm by 7 cm each. These straps can be adjusted in length depending on your personal comfort.
By following these measurements, you’ll have all the necessary components to assemble your bag. If you’re new to sewing patterns, this one is an excellent introduction because it uses basic shapes while still producing a polished and stylish finished product.
Cutting Your Fabric
Once you understand the sewing pattern, the next step is cutting your fabric. Lay your fabric flat on a cutting mat or a clean surface, and carefully measure each piece using a ruler or measuring tape. Mark your cutting lines with tailor’s chalk or a fabric pen to keep them visible while you work.
Be sure to cut both the outer fabric and the lining for each piece. If you’re using interfacing, cut it to the same dimensions and fuse it to your outer fabric before assembling. This will give your bag extra strength and structure. Don’t forget to cut the circular piece neatly—it will be the focal point of your bag, so accuracy matters here.
Take your time with this step. Accurate cutting ensures that your bag pieces align correctly during sewing. Many beginners rush through this stage, but careful cutting will save you headaches later.
Sewing the Circular Pocket
Let’s begin with the feature that makes this bag unique: the circular pocket. First, prepare the circular fabric piece by attaching the zipper along the top edge of the pocket opening. Sew the zipper carefully to ensure smooth operation. Next, sew the circular piece onto the rectangular pocket band (12 cm by 28 cm piece), forming the structure of the pocket.
Once the pocket is assembled, pin it onto the front panel of the bag (one of the 28 cm by 28 cm squares). Position it centrally or slightly lower, depending on your preference. Stitch around the edges securely, making sure to reinforce the zipper area. This will give you a functional and stylish pocket that stands out on your bag.
The circular pocket may look complicated at first, but with patience, it comes together beautifully. It’s also a great opportunity to practice sewing curves, a skill that will help you in many future sewing projects.
Assembling the Bag Body
With the pocket complete, it’s time to sew the main bag body. Start by joining the front and back panels to the side and bottom strip (28 cm by 12 cm). Align the edges carefully and sew with a straight stitch, making sure to keep the corners neat. This forms the boxy shape of the bag.
Next, attach the lining fabric by repeating the same steps, but leave a small opening at the bottom. This opening will allow you to turn the bag right side out later. Once the lining is assembled, you can attach it to the main bag by sewing around the top edge. Be sure to include the zipper for the bag opening in this step.
After stitching everything together, turn the bag right side out through the opening in the lining. Sew the opening closed with a simple straight stitch or by hand using a ladder stitch for a clean finish.
Adding the Straps
Now that your bag is taking shape, it’s time to add the straps. Cut two strips measuring 45 cm by 7 cm each. Fold them in half lengthwise, right sides together, and stitch along the long edge. Turn them right side out and press them flat. For added strength, topstitch along both edges.
Attach the straps securely to the top and bottom of the back panel of the bag. Reinforce the stitching by sewing an X-box pattern (a square with a cross inside) at each attachment point. This ensures that the straps can handle the weight of the bag’s contents without tearing.
If you’d like adjustable straps, you can use strap adjusters or buckles instead of sewing them directly. This gives you more flexibility in how you carry the bag.
Personalization Ideas
One of the joys of sewing your own bag is the ability to customize it however you like. You can personalize this bag in countless ways. Consider using patterned fabric for the lining to add a pop of color every time you open it. You could also embellish the circular pocket with embroidery, patches, or decorative stitching.
Another idea is to experiment with fabric textures. Try using denim for a casual look, faux leather for a chic vibe, or quilted fabric for a soft, cozy feel. Changing the zipper color is another simple yet effective way to make your bag stand out.
By personalizing your bag, you make it truly one-of-a-kind. These little touches are what transform a simple sewing project into a reflection of your creativity and style.
Tips for Beginners
If you’re new to sewing, don’t worry—this project is very beginner-friendly. Start by practicing sewing straight lines and curves on fabric scraps before moving on to your bag pieces. This will build your confidence and help you avoid mistakes.
Always pin or clip your fabric pieces together before sewing. This prevents shifting and ensures cleaner seams. And remember to press your seams with an iron as you go; it makes a huge difference in the final look of your bag.
Most importantly, take your time and enjoy the process. Sewing is not just about the finished product—it’s also about the joy of creating something with your own hands.
Conclusion: Share Your Sewing Journey
Congratulations! You’ve just completed your own bag with a circular pocket using a simple sewing pattern. This bag is practical, stylish, and a fantastic project for anyone interested in sewing. By following the steps, you’ve not only created a useful accessory but also built skills that will serve you in many future projects.
Now that you’ve finished, we’d love to see your version of this bag. Share your project on social media, sewing groups, or with friends. Every creation is unique, and your take on this sewing pattern could inspire someone else to start their own journey.
Happy sewing, and may your new bag accompany you on many adventures!