
If you love sewing and want a practical yet stylish project, this beautiful bag with zipper is the perfect choice. Compact, functional, and customizable, this bag makes an excellent gift or a handy accessory for everyday use. The best part? You can make it yourself with this free sewing pattern. Whether you are a beginner learning the basics or an experienced sewist looking for a quick project, this step-by-step guide will walk you through everything you need.
In this tutorial, we will cover the materials you need, how to cut and prepare your fabric, the sewing process, and creative ways to personalize your bag. Let’s dive into the world of sewing and create something both beautiful and functional!
Materials You Will Need
Before you start, gather all the materials. Having everything at hand makes the sewing process smoother and more enjoyable. For this bag, you will need:
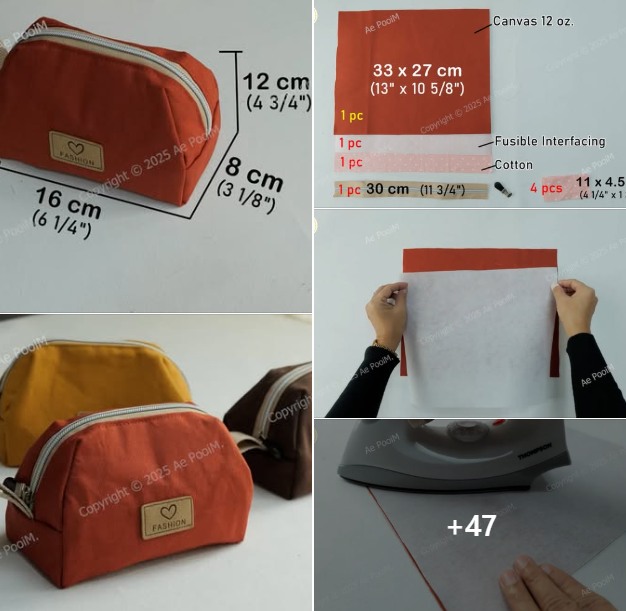
- Canvas fabric (12 oz.): 33 x 27 cm (13” x 10 5/8”) – 1 piece
- Cotton fabric for lining: same size – 1 piece
- Fusible interfacing: same size – 1 piece
- Zipper: 30 cm (11 3/4”) – 1 piece
- Fabric tabs: 4 pieces, each 11 x 4.5 cm (4 1/4” x 1 3/4”)
- Basic sewing tools: scissors, pins or clips, sewing machine, and an iron
The choice of canvas makes the bag sturdy and durable, while cotton lining gives it a neat interior finish. The fusible interfacing helps the bag hold its shape, which is especially important when you want it to look professional.
Don’t worry if you are new to sewing patterns—this one is simple and very beginner-friendly. The rectangular cuts and straightforward steps make it a great project for practice while still giving you a polished final product.
Cutting and Preparing the Fabric
Start by cutting your fabric pieces according to the measurements listed. Accuracy at this stage is important because it will ensure that all parts align properly when you begin sewing. Use a rotary cutter or sharp fabric scissors for clean edges.
Once your fabric is cut, attach the fusible interfacing to the wrong side of the canvas fabric. Place the interfacing with the adhesive side down, cover with a pressing cloth, and press with a hot iron. This will give your bag extra stability and a professional finish.
Next, prepare your zipper tabs. Fold each small piece of fabric in half lengthwise, then fold the raw edges toward the center and press. Insert each end of the zipper into a tab and sew in place. This step not only makes the zipper easier to handle but also gives your bag a neat, finished look.
Sewing the Zipper
The zipper is the highlight of this bag, and sewing it in may seem intimidating, but don’t worry—it’s easier than it looks. Place the zipper face down on the right side of the canvas fabric. Align the edges, then place the lining fabric on top, right side facing down. Pin or clip in place.
Using a zipper foot on your sewing machine, stitch along the edge where the zipper is sandwiched between the two fabrics. Open the layers and press them flat with an iron. Repeat the process with the other side of the zipper, attaching the remaining canvas and lining fabric.
Once both sides are sewn, topstitch close to the zipper. This will keep the fabric from catching in the zipper teeth and will give your bag a crisp, finished appearance. At this stage, you can already see your bag taking shape!
Assembling the Bag
Now that the zipper is attached, it’s time to assemble the bag. Open the zipper halfway—this step is crucial so you can turn the bag right side out later. Align the canvas pieces right sides together and the lining pieces right sides together. Pin or clip around the edges.
Sew along the sides and bottom, leaving a small opening at the bottom of the lining. This will be used to turn the bag inside out. Reinforce the stitching around the zipper area for extra durability.
Next, create the boxed corners. To do this, pinch each corner so that the side seam aligns with the bottom seam, forming a triangle. Measure about 4 cm (1 1/2”) from the point, mark a line, and sew across. Trim the excess fabric. Repeat this step for all four corners—two on the exterior and two on the lining.
Finishing Touches
Once the corners are sewn, turn the bag right side out through the opening in the lining. Push out the corners neatly and press the bag with an iron to smooth out any wrinkles. Sew the opening in the lining closed, either by hand with a ladder stitch or with your sewing machine.
At this point, your bag is nearly complete. Slide the lining into the main bag, making sure it fits nicely, and give it a final press. Your beautiful bag with zipper is ready to use!
This sewing pattern produces a bag measuring about 16 cm (6 1/4”) wide, 12 cm (4 3/4”) tall, and 8 cm (3 1/8”) deep—the perfect size for storing makeup, toiletries, or small craft supplies.
Personalization Ideas
One of the best parts of sewing your own bag is the opportunity to make it uniquely yours. Here are some fun customization ideas:
- Fabric Choices: Experiment with colorful prints, denim, faux leather, or quilting cotton. Each fabric will give your bag a different personality.
- Decorative Touches: Add a leather tag, embroidery, or a fabric label to personalize your project. You can even sew on patches or appliqués.
- Straps and Handles: For added functionality, stitch a wrist strap or small handle onto the side tabs. This makes it easy to carry around.
You can also play with contrasting linings or bright zippers to make the inside of the bag as exciting as the outside. Sewing gives you endless opportunities to express your creativity.
Why This Sewing Pattern is Perfect for Beginners
This free sewing pattern is ideal for those just starting out. It teaches essential skills such as installing a zipper, sewing boxed corners, and using fusible interfacing. Each of these techniques is valuable for future projects, so this bag works as both a practical accessory and a great learning experience.
Because the steps are simple and the shapes are easy to cut, beginners can complete this project in just a few hours. More advanced sewists will appreciate how quick and satisfying it is to sew up a professional-looking bag without complicated patterns.
With practice, you might find yourself making several of these bags for gifts, craft fairs, or even to sell online. Handmade bags are always in demand, and sewing your own means you can control the quality and style.
Share Your Project!
Now that you’ve followed this tutorial and made your own beautiful bag with zipper, it’s time to show it off. Whether you keep it for yourself or gift it to someone special, don’t forget to share your work. Post your finished bag on social media, sewing groups, or with friends and family who appreciate handmade creations.
Sewing is more than just a hobby—it’s a way to connect with others, express your creativity, and build confidence in your skills. By using this free sewing pattern, you’ve created something both practical and beautiful.
So grab your fabrics, thread your needle, and start sewing today. And when your bag is complete, we’d love to see it. Share your photos, inspire others, and keep the joy of handmade sewing alive!