
If you love quilting and Halloween crafts, this Patchwork Pumpkin with Witch Hat is the perfect project to bring a touch of spooky charm to your home. Whether you’re a beginner or an experienced quilter, this tutorial will guide you step by step through the process of creating a festive quilt block that doubles as a delightful Halloween decoration.
From piecing together colorful fabric scraps to adding the playful witch hat detail, this project combines Quilt techniques with whimsical creativity. Let’s dive in and learn how to make your own enchanting Halloween pumpkin art quilt!
Materials You’ll Need
Before starting your quilting adventure, gather all the materials you’ll need. This project is small, so you can easily use your leftover fabrics and scraps — making it both eco-friendly and cost-effective.
Fabric and Supplies
- Fabric scraps in shades of orange, black, beige, green, and purple
- Black felt or cotton fabric for the witch hat and facial features
- Burlap or textured ribbon for the bow decoration
- Small fabric flowers or lace for embellishments
- Batting (lightweight)
- Backing fabric (neutral or Halloween-themed)
- Sewing machine and matching thread
- Pins and scissors
- Iron and ironing board
- Quilting needle (for hand stitching details)
Optional Embellishments
You can add:
- Lace, buttons, or embroidery for extra flair
- Beads or sequins for sparkle
- Fabric paint for shading or outlines
Having everything ready before you begin will make the process much smoother and enjoyable. Now, let’s get creative!
Step 1: Planning Your Patchwork Pumpkin
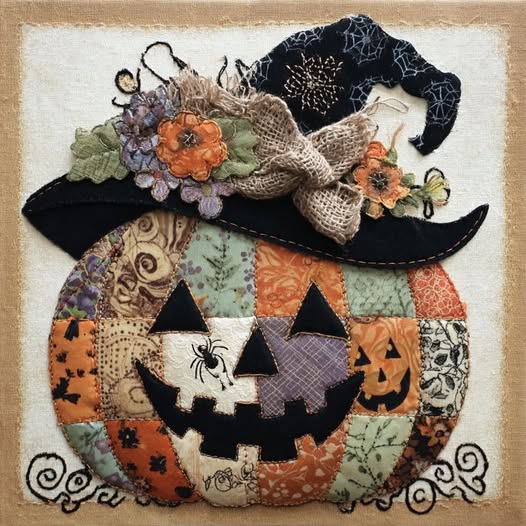
Start by visualizing the overall shape of your pumpkin. The base is composed of patchwork squares sewn together to form a round pumpkin shape. You can use a pumpkin template or sketch your own directly onto paper.
Cut about 16–20 fabric squares (around 2.5 inches each) in different orange, green, and beige patterns. Arrange them in rows, mixing light and dark tones to create texture. The variety of prints will make your pumpkin lively and charming.
Lay out your squares on a flat surface before sewing. Experiment with different combinations — that’s the fun part of quilting! When you’re happy with the arrangement, you’re ready to sew.
Step 2: Sewing the Patchwork Base
Begin by sewing your fabric squares together in rows using a ¼-inch seam allowance. Press each seam open with an iron to keep your work flat and neat.
Once all the rows are complete, sew them together to form a single block — this will become the pumpkin body. Press again to smooth everything out.
Now, trace your pumpkin shape onto the back of the patchwork block. Cut along the outline, leaving a small seam allowance. You’ll start to see your pumpkin taking shape — a colorful, cozy quilted piece full of personality!
Step 3: Adding the Witch Hat
The witch hat is what gives this pattern its Halloween magic. Using black felt or cotton, cut out a curved hat shape with a wide brim and whimsical tip. The hat can be slightly tilted for a playful look.
Attach the hat to the top of your pumpkin using appliqué technique — either by hand or machine. A blanket stitch or zigzag stitch works beautifully for securing the edges.
Once attached, add a bow made of burlap or ribbon at the base of the hat. Decorate with small fabric flowers or leaves to soften the spooky vibe and give your project that rustic, handmade touch.
Step 4: Creating the Pumpkin Face
Every Jack-o’-lantern needs a smile! Use black fabric or felt to cut out triangle eyes and a wide, toothy grin. Feel free to play with expressions — cheerful, spooky, or even quirky.
Position the face pieces on your pumpkin and pin them in place. When you’re happy with the layout, stitch around the edges using a tight zigzag or appliqué stitch.
You can also add embroidered details, like a tiny spider, web, or stitched outline to give your quilt block more character. These small touches make your piece feel alive and unique.
Step 5: Quilting and Assembly
Place your completed patchwork pumpkin on top of a piece of batting and backing fabric. Make sure all layers are smooth and wrinkle-free.
Pin or baste the layers together. Then quilt around the pumpkin and hat — you can use free-motion quilting for a more artistic effect, or straight-line quilting for a clean finish.
Trim any excess fabric around the edges, then add a border or frame if desired. You can also turn this quilt block into:
- A pillow cover
- A wall hanging
- A table topper
- Or part of a larger Halloween quilt
Step 6: Adding Decorative Touches
Now comes the fun part — embellishing your quilt! Add lace flowers, fabric leaves, or hand-stitched details. You can even glue on small Halloween charms or embroidery thread swirls to mimic vines.
Consider using contrasting thread colors for visible stitching that enhances the rustic, folk-art feel of your design.
To make your pumpkin extra special, try mixing textures — cotton, linen, felt, and burlap combine beautifully in quilting patterns like this one. It’s a wonderful way to showcase creativity while giving your project a cozy autumn look.
Step 7: Finishing Touches and Display Ideas
Once your stitching is done, iron your finished piece gently. Trim loose threads and check that all appliqués are secure.
Now you can decide how to display your Halloween quilt art:
- Frame it as seasonal wall art
- Use it as a quilt block in a larger patchwork quilt
- Sew a hanging loop on the back for easy display
- Gift it to a friend who loves handmade Halloween décor
Your Patchwork Pumpkin Quilt is more than just a decoration — it’s a keepsake full of warmth and creativity that will charm every guest who sees it.

Personalization Ideas
The beauty of quilting lies in its versatility. You can easily adapt this quilting pattern to suit your personal style. Here are a few creative twists:
- Color Variation: Try pastel pumpkins for a softer look or deep purples and blacks for a gothic Halloween vibe.
- Theme Mix: Combine it with cat or bat appliqués for an even more playful design.
- Texture Play: Use velvet or corduroy for the hat to add depth and dimension.
You can also stitch your initials or the year on the back — a sweet way to mark your handmade creation.
Share Your Halloween Quilt!
Now that you’ve finished your Patchwork Pumpkin with Witch Hat, it’s time to share it with the world! Post your finished project on Instagram, Facebook, or Pinterest using hashtags like #Quilt, #QuiltingPattern, and #HalloweenQuilt.
Sharing your work not only inspires others but also connects you to a vibrant community of quilters who love seasonal designs.
So grab your favorite fabrics, turn on your sewing machine, and bring a bit of spooky joy to your home this Halloween — one stitch at a time.