
If you’ve been Sewing for a while, chances are you have a growing pile of leftover fabric scraps. Maybe you’ve saved them from your favorite quilts, dresses, or old jeans — too pretty to throw away, yet too small for a big project. Why not turn those colorful memories into something useful and stylish? This tutorial will show you how to make a Backpack made with scraps, combining creativity, sustainability, and function.
Sewing with scraps is not only eco-friendly but also deeply rewarding. Every stitch carries a story, and the final piece feels personal and unique. Plus, this kind of project is perfect for beginners looking to practice their Sewing pattern skills without needing a lot of new materials. You’ll learn to mix fabrics, work with denim, and add charming patchwork details.
In this tutorial, we’ll walk through every step — from choosing your fabrics to adding finishing touches. You’ll also find ideas for personalizing your backpack so that it truly reflects your style. Grab your Sewing machine, gather your scraps, and let’s create something beautiful together!
Materials You’ll Need
Before you start, take a few moments to gather all your supplies. Using what you already have at home is part of the fun! Here’s what you’ll need:
- Assorted fabric scraps (cotton, linen, or denim work best)
- One pair of old jeans (for the base fabric and straps)
- Fabric for lining (cotton or canvas)
- Crochet lace or decorative trim (optional but adds charm!)
- Zipper (about 12–14 inches)
- Magnetic snaps or leather straps for pockets
- Sewing machine, thread, scissors, pins, and iron
- Sewing pattern for a simple backpack (or make your own template using paper)
If you’re new to Sewing, don’t worry. You can easily find a free Sewing pattern for a small backpack online, or trace an old backpack to create your own. The key is to start simple and focus on the joy of the process rather than perfection.
Step 1: Cutting Your Fabric
Start by cutting the main body of your backpack. Use your old jeans as the base fabric — denim is durable and gives the bag a rustic charm. You’ll need two rectangular pieces for the front and back, plus two side panels and one bottom piece. If your jeans already have pockets, you can reuse them on the front for extra storage.
Next, sort through your fabric scraps. Choose colors and patterns that complement each other — think floral cottons, bright solids, or soft pastels. Cut your scraps into squares or rectangles and arrange them like a patchwork quilt. This will become the decorative layer for your backpack.
Once you’re happy with the layout, sew the scraps together using a straight stitch. Press the seams flat with an iron. The result will be a colorful, one-of-a-kind panel that you’ll attach to the denim base later. This step is where creativity shines, so don’t be afraid to experiment with different textures and prints.
Step 2: Assembling the Front Panel
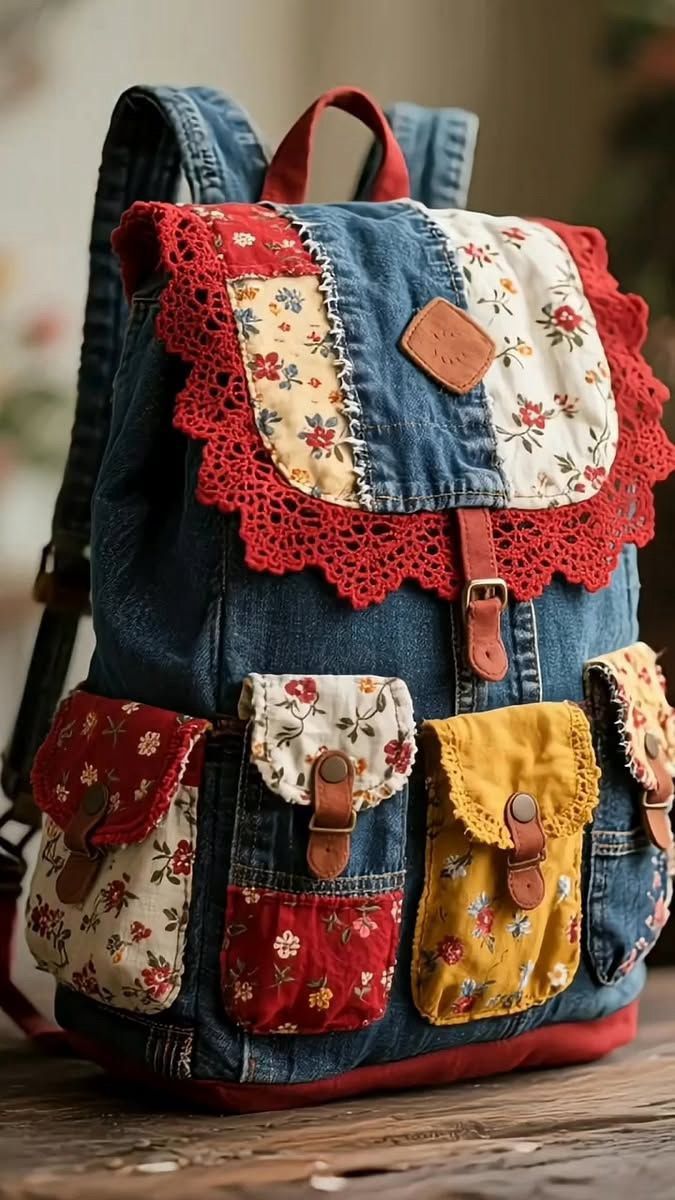
Now it’s time to add personality to your backpack. Take your patchwork panel and place it on the front denim piece. You can topstitch around the edges for a clean finish or add lace trim along the flap for a romantic, handmade look. The crochet border in the photo above adds a vintage touch — you can achieve this with ready-made lace or even hand-crochet your own if you’re feeling adventurous.
Next, create small pockets from leftover scraps. Mix colors for a playful vibe — one pocket could be floral, another solid yellow, another red. Add snap buttons or small leather straps to secure them. Attach the pockets to the front panel, spacing them evenly. Make sure to double-stitch the pocket edges for extra strength.
When you finish, the front panel will look full of charm — a mix of practicality and artistry. Each pocket can hold small essentials, like keys or a notebook, and the patchwork gives your backpack a cheerful personality that stands out from mass-produced bags.
Step 3: Sewing the Lining and Body
Cut your lining fabric using the same measurements as the outer pieces. You can add an inside pocket or zip compartment if you like. Place the lining pieces right sides together and sew along the edges, leaving the top open. Repeat this process for the denim outer body.
Once both are sewn, place the lining inside the denim piece, wrong sides together. Pin around the top edges and make sure everything aligns neatly. This will help your backpack maintain structure and last longer.
You’ll notice how the combination of denim and soft cotton gives your bag both durability and comfort. This is one of the best things about Sewing your own backpack — you control the materials, the quality, and the details. Every stitch you make builds confidence and teaches you something new.
Step 4: Making the Flap and Straps
The flap is one of the most visible parts of your backpack, so it’s a great place to highlight your favorite scraps. Cut a piece of denim and a patchwork piece in the same shape (rounded or square). Place them right sides together, sew around, and turn them inside out. Add lace trim or crochet edging for a cozy, handmade feel.
Topstitch around the edges to secure the flap and give it a professional look. Attach it to the back panel of your backpack, about two inches below the top edge. You can sew on a magnetic snap or use a decorative leather buckle for closure.
For the straps, use long strips of denim or webbing. If you want extra comfort, sew two layers together with a bit of batting inside. Attach the straps firmly to the top and bottom of the back panel. You can also add a small handle at the top for easy carrying — perfect for hanging your bag on a hook or holding it in one hand.
Step 5: Finishing Touches
Once the main structure is complete, sew the lining and outer bag together along the top edge. Add your zipper or closure of choice. Take your time here — neat stitching makes a big difference in the final look. Press the seams flat with an iron for a clean finish.
Now is the fun part: decorating! You can sew on fabric flowers, buttons, patches, or embroidery. Some crafters like to write their initials or add small appliqués that tell a story. The goal is to make your backpack a reflection of you.
Before calling it done, give your bag a gentle press and check all seams for security. Once you’re sure everything is in place, step back and admire your work. You’ve just transformed old jeans and fabric scraps into a beautiful, functional piece you can use every day!

Ideas for Personalization
One of the best parts of this project is how flexible it is. No two scrap backpacks will ever look the same! Here are some ideas to personalize yours even more:
- Add Embroidery: Stitch your name, favorite quote, or a small flower design onto one of the pockets.
- Mix Textures: Combine denim with velvet, linen, or canvas scraps for contrast.
- Use Color Themes: Try blue and white for a nautical style or red and mustard for a vintage country feel.
- Include Decorative Stitching: Use your Sewing machine’s fancy stitches to create borders or patterns.
- Reinforce with Leather: Add leather corners or strap details for a more durable finish.
Experiment and have fun — that’s the beauty of creative Sewing. This project is not about perfection but about joy and expression. Every patch, stitch, and color choice tells a story.
Conclusion: Share Your Creation!
Congratulations — you’ve completed your Backpack made with scraps! You’ve learned how to mix fabrics, work with denim, and follow a simple Sewing pattern step by step. Most importantly, you’ve created something eco-friendly and full of heart.
Now, don’t keep it to yourself! Take a photo of your backpack and share it on social media or in your favorite Sewing group. Inspire others to give new life to their fabric scraps and show that handmade items never go out of style. You can even gift one to a friend — a backpack like this carries more than things; it carries meaning.
So grab your scraps, thread your needle, and start your next project. Every time you sew, you’re not just making — you’re creating beauty, preserving memories, and keeping the art of Sewing alive.