
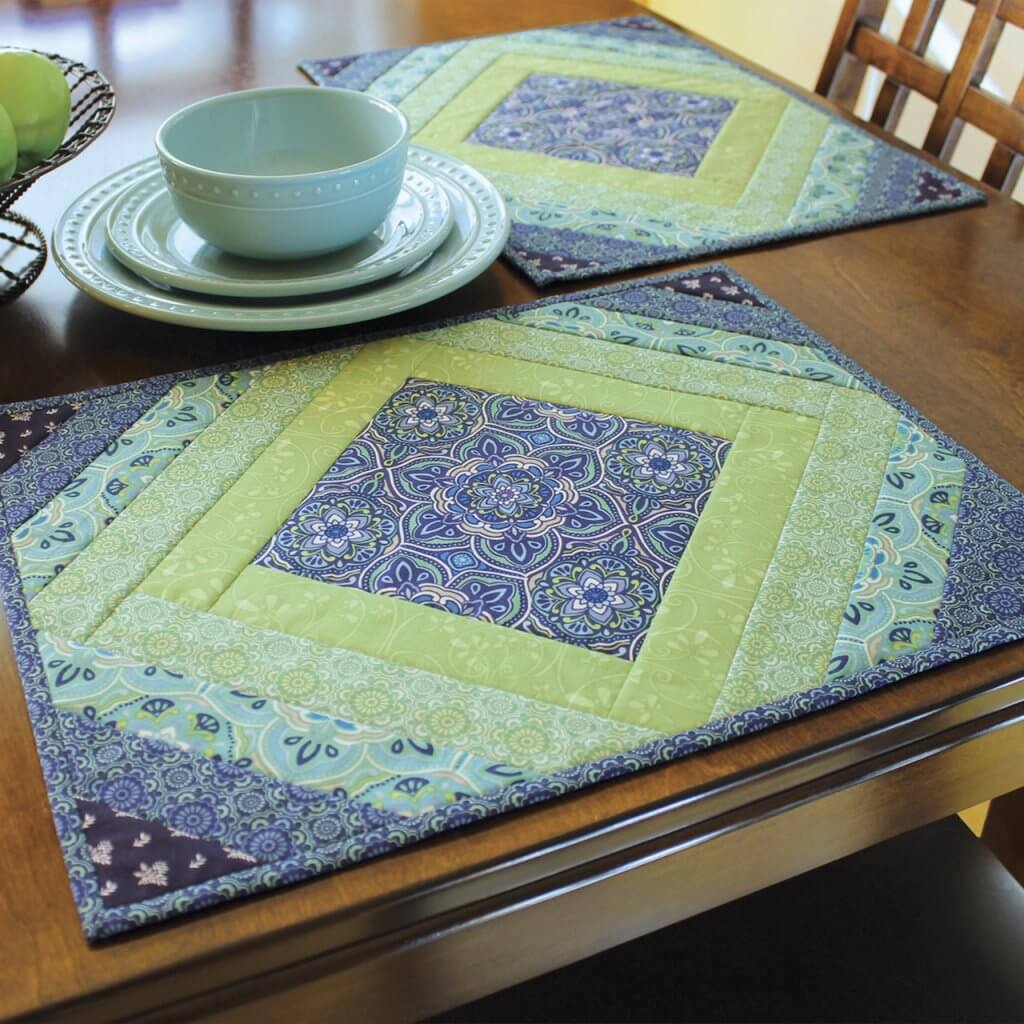
Patchwork projects are the perfect way to dive into the world of quilting. They’re small, creative, and a wonderful opportunity to use your favorite fabric scraps. One of the most rewarding beginner projects is making a Patchwork Placemat. It’s functional, beautiful, and gives your dining table a cozy handmade touch. In this tutorial, you’ll learn step-by-step how to make a stunning patchwork placemat using simple quilting techniques, plus tips to personalize your creation.
Why Make a Patchwork Placemat?
If you’ve ever wanted to try quilting but felt intimidated by large quilts, placemats are the perfect starting point. They’re small enough to complete in one sitting but still teach you essential quilting skills like cutting, piecing, pressing, and binding. Plus, they add instant charm to any table setting.
Another reason to love this project is its flexibility. You can use fabric leftovers from previous quilt projects, experiment with different color schemes, or mix prints for a more modern look. Each placemat becomes a tiny piece of quilted art. You’ll quickly discover how addictive and satisfying patchwork can be once you start playing with patterns and textures.
Finally, these placemats also make thoughtful handmade gifts. Whether it’s for a friend, a family gathering, or a festive holiday table, a quilted placemat brings warmth and personality to every meal. Once you’ve made one, you’ll want to create an entire set!
Materials You’ll Need
Before diving into the step-by-step process, let’s gather the materials. One of the joys of quilting is how easily you can adapt it to what you already have at home. Here’s what you’ll need for one patchwork placemat:
- Fabric scraps or fat quarters in coordinating colors (cotton is best)
- Backing fabric – about 14″ x 20″ (35 x 50 cm)
- Batting – same size as the backing fabric
- Rotary cutter and cutting mat
- Quilting ruler
- Sewing machine (or needle and thread if hand sewing)
- Pins or clips
- Iron and ironing board
- Fabric scissors
- Binding strip – about 2½” wide and long enough to go around the edges
Optional but helpful:
- Walking foot for quilting
- Fabric marker or chalk for marking quilting lines
With these materials, you’re ready to start your first quilting pattern project. Let’s move on to the fun part — cutting and piecing your fabrics!
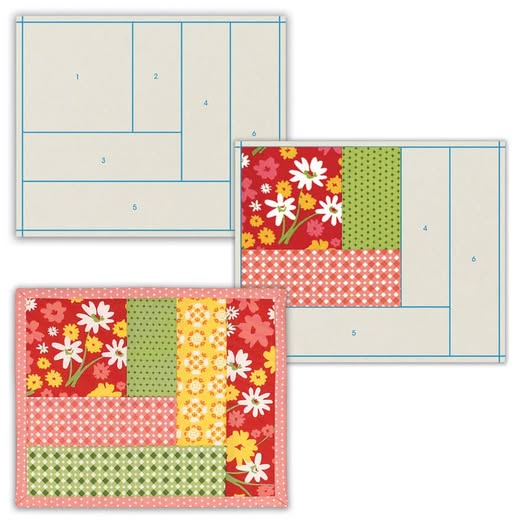
Step 1: Choosing and Cutting Your Fabrics
Patchwork is all about creativity and balance. Start by selecting fabrics that complement each other. You can go for a color theme — like blue and white for a nautical look or bright florals for a cheerful summer table. If you’re new to quilting, sticking with three to four colors makes it easier to create a harmonious design.
Once you’ve chosen your fabrics, cut them into small squares or rectangles. A common size for placemats is 4-inch squares. You’ll need enough pieces to make a finished top of about 12″ x 18″. For example, using 4×3 squares across and 6×3 squares down gives you a nice rectangular shape.
Arrange your fabric pieces on a flat surface before sewing. Move them around until you find a layout you love. This stage is called “auditioning” fabrics — and it’s one of the most creative parts of quilting. Don’t be afraid to experiment with different combinations. The best patchwork designs often come from happy accidents!
Step 2: Sewing the Patchwork Top
Now that your pieces are cut and arranged, it’s time to sew them together. Start by joining the squares in horizontal rows. Place two squares right sides together and sew along one edge using a ¼-inch seam allowance. Continue joining pieces until the first row is complete.
After each row is sewn, press the seams with an iron. For best results, press them to one side, alternating directions between rows. This helps the seams nest neatly when you sew the rows together. Then, join the rows one by one until you have a complete patchwork rectangle — this is your quilt top.
Once your quilt top is finished, give it a final press. You’ll be amazed at how professional it looks already! Remember, neat pressing makes a big difference in the final appearance of your quilted placemat.
Step 3: Layering the Quilt Sandwich
Every quilt project, big or small, uses a “quilt sandwich” — three layers that give it structure and softness. Lay your backing fabric right side down on a flat surface. Place the batting on top, and then your patchwork top right side up.
Smooth out any wrinkles carefully, making sure all layers are aligned. Secure them together using pins or basting spray. This step is essential to prevent shifting when you start quilting. Once basted, your placemat is ready for quilting.
If you’re working on a small table, use painter’s tape to hold the backing fabric in place while layering. It keeps everything flat and makes quilting much easier.
Step 4: Quilting the Layers
Here comes the magic! Quilting is the process of stitching through all three layers to add texture and stability. For beginners, straight-line quilting is the easiest and most effective technique. You can sew lines along the seams (“stitch in the ditch”) or diagonal lines across the squares for a more dynamic look.
Use a walking foot on your sewing machine if you have one — it helps the layers feed evenly. You can also hand quilt using small running stitches for a traditional touch. Choose a matching or contrasting thread depending on the style you want.
When quilting, start from the center and move outward to prevent fabric bunching. After finishing, trim any excess batting or backing around the edges so that all layers are even. Your patchwork placemat is now quilted and almost done!
Step 5: Adding the Binding
The final step is adding the binding, which neatly finishes the edges of your placemat. Cut your binding strip about 2½ inches wide and long enough to go around all sides. Fold it in half lengthwise, wrong sides together, and press with an iron.
Attach the binding to the front of your placemat by sewing along the raw edge with a ¼-inch seam allowance. When you reach a corner, fold it neatly to create a crisp mitered edge. Once all sides are sewn, fold the binding over to the back and hand-stitch or machine-stitch it in place.
This step gives your placemat a polished, professional look. Binding can be made from matching fabric or a fun contrasting print — the choice is yours!
Ideas for Customization
Now that you’ve mastered the basic quilting pattern, it’s time to add your personal touch! Patchwork projects are full of creative possibilities. Here are a few ideas to make your placemat unique:
- Seasonal Themes – Use fabrics that match holidays like Christmas, Easter, or Thanksgiving.
- Monogram or Appliqué – Add an initial or a cute shape like a heart or leaf.
- Scrapbuster Style – Use leftover quilt blocks or random fabric scraps for a colorful, eclectic look.
- Embroidery – Stitch simple designs or decorative lines over your quilting for an artistic flair.
- Reversible Placemats – Use a solid backing fabric and quilt it attractively so both sides can be used.
Every detail you add makes your piece more meaningful and fun to create. With each new project, you’ll grow more confident in your quilting skills.
Caring for Your Quilted Placemats
Handmade placemats are made to be used and loved, but proper care helps them last longer. Machine wash on a gentle cycle with mild detergent, and air dry or tumble dry on low heat. Iron lightly if needed to keep them crisp and beautiful.
Because these are small quilts, they’re easy to clean and store. You can even make different sets for different seasons or occasions. Over time, your dining table will tell a story — one placemat at a time!
Share Your Patchwork Creations!
Congratulations — you’ve just finished your Patchwork Placemat Pattern! You’ve learned how to cut, piece, quilt, and bind — the very same techniques used in larger quilts. Whether you’re making one or a dozen, this project is a wonderful introduction to the art of quilting.
If you enjoyed this tutorial, don’t keep it to yourself! Share your finished placemats on social media, quilting groups, or with friends who love crafts. Tag your photos with #QuiltPattern or #PatchworkPlacemat to inspire others to join in. Handmade projects connect us to creativity, patience, and the joy of crafting something from the heart.
So grab your fabric scraps and start stitching — your table (and your soul) will thank you!