
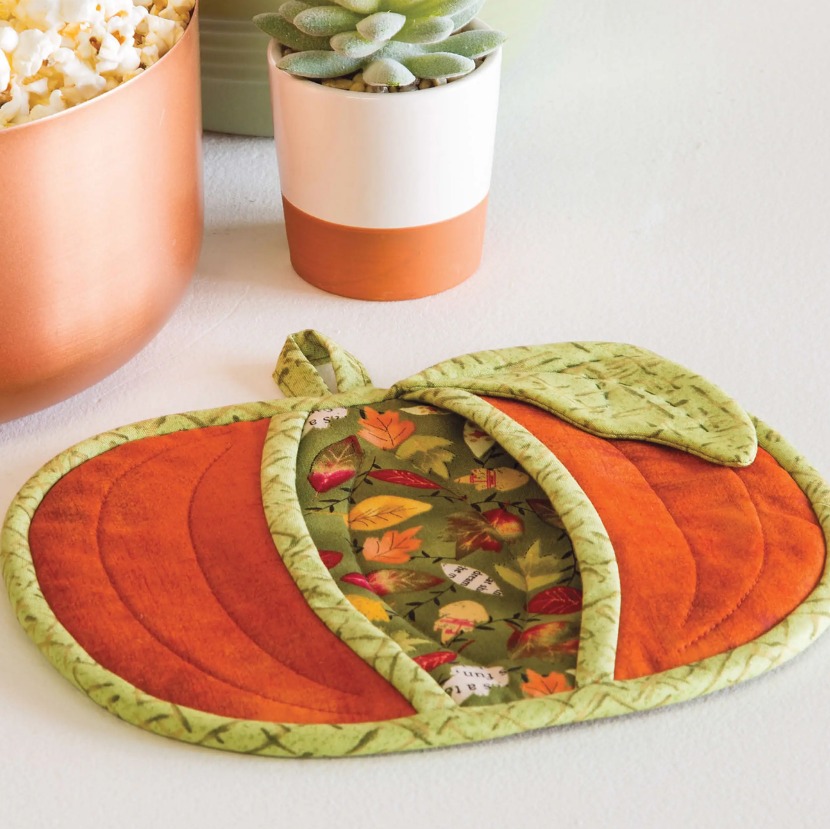
Nothing says autumn quite like the sight of bright orange pumpkins decorating our homes. If you’re looking for a creative way to bring the cozy fall spirit into your kitchen, this Pumpkin Pot Holder Sewing Pattern is the perfect project! Whether you’re a beginner or a seasoned crafter, this charming pot holder combines practicality with seasonal style. It’s quick, fun, and perfect for using up fabric scraps while learning some basic sewing techniques.
In this tutorial, you’ll learn how to make a beautiful pumpkin-shaped pot holder from start to finish. We’ll go over the materials you’ll need, a step-by-step sewing guide, and even a few creative ideas for personalizing your design. So grab your sewing machine and let’s get started!
Materials You’ll Need
Before diving into your project, gather all the supplies. You don’t need anything fancy—just a few basic sewing tools and materials that you probably already have in your craft space.
Here’s your list:
- Fabric: Choose two coordinating cotton fabrics — one for the front and one for the back of the pot holder. Orange, rust, or mustard shades work perfectly for a fall look.
- Batting or Insul-Bright: For heat protection, you’ll need a layer of thermal batting (like Insul-Bright) and a layer of regular cotton batting.
- Bias tape or fabric strip: To finish the edges neatly.
- Sewing machine and thread: Choose a matching or contrasting color depending on your design.
- Scissors or rotary cutter, pins, and an iron.
- Pumpkin pattern template: You can draw your own or print one online.
Having the right materials on hand ensures your sewing experience goes smoothly. Always prewash and press your fabrics before you start cutting—this will help prevent shrinking later. A well-prepared workspace and clean, pressed fabric make all the difference when creating something you’ll actually use and love.
Once you’ve gathered everything, take a moment to imagine your finished pot holder. Will it be a bright, playful pumpkin? Or maybe a rustic, farmhouse-style design? Let your creativity guide your fabric choices—it’s part of the joy of sewing.
Cutting and Preparing Your Fabric
Now that your materials are ready, it’s time to cut your fabric pieces. Place your pumpkin sewing pattern template over the fabric and pin it in place. Cut two pieces—one for the front and one for the back—along with the batting and Insul-Bright layers.
Accuracy here is key. If your pieces line up perfectly, it will make the sewing process much easier later. You can trace the pattern using tailor’s chalk or a washable fabric pen before cutting to ensure smooth, even edges.
Once you have all your pieces cut out, layer them in this order: backing fabric (right side down), batting, Insul-Bright, and then your top fabric (right side up). This fabric “sandwich” will form the body of your pot holder. Use clips or pins to secure all the layers together before moving on to quilting.
Don’t forget to mark the pumpkin’s segment lines if your sewing pattern includes them. These lines give your pot holder that signature pumpkin look and add extra texture and sturdiness.
Quilting the Pumpkin
This is the fun part—adding those curved stitching lines that make your pot holder look like a real pumpkin! Using your sewing machine, stitch along the lines you marked earlier, starting from the top and curving down toward the base.
You can use a straight stitch or experiment with decorative stitches if your machine has them. The goal is to create dimension while keeping the layers firmly secured together. Remember to backstitch at the beginning and end of each line for durability.
If you’re new to quilting, take it slow and steady. The curved lines don’t have to be perfect—imperfections only add to the handmade charm! You can also use a walking foot to help your machine feed the layers evenly. After quilting, press your pumpkin gently with a warm iron to smooth out any wrinkles.
This step transforms your flat fabric layers into a textured, cozy design. You’ll immediately start to see your pumpkin come to life—one of the most satisfying moments in sewing!

Adding the Stem and Details
No pumpkin is complete without its stem! Cut a small rectangle of green or brown fabric and fold it in half lengthwise with right sides together. Stitch along the edge, turn it right side out, and press flat. This will become your pumpkin stem.
Insert the stem between the top layers of your pot holder (with the raw edges aligned) and pin it securely in place. When you sew the binding around the edges later, it will hold the stem in position. You can also add a small fabric leaf or a decorative button for extra flair.
Some makers like to embroider details such as vines or leaf veins to make their pumpkins look even more realistic. A few simple hand stitches using green embroidery thread can really make your project stand out. Remember, this is your pumpkin—have fun making it unique!
Adding little touches like these helps turn a simple sewing pattern into something that reflects your personality and creativity. It’s those personal touches that make handmade items truly special.
Binding and Finishing the Edges
Now it’s time to give your pot holder a polished look. Using bias tape (store-bought or handmade), bind all around the edges of your pumpkin. Start by pinning the tape to the edge with the raw sides together, then sew along the first fold. Fold it over the raw edge to the back and topstitch to secure.
Take your time on this step—the binding is what gives your project a clean, professional finish. If you’re new to sewing, don’t worry if the corners or curves aren’t perfect. Practice makes progress! The key is to keep your stitches neat and even.
Once the binding is complete, check your pot holder for any loose threads and give it a final press. Congratulations—your Pumpkin Pot Holder is finished! It’s now ready to brighten up your kitchen or become a thoughtful handmade gift.
You can also add a small fabric loop at the top before binding if you’d like to hang your pot holder. It’s a simple detail that makes it both decorative and functional.
Creative Customization Ideas
The beauty of this sewing pattern lies in how versatile it is. Once you’ve mastered the basic pumpkin shape, there are endless ways to make it your own. Try experimenting with different fabrics—like plaid for a rustic vibe or metallic orange for a modern twist.
For a festive touch, you can even create a set of pot holders in various colors—white pumpkins for a farmhouse look, deep burgundy for a cozy fall feel, or even patterned fabric for a whimsical design. Add a touch of embroidery with words like “Give Thanks” or “Happy Fall” for seasonal charm.
If you love to mix crafts, consider embellishing your pumpkin with lace, felt leaves, or fabric paint. The possibilities are endless when it comes to sewing and creativity. Each pot holder becomes a tiny canvas for your imagination.
Final Thoughts and Sharing Your Project
And there you have it—a beautiful, functional Pumpkin Pot Holder Sewing Pattern that brings autumn warmth right into your home. Not only is this project beginner-friendly, but it also teaches you essential sewing skills like quilting, binding, and layering. Plus, it’s a great way to repurpose fabric scraps and make something both decorative and useful.
Whether you’re sewing for yourself, your family, or friends, these pumpkin pot holders are guaranteed to add a touch of handmade happiness to any kitchen. They also make wonderful gifts for Thanksgiving or fall gatherings—because who doesn’t love a thoughtful, handcrafted item?
PATTERN HERE
Quilt – Tutorial
FULL PATTERN ACCESS
You will be redirected to another site
If you give this project a try, don’t forget to share your creation! Post your photos online, tag your favorite crafting communities, or inspire others by showing off your finished pot holder. The joy of sewing grows when we share our work and creativity with others.