
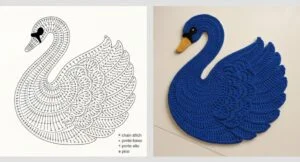
Few crochet projects are as elegant and eye-catching as a Swan Crochet Rug. Its graceful shape and soft texture can transform any space, adding a touch of charm and sophistication. Whether you’re decorating a nursery, brightening up a bathroom, or giving your living room a handmade accent, this swan rug is a perfect project for beginners and experienced crocheters alike.
In this step-by-step crochet pattern, you’ll learn how to make a swan-shaped rug from start to finish — from choosing your yarn and hook to creating the signature swan curves and finishing details. Don’t worry if you’re new to crochet; this tutorial is designed to guide you through each stage with clarity, encouragement, and creative inspiration.
Let’s get started and bring your elegant swan to life!
Materials You’ll Need
Before diving into the stitches, let’s prepare everything you’ll need. Gathering your materials first makes your crocheting experience smoother and more enjoyable.
Materials:
- 2 skeins of chunky cotton yarn in white (for the body)
- 1 small skein of black yarn (for the beak and eyes)
- 1 small skein of orange or yellow yarn (for the beak)
- Crochet hook size 6 mm (J/10)
- Yarn needle for weaving in ends
- Stitch markers (optional, but helpful)
- Scissors
When choosing yarn, opt for something soft yet durable, like a cotton blend. Cotton yarn holds shape well and feels comfortable underfoot, making it perfect for a rug. You can also use t-shirt yarn for a thicker and more textured look.
Before starting, make sure you test your gauge. This helps your rug turn out the right size and keeps your stitches consistent. A quick 10×10 cm (4×4 inch) test swatch can save time and frustration later on.
Step 1: Starting the Swan’s Body
We’ll begin by crocheting the base of the swan’s body — this will form the main oval section of your rug. Start by creating a magic ring and working in the round.
- Round 1: Make a magic ring and crochet 6 single crochets (sc) into the ring. Pull tight and join with a slip stitch.
- Round 2: Chain 1, then make 2 sc in each stitch around (12 sc total). Join with a slip stitch.
- Round 3: Chain 1, 1 sc in next stitch, 2 sc in next stitch, repeat around (18 sc total).
Keep working in rounds, increasing evenly until your oval reaches your desired body size — typically around 60 cm (24 inches) in length for a medium rug. You can add more rounds for a larger rug or stop earlier for a small one.
As you crochet, keep your tension even and smooth. It’s normal for the piece to curl slightly, but it will flatten out as the rug grows. This is the foundation of your swan, so take your time and make sure your stitches are neat and even.
Step 2: Shaping the Neck and Head
Now that you’ve finished the body, it’s time to form the swan’s iconic curved neck and head. This part gives the rug its personality and delicate beauty.
To shape the neck, we’ll stop working in the round and switch to crocheting back and forth in rows:
- From the top edge of the body, count about 10 stitches from the center and attach your yarn.
- Chain 20 — this will form the start of the neck.
- Starting in the second chain from the hook, make 1 sc in each stitch back down the chain (19 sc total). Slip stitch into the next body stitch to anchor it.
Repeat this process by chaining and working back and forth to build up the thickness of the neck. You can gently curve the neck by decreasing 1 stitch at the end of each row on one side.
Once the neck reaches your desired height, begin forming the head by making small increases (2 sc in one stitch) to round out the shape. When the head looks proportional, fasten off and weave in the ends.
Step 3: Adding the Beak and Eye Details
Every swan needs its elegant features — the beak and the eyes. This is where your crochet project really comes to life!
Beak:
Attach the orange or yellow yarn to the tip of the swan’s head. Chain 3 and make 2 single crochets back along the chain. Turn and repeat to create a small triangle. Continue for 2–3 rows, decreasing one stitch each time until the beak tapers naturally.
Eyes:
Using black yarn, either embroider small eyes with a yarn needle or crochet two tiny circles:
- Chain 2, make 6 sc in the second chain from hook, and slip stitch to close.
Sew them onto the head just above the beak.
These small touches add personality and charm to your swan rug. Feel free to adjust their placement slightly — a lower eye makes your swan look gentle, while a higher one gives a proud expression.
Step 4: Finishing and Border
Once your swan’s shape is complete, it’s time to add a finishing border. This not only polishes the look but also helps the rug lay flat and sturdy.
Join your white yarn to any edge of the rug. Work a round of single crochet all around the body, neck, and head. This will smooth out any uneven edges and give your swan a defined outline.
If you’d like extra flair, try a scalloped border by working 5 double crochets in one stitch, skip one stitch, slip stitch in the next, and repeating around. This creates a pretty lace-like edge that suits the graceful theme of the swan.
After completing the border, fasten off your yarn and weave in all the loose ends neatly with a yarn needle. Lay your rug flat and gently block it by spraying with water and smoothing it into shape.
Personalization Ideas
Part of the joy of crochet is making each project uniquely yours. Here are some creative ways to customize your Swan Crochet Rug:
- Color Variation: Instead of traditional white, try soft pastels like light pink or baby blue for a nursery, or bold black for a modern twist.
- Textured Yarn: Use fluffy or velvet yarn for a cozy, plush finish. This adds depth and softness to your rug.
- Embellishments: Sew small beads for the eyes or add a crochet bow around the neck for a decorative touch.
You can even crochet two smaller swans and place them together, forming a heart shape — a lovely idea for a romantic or elegant room decor. Personal touches like these make your rug one-of-a-kind and full of character.
Tips for Beginners
If this is your first crochet rug, don’t worry! Here are some tips to help you succeed and enjoy the process:
- Take your time: Crocheting a rug takes patience. It’s okay to pause and stretch your hands often.
- Watch your tension: Consistent tension keeps your rug even and prevents curling or warping.
- Use stitch markers: They’re especially helpful when shaping the neck or counting rows.
Remember, every crocheter starts somewhere. Mistakes aren’t failures — they’re learning moments. The beauty of crochet is that you can always unravel a section and try again.
Caring for Your Crochet Rug
To keep your swan rug looking fresh and clean, handle it with care. Cotton yarn is machine washable, but it’s best to wash your rug on a gentle cycle with cold water. Avoid wringing or twisting — simply roll it in a towel to remove excess water.
Lay it flat to dry and reshape it if needed. Regular vacuuming or shaking out dust will help maintain its texture and color. With proper care, your handmade rug can last for years and continue to bring charm to your home.
Share Your Swan!
Congratulations — you’ve completed your Swan Crochet Rug! Each stitch represents time, effort, and creativity. Whether you made it as a gift, a home decor piece, or simply as a relaxing project, you should feel proud of your work.

We’d love to see your version! Share your finished rug on social media with the hashtag #SwanCrochetRug and tag other crochet lovers. Sharing your journey inspires others to pick up their hooks and try something new.
Happy crocheting — and may your elegant swan rug bring beauty and warmth wherever it lands!