
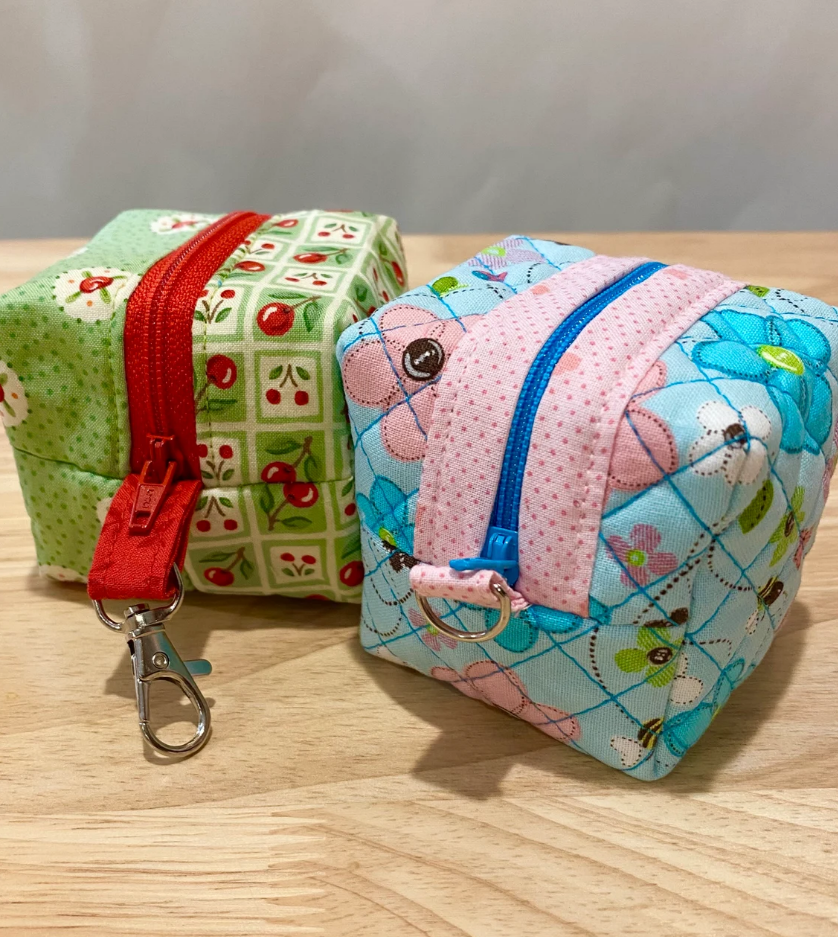
If you love small and adorable sewing projects, the Mini Cube Zipper Pouch is sure to capture your heart. This delightful little cube is perfect for holding coins, lip balm, sewing notions, or even small quilting tools. With its soft quilted texture and charming fabric combinations, this project is not only functional but also a fun way to experiment with your favorite quilt patterns and scraps. Whether you’re a beginner or an experienced quilter, this guide will walk you through every step of creating your own mini cube pouch.
Why You’ll Love This Project
There’s something deeply satisfying about transforming fabric scraps into something both cute and practical. The Mini Cube Zipper Pouch combines the art of quilting with simple sewing techniques, giving you a perfect small-scale project that can be completed in just an afternoon. It’s also an excellent way to practice your quilting and zipper installation skills without committing to a large project like a full quilt.
Another reason to fall in love with this pattern is its versatility. You can adjust the cube size, mix and match fabrics, or even use leftover quilt blocks from previous projects. The finished pouch makes a thoughtful handmade gift or a great addition to your craft fair table. Once you make one, you’ll find yourself sewing several more in no time.
Lastly, this project helps you experiment with textures and colors. From soft florals to bold geometrics, each combination tells its own story. It’s a wonderful opportunity to play with quilting techniques and showcase your creativity on a small, manageable canvas.
Materials You’ll Need
Before diving into the sewing steps, make sure you have all the necessary materials. The list is short and sweet—perfect for using up leftovers from your quilting stash.
Materials:
- Two coordinating fabric pieces (for outer fabric and lining) – 10″ x 10″ each
- Lightweight batting or fusible fleece – 10″ x 10″
- One 6″ zipper (nylon or plastic)
- Sewing thread in matching or contrasting color
- Fabric clips or pins
- Scissors or rotary cutter
- Ruler or cutting mat
- Optional: keyring, lobster clasp, or small D-ring for attaching accessories
You can also add interfacing if you want a firmer pouch or use quilted fabric from a previous quilt pattern. Choosing a fun, colorful zipper can also make your pouch stand out beautifully.
Preparing the Fabric and Batting
Begin by preparing your quilt sandwich: place the batting between your outer fabric and lining. If you’re using fusible fleece, follow the manufacturer’s instructions to fuse it to the wrong side of the outer fabric. Smooth out any wrinkles and ensure the layers are evenly aligned. This quilted layer will give your pouch structure and a soft, cushiony feel.
Next, use your sewing machine to quilt the layers together. You can choose a simple grid pattern, diagonal lines, or free-motion quilting for a more creative touch. The key is to create a consistent quilting pattern that complements your fabric design. Don’t be afraid to experiment—after all, quilting is all about self-expression!
Once your fabric is quilted, trim it to a perfect 8″ x 8″ square. This will form the main body of your pouch. Having clean, straight edges ensures your seams line up neatly later on, giving your finished project a professional look.
Installing the Zipper
Zippers can seem intimidating, but installing one in this project is surprisingly simple. Place your zipper face down along one edge of your quilted square. The right side of the zipper should touch the right side of the fabric. Secure it in place with clips or pins. Then, lay your lining fabric face down on top, sandwiching the zipper between the two layers.
Using your zipper foot, sew along the edge with a ¼” seam allowance. Once done, open the fabrics and press them flat. Topstitch along the zipper to keep the fabric from catching. Repeat the same process on the opposite edge of the zipper, so that both sides are attached and the piece forms a loop. This will become the body of your cube.
Check that your zipper moves smoothly. If you’re new to sewing zippers, this step is excellent practice for future quilting or bag-making projects.
Forming the Cube Shape
With the zipper installed, turn the fabric inside out so that the lining is facing out. Align the bottom edge of the pouch, and sew across it using a ¼” seam allowance. For durability, backstitch at both ends. Make sure the zipper is half-open before sewing the next steps—this will make turning the pouch right side out much easier later.
Now comes the fun part—creating the cube shape. Pinch each corner of your pouch so that the side and bottom seams align. Measure about 1.5 inches from the point and draw a line straight across. Sew along this line, then trim the excess fabric, leaving about ¼” seam allowance. Repeat for all four corners (two on each end). This will give your pouch its distinctive boxy form.
Turn the pouch right side out through the zipper opening, gently pushing out the corners. You’ll see the adorable cube shape come to life right before your eyes!
Adding Finishing Touches
Now that your cube is taking shape, it’s time to add a few final details to personalize it. Attach a small loop of fabric, ribbon, or webbing near the zipper end. You can use this loop to attach a keyring, lobster clasp, or small handle. It’s a simple addition that enhances both the function and appearance of your mini pouch.
If you want to give your project a more quilted look, consider adding some decorative stitching or small fabric appliqués. Embroidery details or buttons can make your pouch stand out and reflect your personality. You can also sew a small label or tag on one side to make it look professional and gift-ready.
Give your finished pouch a light press with an iron (be careful not to melt the zipper!) to smooth out any wrinkles. Your Mini Cube Zipper Pouch is now ready to use, gift, or show off on your crafting shelf.
Creative Customization Ideas
This quilt pattern is just the beginning! Once you’ve made your first cube pouch, try customizing it with different sizes and fabrics. You can make smaller versions to hold jewelry or earphones, or larger ones for makeup and sewing supplies. The possibilities are endless.
Play with contrasting linings, patchwork exteriors, or even use leftover quilt blocks to make each pouch unique. If you love bright designs, go for floral or geometric prints. For a minimalist style, choose neutral tones with subtle quilting lines. Don’t forget—you can always mix textures by using denim, linen, or canvas.
Adding personal touches makes your project even more special. Try using themed fabrics for holidays, gifting, or kids. These small pouches are perfect as stocking stuffers, birthday favors, or small storage companions in your sewing room.
Tips for Beginners
If you’re new to sewing or quilting, this project is a fantastic way to build your confidence. The small size makes it manageable, and you’ll get to practice essential skills like quilting, sewing straight seams, and installing a zipper. Remember, perfection isn’t the goal—enjoying the creative process is.
Take your time aligning seams and pressing your fabric as you go. Using fabric clips instead of pins can make handling thick quilted layers much easier. Also, always test your stitches on a scrap piece first to make sure your tension and stitch length are set correctly.
Lastly, don’t be afraid to make mistakes. Every handmade piece tells a story, and small imperfections only add character. With each pouch you make, you’ll improve your technique and discover new ways to express your creativity through quilting.
Share Your Mini Cube Zipper Pouch!
Now that you’ve completed your first Mini Cube Zipper Pouch, it’s time to celebrate your accomplishment! Share your creation with friends, family, or your favorite quilting community online. Seeing how others interpret the same quilt pattern is a great way to find inspiration for future projects.
If you post your pouch on social media, include a few progress shots or creative flat-lay photos with your sewing tools and fabric scraps. Other crafters will love seeing your process and might even try making their own. After all, the joy of quilting comes not only from sewing but also from sharing.
So, grab your favorite fabrics and start creating! These adorable quilted pouches are proof that even the smallest projects can bring big happiness.