
1. Introduction – Comfort Meets Creativity
Driving long distances or even short commutes can often cause neck strain, but a handmade car neck pillow is a perfect solution! With this easy-to-follow sewing guide, you’ll learn how to create a stylish and comfortable neck pillow that looks like a bow tie — perfect for adding a touch of personality to your car interior.
This project is beginner-friendly and requires only basic sewing skills. Plus, it’s an excellent way to use leftover fabric scraps from your latest quilt pattern projects! Let’s dive in and discover how to make your next travel accessory both cozy and chic.
2. Materials You’ll Need
Before you start, gather all the materials for this DIY project. You don’t need anything fancy — just simple sewing essentials and a few household tools.
Materials List:
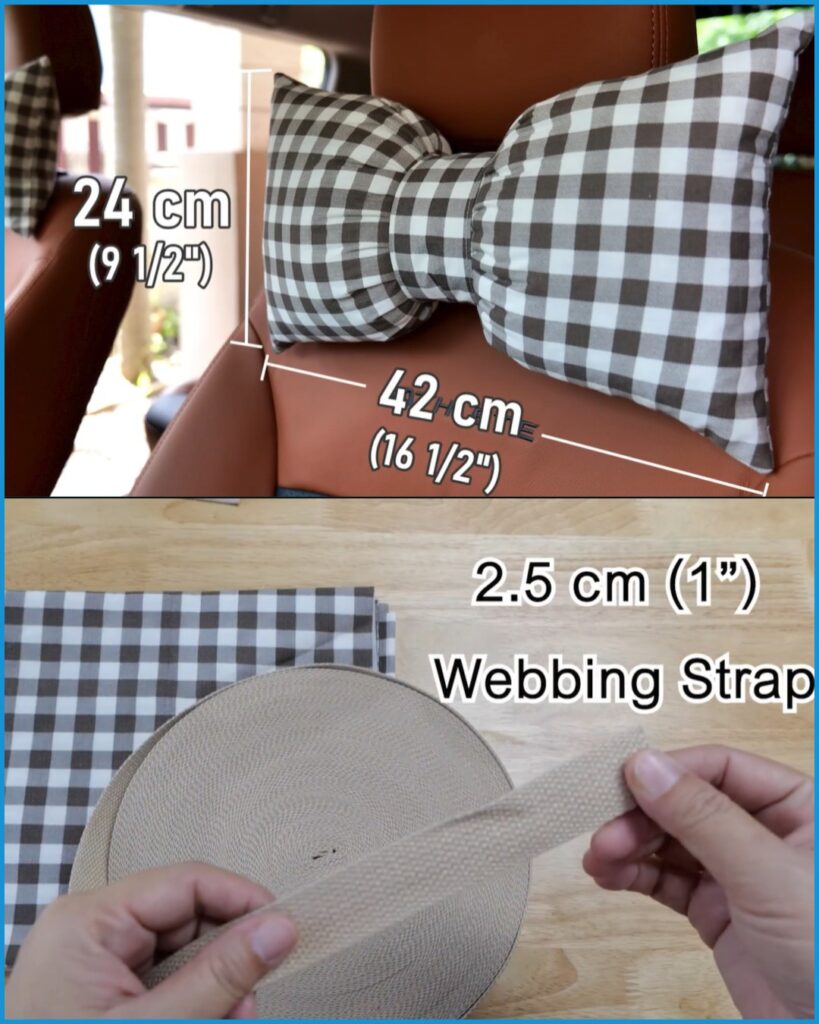
- Outer fabric (cotton or linen): 42 cm x 24 cm (16½” x 9½”)
- Stuffing material (polyester fiberfill or pillow stuffing)
- 2.5 cm (1”) webbing strap for attachment
- Needle and thread or a sewing machine
- Pins, scissors, and measuring tape
- Optional: Velcro or snap button for closure
Choose a quilting cotton fabric with a charming pattern. Gingham, florals, or geometric prints can give your pillow a handmade quilt-inspired aesthetic.
3. Cutting and Preparing the Fabric
Start by cutting your fabric to the specified size — 42 cm by 24 cm (16½” x 9½”). This will form the main body of the pillow. Fold it in half lengthwise, right sides together, and pin along the edges to hold the fabric in place.
If you love quilting, this is the perfect chance to use a quilt pattern design for your pillow’s surface. You can even piece together fabric scraps from previous quilt projects to make a unique patchwork-style pillow.
Make sure your seams are even, and if you’re a beginner, mark your sewing lines lightly with chalk to maintain straight edges.
4. Sewing the Pillow Shape
Once your fabric is prepared, it’s time to start sewing! Begin by stitching along the pinned edges, leaving a small opening of about 6 cm (2½”) for turning and stuffing later.
Trim any excess fabric along the seams to prevent bulk. Then, carefully turn the fabric right side out using a blunt tool like a pencil or chopstick to push out the corners neatly.
Press the fabric gently with an iron for a smooth finish. This step gives your pillow that crisp, professional look often seen in quilt projects.
5. Stuffing the Pillow
Now comes the fun part — stuffing! Using polyester fiberfill, stuff the pillow evenly to achieve a soft but firm feel. Don’t overfill, as it should remain comfortable to rest your neck on during long drives.
Distribute the filling evenly to avoid lumps. Once you’re happy with the fullness, close the opening with a ladder stitch or by sewing along the edge with a neat topstitch.
The result should be a puffy rectangle ready to transform into the bow shape that makes this car neck pillow so adorable.
6. Creating the Bow Shape
To achieve that charming bow-tie appearance, find the center of your pillow and pinch it gently. Wrap a strip of matching fabric or use your 2.5 cm (1”) webbing strap around the middle section.
Sew the ends of the strap together at the back to hold the shape. This step not only gives your pillow its signature design but also creates a spot to attach the strap that will secure it to your car seat.
Make sure the center is tight enough to define the bow shape but not so tight that it distorts the pillow’s comfort.
7. Attaching the Webbing Strap
Cut a piece of webbing strap long enough to wrap around your car headrest comfortably. Usually, 40–45 cm (16–18”) works well, but measure your seat to be sure.
Sew or attach one end of the webbing strap to the back of the pillow’s center band. Add a Velcro piece, snap button, or buckle to the ends of the strap for easy removal.
This makes it practical to take off and wash the pillow cover, a feature that every quilt lover appreciates in handmade accessories.
8. Personalization Ideas
Now that your pillow is functional, why not add your personal touch? Customizing your car neck pillow can make it one-of-a-kind and more aligned with your car’s style.
Try adding decorative stitching, embroidery initials, or small quilt pattern patches to enhance its charm. You can also mix fabrics — perhaps a floral print on one side and a checkered pattern on the other!
For a cozy winter look, consider using soft fleece or flannel fabric. For summer, light cotton or linen keeps things cool and breathable.
9. Matching Set Ideas
Once you see how easy this project is, you’ll want to make more! Create a matching set for all the seats in your car or even make a travel pillow for road trips.
Use coordinating fabrics from your favorite quilting stash to make seat belt covers, armrest pads, or even a mini car blanket to complete the ensemble.
This simple pattern can also make thoughtful handmade gifts for friends and family — everyone loves something made with care and creativity!
10. Tips for Beginners
If you’re new to sewing or quilting, don’t worry. This project is very forgiving, and every step helps you build confidence with fabric handling, straight stitching, and simple finishing techniques.
Always use pins or clips to keep your fabric layers aligned. Take your time when sewing curves or tight corners. Remember, practice makes perfect!
Using quality thread and fabric ensures your pillow lasts longer, even with daily use. Like every quilt project, patience and precision pay off in the final look.
11. Care and Maintenance
Handmade items deserve care! To keep your car neck pillow looking fresh, remove it occasionally and wash the cover gently with mild detergent.
If you used cotton fabric, avoid high heat drying — air drying helps preserve the shape and prevent shrinking.
Regular cleaning not only keeps it hygienic but also maintains the vibrant look of your quilt-inspired design.
12. Share Your Creation!
Congratulations — you’ve just made your very own Car Neck Pillow! Take a moment to admire your work and enjoy the comfort it brings to every drive.
Don’t forget to share photos of your finished project on social media. Use hashtags like #QuiltPattern, #DIYCarPillow, and #SewingProject to connect with other creative makers around the world.
Whether you’re a beginner or a seasoned quilter, every handmade item tells a story — and your new pillow is a perfect example of comfort, style, and love stitched together.