
Looking for a small, adorable project that’s perfect for gifting or organizing little treasures? This Sewing Gift Bag Free Pattern is just what you need! It’s cute, quick to make, and a wonderful way to use up your favorite fabric scraps. Whether you’re new to sewing or have some experience, this project is fun, simple, and rewarding. Let’s go step by step and create a charming fabric gift bag that everyone will love.
Materials You’ll Need
Before you begin, gather your supplies so everything is ready at hand. You don’t need many materials for this project — just a few pieces of fabric and basic sewing tools. This makes it an excellent beginner-friendly project or a relaxing weekend craft.
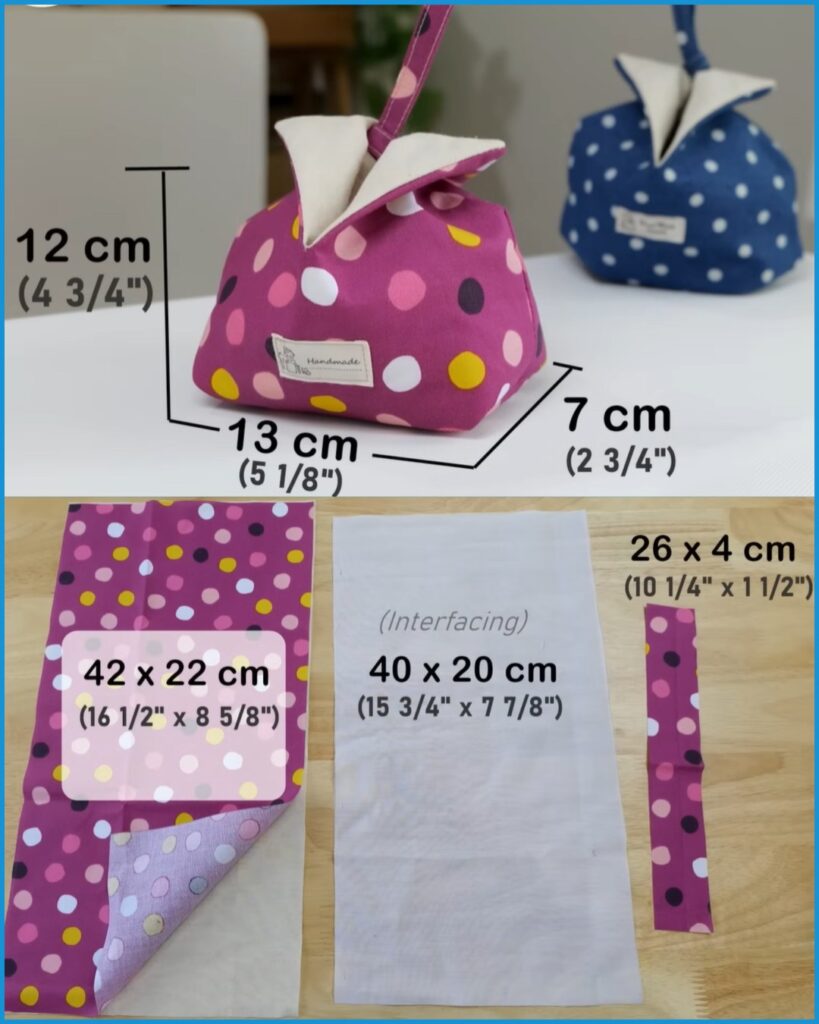
- Outer fabric: 42 x 22 cm (16 ½” x 8 ⅝”)
- Lining fabric: same size as the outer fabric
- Interfacing: 40 x 20 cm (15 ¾” x 7 ⅞”)
- Strap piece: 26 x 4 cm (10 ¼” x 1 ½”)
- Matching thread
- Scissors or rotary cutter
- Iron and ironing board
- Pins or clips
- Sewing machine (or hand sewing needle if preferred)
This Sewing Pattern creates a finished bag measuring approximately 13 cm (5 ⅛”) wide, 12 cm (4 ¾”) high, and 7 cm (2 ¾”) deep. It’s the perfect size for small gifts, accessories, or cosmetics.
Preparing Your Fabric Pieces
Start by cutting all your fabric according to the measurements. If you’re using patterned fabric, make sure the design faces the direction you want before cutting. You can use cotton fabric, linen, or even soft canvas for a sturdier feel.
Next, iron the interfacing to the wrong side of your outer fabric piece. This will give your bag more structure and help it keep its shape. Make sure to follow the manufacturer’s instructions for the interfacing — usually, you’ll need to press it for about 10–15 seconds using a medium heat setting.
Once your interfacing is fused, press your fabrics well to remove any wrinkles. Accurate cutting and neat pressing will make your sewing process smoother and your final bag look more professional.
Sewing the Main Body
Now it’s time to start sewing! Take your outer fabric and fold it in half, right sides together, matching the short edges. Pin or clip the sides in place. Sew along both sides with a 1 cm (⅜”) seam allowance. Remember to backstitch at the beginning and end to secure the seams.
Repeat the same process with the lining fabric. You’ll now have two fabric “pockets” — one for the outside and one for the inside.
To create the boxy bottom of the bag, flatten one corner of the fabric so that the side seam aligns with the bottom fold, forming a triangle. Measure about 3.5 cm (1 ⅜”) from the point of the triangle and draw a straight line across. Sew along this line, then trim the excess fabric, leaving a 1 cm seam allowance. Do this for both corners of the outer fabric and the lining.
This step gives your bag its depth and signature soft cube shape. Once you’ve done this, turn the outer fabric right side out and leave the lining inside out for now.
Making the Handle Strap
Let’s make the handle strap next. Take the 26 x 4 cm (10 ¼” x 1 ½”) fabric strip and fold it in half lengthwise, wrong sides together, pressing it with an iron. Open it up, then fold both long edges toward the center crease and press again. Fold it once more along the center line so that all raw edges are enclosed.
Sew along both long sides of the strap about 2–3 mm (⅛”) from the edge. This gives it a clean, professional look. Once your strap is stitched, fold it in half and baste it temporarily to one side of the outer bag’s top edge, with the raw ends aligned. Make sure it’s centered on the side seam.
This little strap adds not only charm but also functionality to your gift bag — perfect for carrying or hanging.
Assembling the Bag
Now comes the exciting part — putting everything together! Place the outer bag (right side out) inside the lining (right side in), so that the right sides of both fabrics are facing each other. Align the top edges and side seams carefully and pin or clip them together.
Sew around the top edge, leaving a small opening of about 7 cm (2 ¾”) for turning. Backstitch at both ends of the opening for strength. After sewing, clip the corners slightly to reduce bulk, but be careful not to cut into your stitching.
Turn the bag right side out through the opening. Gently push out the corners with a blunt tool (like a pencil or chopstick), then tuck the lining into the outer bag neatly. Press the top edge flat with an iron, paying attention to the area around the opening.
To finish, topstitch around the top edge about 3 mm (⅛”) from the seam. This not only closes the turning gap but also gives your sewing project a crisp, polished finish.
Adding Personal Touches
Now that your Sewing Gift Bag is complete, it’s time to make it uniquely yours! There are so many creative ways to personalize your project, depending on your style and purpose.
You can add a handmade label, embroidery, or a small charm for an extra touch of personality. If you’re giving this as a gift, consider stitching the recipient’s initials on the front or using fabric that matches their favorite color or pattern. A floral print, polka dots, or even a minimalist linen texture can completely change the bag’s look.
You could also experiment with different closures — add a button, magnetic snap, or ribbon tie if you’d like. Don’t be afraid to play with your sewing creativity — this is your handmade masterpiece!
Ideas for Using Your Gift Bag
This small fabric bag is incredibly versatile! Here are a few fun ways to use it beyond just gift-giving. You can use it as a makeup pouch, a travel jewelry holder, or even a snack bag for light treats. It’s also great for storing small craft supplies like thread spools, buttons, or crochet hooks.
If you enjoy organizing, you can make several in different fabrics to sort items neatly in your drawer or suitcase. Because the bag stands upright and holds its shape, it’s both practical and adorable.
These little bags also make wonderful eco-friendly gift wraps. Instead of using disposable paper, you can sew these reusable fabric bags and add an extra layer of thoughtfulness to your presents.
Tips for Beginners
If this is your first sewing pattern, don’t worry — you’re in the right place! Here are a few simple tips to help your project go smoothly:
- Press often: Iron your fabric after every major step. It keeps seams neat and makes sewing easier.
- Pin before sewing: Especially around corners and seams, pins help ensure accuracy.
- Go slow: There’s no rush! Take your time guiding the fabric under the presser foot to get clean, straight stitches.
- Use a matching thread: It blends better and hides small imperfections.
- Practice makes perfect: Even if your first bag isn’t flawless, you’ll improve with each project. Every stitch counts as experience!
Remember, sewing is as much about the joy of creating as it is about the final product. Enjoy the process, and be proud of what you make.
Final Thoughts – Share Your Sewing Joy!
And there you have it — your very own Sewing Gift Bag made with love and creativity! This quick project combines simplicity and charm, making it ideal for gifting or personal use. You can finish one in under an hour once you get the hang of it, and it’s an excellent way to use up your leftover fabric pieces.
If you enjoyed this sewing pattern, share it with your friends, family, or sewing group! You can even post your finished bag on social media — tag it with your favorite sewing hashtags or share it with other makers. It’s always inspiring to see how others personalize their projects.
Now that you’ve completed this one, why not try making a set in different colors? The more you make, the easier and faster it gets. So, grab your fabrics, fire up your sewing machine, and start stitching joy into every little bag!