
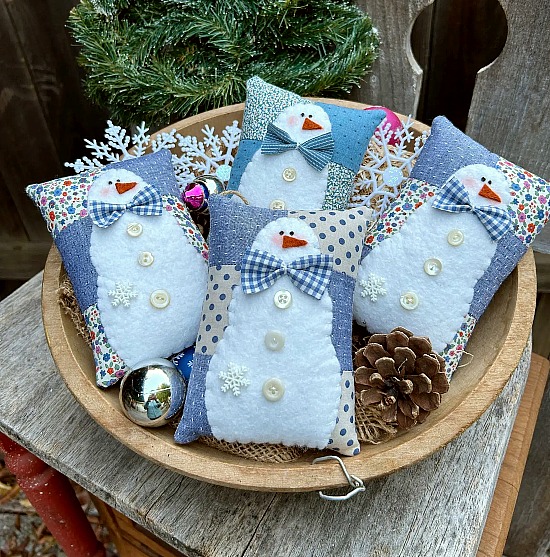
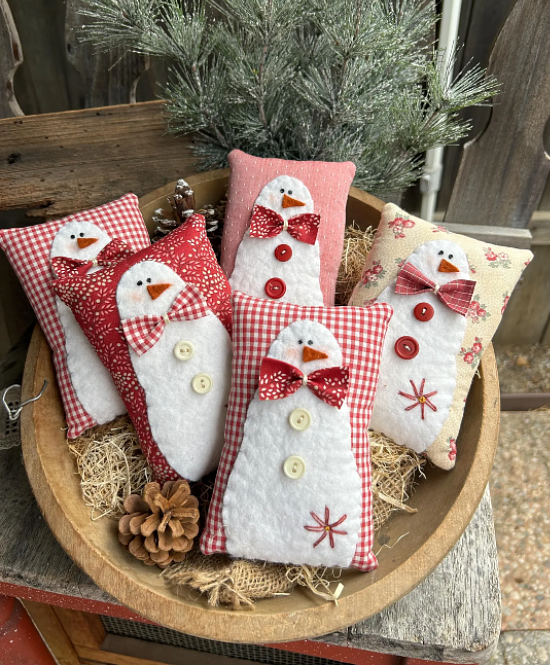
There’s something magical about mixing the coziness of quilting with the whimsy of winter décor. These Snowman Mini Pillows are the perfect example—a charming, beginner-friendly project that lets you sew adorable little snowmen using a simple Quilting pattern. They look beautiful displayed in bowls, trays, shelves, or even handed out as festive gifts. If you love handmade decor, you’ll be delighted by how quickly these little pillows come together.
In this tutorial, you’ll learn how to make your own Snowman Mini Pillows from start to finish. We’ll go through the materials list, step-by-step instructions, and a few creative ways to personalize your project. Whether you’re new to quilting or looking for a fun weekend craft, this project is the perfect blend of simplicity and charm.
Materials You Will Need
Before starting any Quilt project, gathering the right materials sets the tone for success. The great thing about these mini pillows is that they don’t require much fabric. In fact, this is a fantastic scrap-buster project! You can mix leftover Quilting cottons, tiny felt scraps, and buttons you already have at home. Even beginners will appreciate how forgiving this pattern is.
To create your Snowman Mini Pillows, gather a variety of cool-toned fabrics—blues, grays, whites, and soft florals. These shades create that cozy winter vibe, but feel free to choose any palette that inspires your creativity. Small prints, polka dots, checkered fabrics, and textured cottons look especially charming in this Quilting pattern.
Materials List:
- Assorted cotton fabrics (scraps work perfectly)
- White felt for the snowman body
- Orange felt for the carrot nose
- Small buttons (for the snowman’s belly)
- Ribbon or fabric for the bow tie
- Embroidery thread (black, optional)
- Fiberfill stuffing
- Scissors or rotary cutter
- Needle and thread or sewing machine
- Pins or clips
- Paper and pencil (for creating templates)
Preparing Your Snowman Quilt Pieces
Every great Quilt starts with good preparation, and these mini pillows are no different. Begin by deciding the size of your pillow. A common and charming size is around 4″ x 6″, but you can make them larger or smaller depending on your display bowl or desired decoration. Once you’ve chosen a size, create a paper template for the pillow shape. This will help ensure your pieces stay consistent when making several.
Next, select the fabrics for the pillow front. You can choose a single fabric or create a patchwork background for a more traditional Quilting look. Simply cut two rectangles for each pillow—one for the front and one for the back. If you enjoy the feel of a scrappy Quilt, consider stitching together several small strips or squares before trimming them into your rectangle shape.
Finally, prepare the snowman pieces. Using white felt, cut out a simple snowman silhouette—either with three sections or a soft rounded shape, depending on your style preference. Cut a tiny triangle from orange felt for the carrot nose and choose your buttons. These elements will add personality and charm to your finished pillows.
Assembling the Snowman Appliqué
Now comes the fun part—building your snowman! Place the white felt snowman piece onto the center of your pillow front. If you used a patchwork background, position the snowman to highlight the colors and textures behind it. Pin or lightly glue the snowman felt piece to keep it in place during stitching.
To attach the snowman, use a simple straight stitch, blanket stitch, or zig-zag stitch around the edges. This part of the Quilting pattern gives your mini pillow that handmade, cozy look. Beginners don’t need to worry about perfection—slight unevenness adds charm and character to the design. Take your time and enjoy the slow, meditative process of stitching around curves.
After securing the snowman body, stitch on the buttons to create the classic snowman belly. Then sew the small felt carrot nose in place. If you want to add a stitched smile or little eyes, use black embroidery thread to make tiny dots or a curved line. The details make your snowman come to life and allow you to express creativity in your Quilt project.
Adding the Bow Tie and Decorative Elements
One of the most delightful details in this Quilting pattern is the snowman’s bow tie. Cut a small rectangle of fabric or ribbon, fold it into shape, and stitch or glue it under the snowman’s chin. Checkered or gingham patterns look especially adorable and give your mini pillow a farmhouse feel.
To add even more charm, consider decorating the pillow with extra elements such as snowflake buttons, tiny appliqué stars, or embroidery details. These embellishments make each snowman unique. You can mix floral fabrics, polka dots, and geometric prints to give the project personality and visual variety.
This step is where your imagination truly takes over. Some crafters like to add little scarves made of felt or yarn. Others prefer to keep the design simple and rustic. No matter your style, these small touches help transform your Snowman Mini Pillow into a sweet handmade keepsake that stands out in your winter décor.
Sewing the Pillow Together
With your snowman fully decorated, it’s time to turn the design into a mini pillow. Place the pillow front and pillow back right sides together. Pin or clip the edges to secure them. Using a ¼” seam allowance, sew around the perimeter of the pillow, leaving a small opening (about 2″) on one side so you can turn it right side out.
Once stitched, trim the corners slightly to help them turn crisply. Then flip the pillow right side out through the opening. Take your time poking out the corners with a chopstick, knitting needle, or blunt pencil. You’ll instantly see your quilted snowman come to life in pillow form.
Now fill your pillow with fiberfill stuffing. Add small amounts at a time so you can control the shape and firmness. Some people prefer a lightly stuffed pillow for a soft, squishy look, while others like a firmer feel. When you’re satisfied, fold the raw edge inside and ladder-stitch the opening closed. Your Snowman Mini Pillow is complete!
Creative Personalization Ideas
While the basic Quilting pattern is already adorable, customization makes your pillows extra special. Try making a whole set of snowmen with different personalities—some with floral backgrounds, others with patchwork, and some with vintage fabrics for a nostalgic look. They make fantastic gifts for friends, neighbors, or teachers during the holiday season.
Another fun idea is to turn your mini pillows into scented sachets. Simply add dried lavender, cinnamon cloves, or pine-scented sachet mix inside the stuffing. This transforms your snowmen into delightful fragrance accents perfect for closets or holiday baskets. The mix of scent, fabric, and winter charm is irresistible.
You can also experiment with varying sizes. Larger pillows make cute decor pieces for couches and reading chairs, while tiny 3″ versions are adorable as ornaments or gift-bag additions. This Quilting pattern is incredibly versatile, giving you endless creative opportunities.
Final Thoughts + Share Your Creation!
Creating these Snowman Mini Pillows is a joyful way to celebrate the winter season through quilting. Whether you choose classic patchwork backgrounds or modern color palettes, this project is approachable, relaxing, and incredibly rewarding. The Quilting pattern is perfect for beginners, yet enjoyable for experienced makers who want a quick and charming craft.
Handmade décor adds warmth to any home, and these mini pillows bring smiles wherever they’re placed. Place them in bowls, scatter them around shelves, or gift them to someone who loves handmade creations. Each one carries a bit of your personality in every stitch.
If you make these Snowman Mini Pillows, I’d love to see your finished creations! Share your Quilt project with your friends, in your crafting groups, or on social media so others can enjoy the inspiration. Happy quilting—and may your winter be filled with creativity, coziness, and lots of handmade magic.