
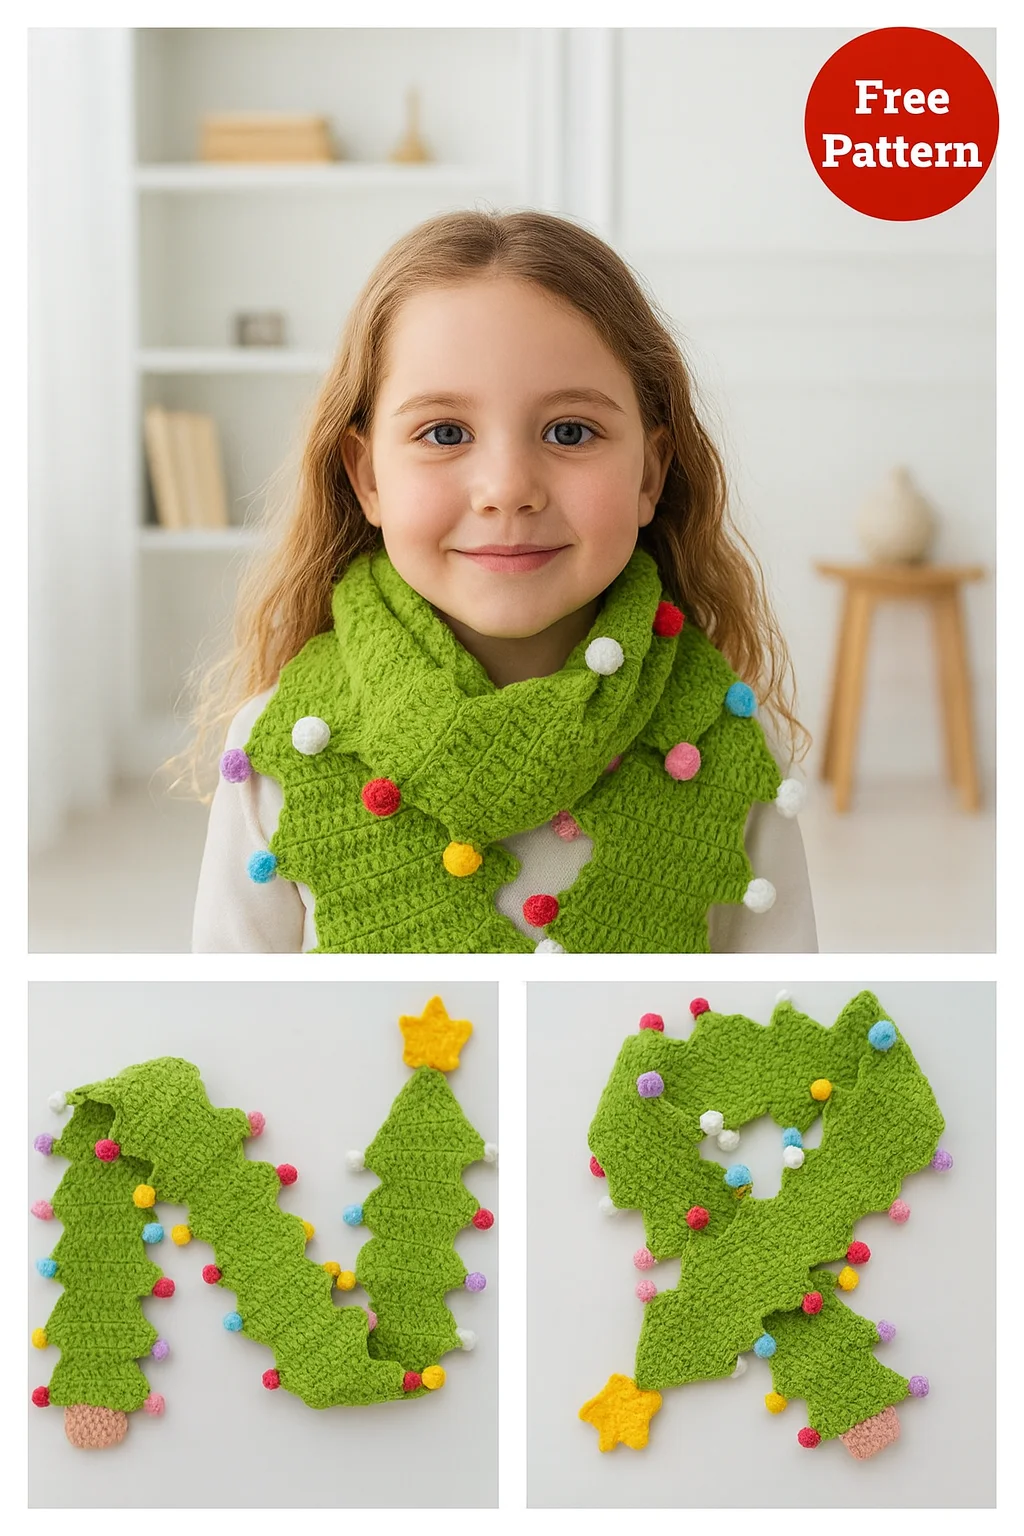
If you are looking for a festive and easy project to make this holiday season, this Free Crochet Pattern Christmas Tree Scarf is a wonderful choice. It is beginner-friendly, fun to stitch, and adds a cheerful touch to any winter outfit. The scarf is designed using multiple triangular motifs shaped like Christmas trees, which makes it both creative and adorable. Whether you want to wear it yourself, give it as a gift, or sell it at craft fairs, this pattern is sure to be a favorite during the holidays.
This tutorial includes everything you need to make your own scarf from start to finish. You’ll find the complete list of materials, step-by-step instructions, customization ideas, and helpful details to make your project easy and enjoyable. Throughout the text, you’ll also see how naturally the keywords Crochet and Crochet Pattern fit into the flow of the tutorial. Grab your hook, choose your favorite holiday colors, and let’s begin this festive project.
Crocheting your own Christmas Tree Scarf is not only rewarding but also a delightful way to get into the holiday spirit. The simple construction and repetitive stitches make this project relaxing while still resulting in a beautiful handmade accessory. Whether you’re a beginner or a longtime maker, you’ll enjoy every part of creating this unique Crochet Pattern.
Materials You Will Need
To start your Christmas Tree Scarf, gather all the necessary materials so your project runs smoothly from beginning to end. Choosing the right yarn is important because it helps determine the texture, warmth, and overall appearance of your scarf. A soft worsted-weight yarn works perfectly for this project, as it provides structure while remaining comfortable to wear around the neck.
You will also need a 5.0 mm (H) crochet hook, which works well with medium-weight yarn and ensures your stitches stay even. This hook size is very beginner-friendly and helps create a neat, consistent look throughout the scarf. Make sure you also have a yarn needle for sewing pieces together and weaving in the ends, as well as scissors for trimming your yarn.
Optional decorations such as small pom-poms, tiny stars, sequins, or beads can be added at the end. These embellishments give your trees a fun and festive look that makes the scarf extra special. With all your materials ready, you’re all set to begin crocheting your Christmas Tree motifs.
Step-by-Step Instructions
This scarf is made by crocheting several triangular motifs that look like Christmas trees. Each triangle is simple to make and uses basic stitches such as single crochet and double crochet. Beginners will find this section very accessible because the increases follow a clear and predictable pattern. Once you master the first triangle, the rest become easy and enjoyable.
To make one tree, begin with a magic ring and chain three. Work double crochets into the ring, then start building the triangle by increasing in the center of each row. As you add rows, the shape widens and becomes more defined. Continue this process until your tree reaches the desired size. Once you finish one triangle, simply repeat the same steps until you have enough pieces to create the length of your scarf.
When your triangles are ready, lay them out in a straight line. Each tree should slightly overlap the next, creating a stacked appearance. This layout is what gives the scarf its charming Christmas tree shape. After arranging them, you can begin joining your pieces with a yarn needle. This is a satisfying step because your Crochet Pattern starts taking shape as a full scarf.
Shaping the Christmas Trees
The shaping of each Christmas tree is done through consistent increases in the center of each row. Even though triangular shapes may seem tricky, this particular Crochet Pattern is designed to be very straightforward. As long as you can identify the center stitch in every row, your increases will be placed correctly and your triangle will form evenly.
Each row begins with a turning chain followed by double crochets. When you reach the middle of the row, place two stitches in the center stitch to keep your triangular shape growing. A helpful tip for beginners is to use a stitch marker to mark that center space. This simple step helps avoid mistakes and keeps the triangle uniform.
By the time you reach the final row, the piece will look like a lovely little Christmas tree. The more you make, the quicker you’ll become, and soon you may even find yourself crocheting them while watching your favorite holiday movie. Once all trees are shaped, you can move on to assembling the scarf into one long festive piece.
Assembling the Scarf
After completing all your trees, it’s time to assemble your scarf. Place the triangles in a row with the tip of one touching the base of the next. Make sure they are aligned neatly before you begin stitching them together. This lineup creates a charming visual effect, almost as if the trees are stacked or gently cascading downward.

Using a matching yarn color and a yarn needle, begin sewing each tree to the next. You can use whip stitch or mattress stitch—both methods work well, but the mattress stitch creates a cleaner, more invisible seam. This helps the scarf look more polished and professional, which is important if you’re giving it as a gift or selling it.
Once all trees are attached, crochet a small rectangle in brown yarn to represent the tree trunk. Sew this piece to the bottom of the last triangle. This final touch completes the Christmas tree design and adds extra character to your scarf. At this point, your Crochet Pattern has fully come to life and looks wonderfully festive.
Adding Decorations and Details
Decorating your Christmas Tree Scarf is one of the most enjoyable steps. This is where you can get creative and add personal touches that suit your holiday style. Some crocheters like to attach mini pom-poms to each tree to imitate ornaments. Others prefer crocheting small stars to place at the top of each tree for a classic festive look.
If you love sparkle, consider sewing on a few sequins or beads. These tiny details catch the light beautifully and give your scarf a magical holiday glow. If you prefer a more natural or minimal look, you can skip the decorations and leave the trees plain. The simple shape is already lovely on its own.
You may also choose to add a border around the entire scarf. A single crochet border in white, gold, or red can help frame the trees and give the scarf a crisp, finished look. Borders are also helpful for keeping edges straight and reinforcing the structure of the scarf.
Customization Ideas
This Crochet Pattern is incredibly versatile, allowing you to customize the scarf in many ways. Although green is the traditional color for Christmas trees, you can experiment with different color themes to make your scarf unique. Try snowy white trees, pastel shades for a soft winter aesthetic, or bold bright colors for a fun and playful twist.
Another idea is to create an ombre effect by using multiple shades of green. This gradient style adds depth and interest to your scarf. You can also vary the size of your trees by adding or removing rows to create a whimsical forest look. This gives the scarf character and makes it even more eye-catching.
If you plan to give the scarf as a gift, consider adding initials or a small embroidered detail for personalization. Handmade gifts become even more meaningful when they include thoughtful touches. Whatever you choose, customizing your project makes your Crochet work feel special and one-of-a-kind.
Finishing Touches
Once your scarf is fully assembled and decorated, you’re almost done. Begin by weaving in all loose ends carefully. This step may feel small, but it makes a big difference in the appearance and durability of your scarf. Neatly woven ends help your project last longer and look professionally finished.
Next, block your scarf if needed. Blocking helps smooth out the triangles, evens the edges, and makes the scarf drape beautifully. To block, simply lay the scarf on a flat surface, pin it into shape, and lightly spray it with water. Allow it to dry completely before wearing or gifting it.
Once your scarf is dry and ready, you can proudly display your beautiful holiday accessory. This Crochet Pattern creates a warm, playful, and festive scarf that you’ll enjoy every year. It is also a wonderful piece to showcase your handmade skills and holiday creativity.
Share Your Creation!
Now that you’ve completed your Free Crochet Pattern Christmas Tree Scarf, it’s time to celebrate your creativity. Share your finished project on social media, show it to friends and family, or gift it to someone who loves handmade items. Your scarf is not just an accessory—it’s a piece of holiday joy stitched with love and care.
PATTERN HERE
Crochet – Tutorial
FULL PATTERN ACCESS
You will be redirected to another site
If you enjoyed this tutorial, try making more scarves in different colors or creating matching accessories for a fun holiday set. Crochet is a wonderful way to express creativity, relax, and spread joy through handmade work. Keep experimenting, keep stitching, and keep sharing your beautiful creations.
Happy crocheting, and may your Christmas season be filled with warmth, creativity, and festive spirit!