
Creating your own handmade tote bag is one of the most enjoyable sewing projects you can add to your crafting routine. Whether you love quilting, working with fabric scraps, or simply exploring new textile ideas, this Amazing Tote Bag Pattern is perfect for beginners and experienced makers alike. The design is soft, elegant, and quick to assemble, making it ideal for everyday use, gifting, or even selling. Inspired by simple quilting pattern proportions and a fabric-friendly silhouette, this tote bag brings together beauty and practicality in one delightful project.
In this tutorial, you will learn how to cut your fabric, assemble the bag, sew the casing, and attach round wooden handles to create a stylish and functional handmade accessory. The process is simple, meditative, and beginner-friendly. Even if you are new to sewing or quilting, this step-by-step guide will walk you through each part with clarity and confidence. Let’s get started and bring your new favorite tote bag to life.
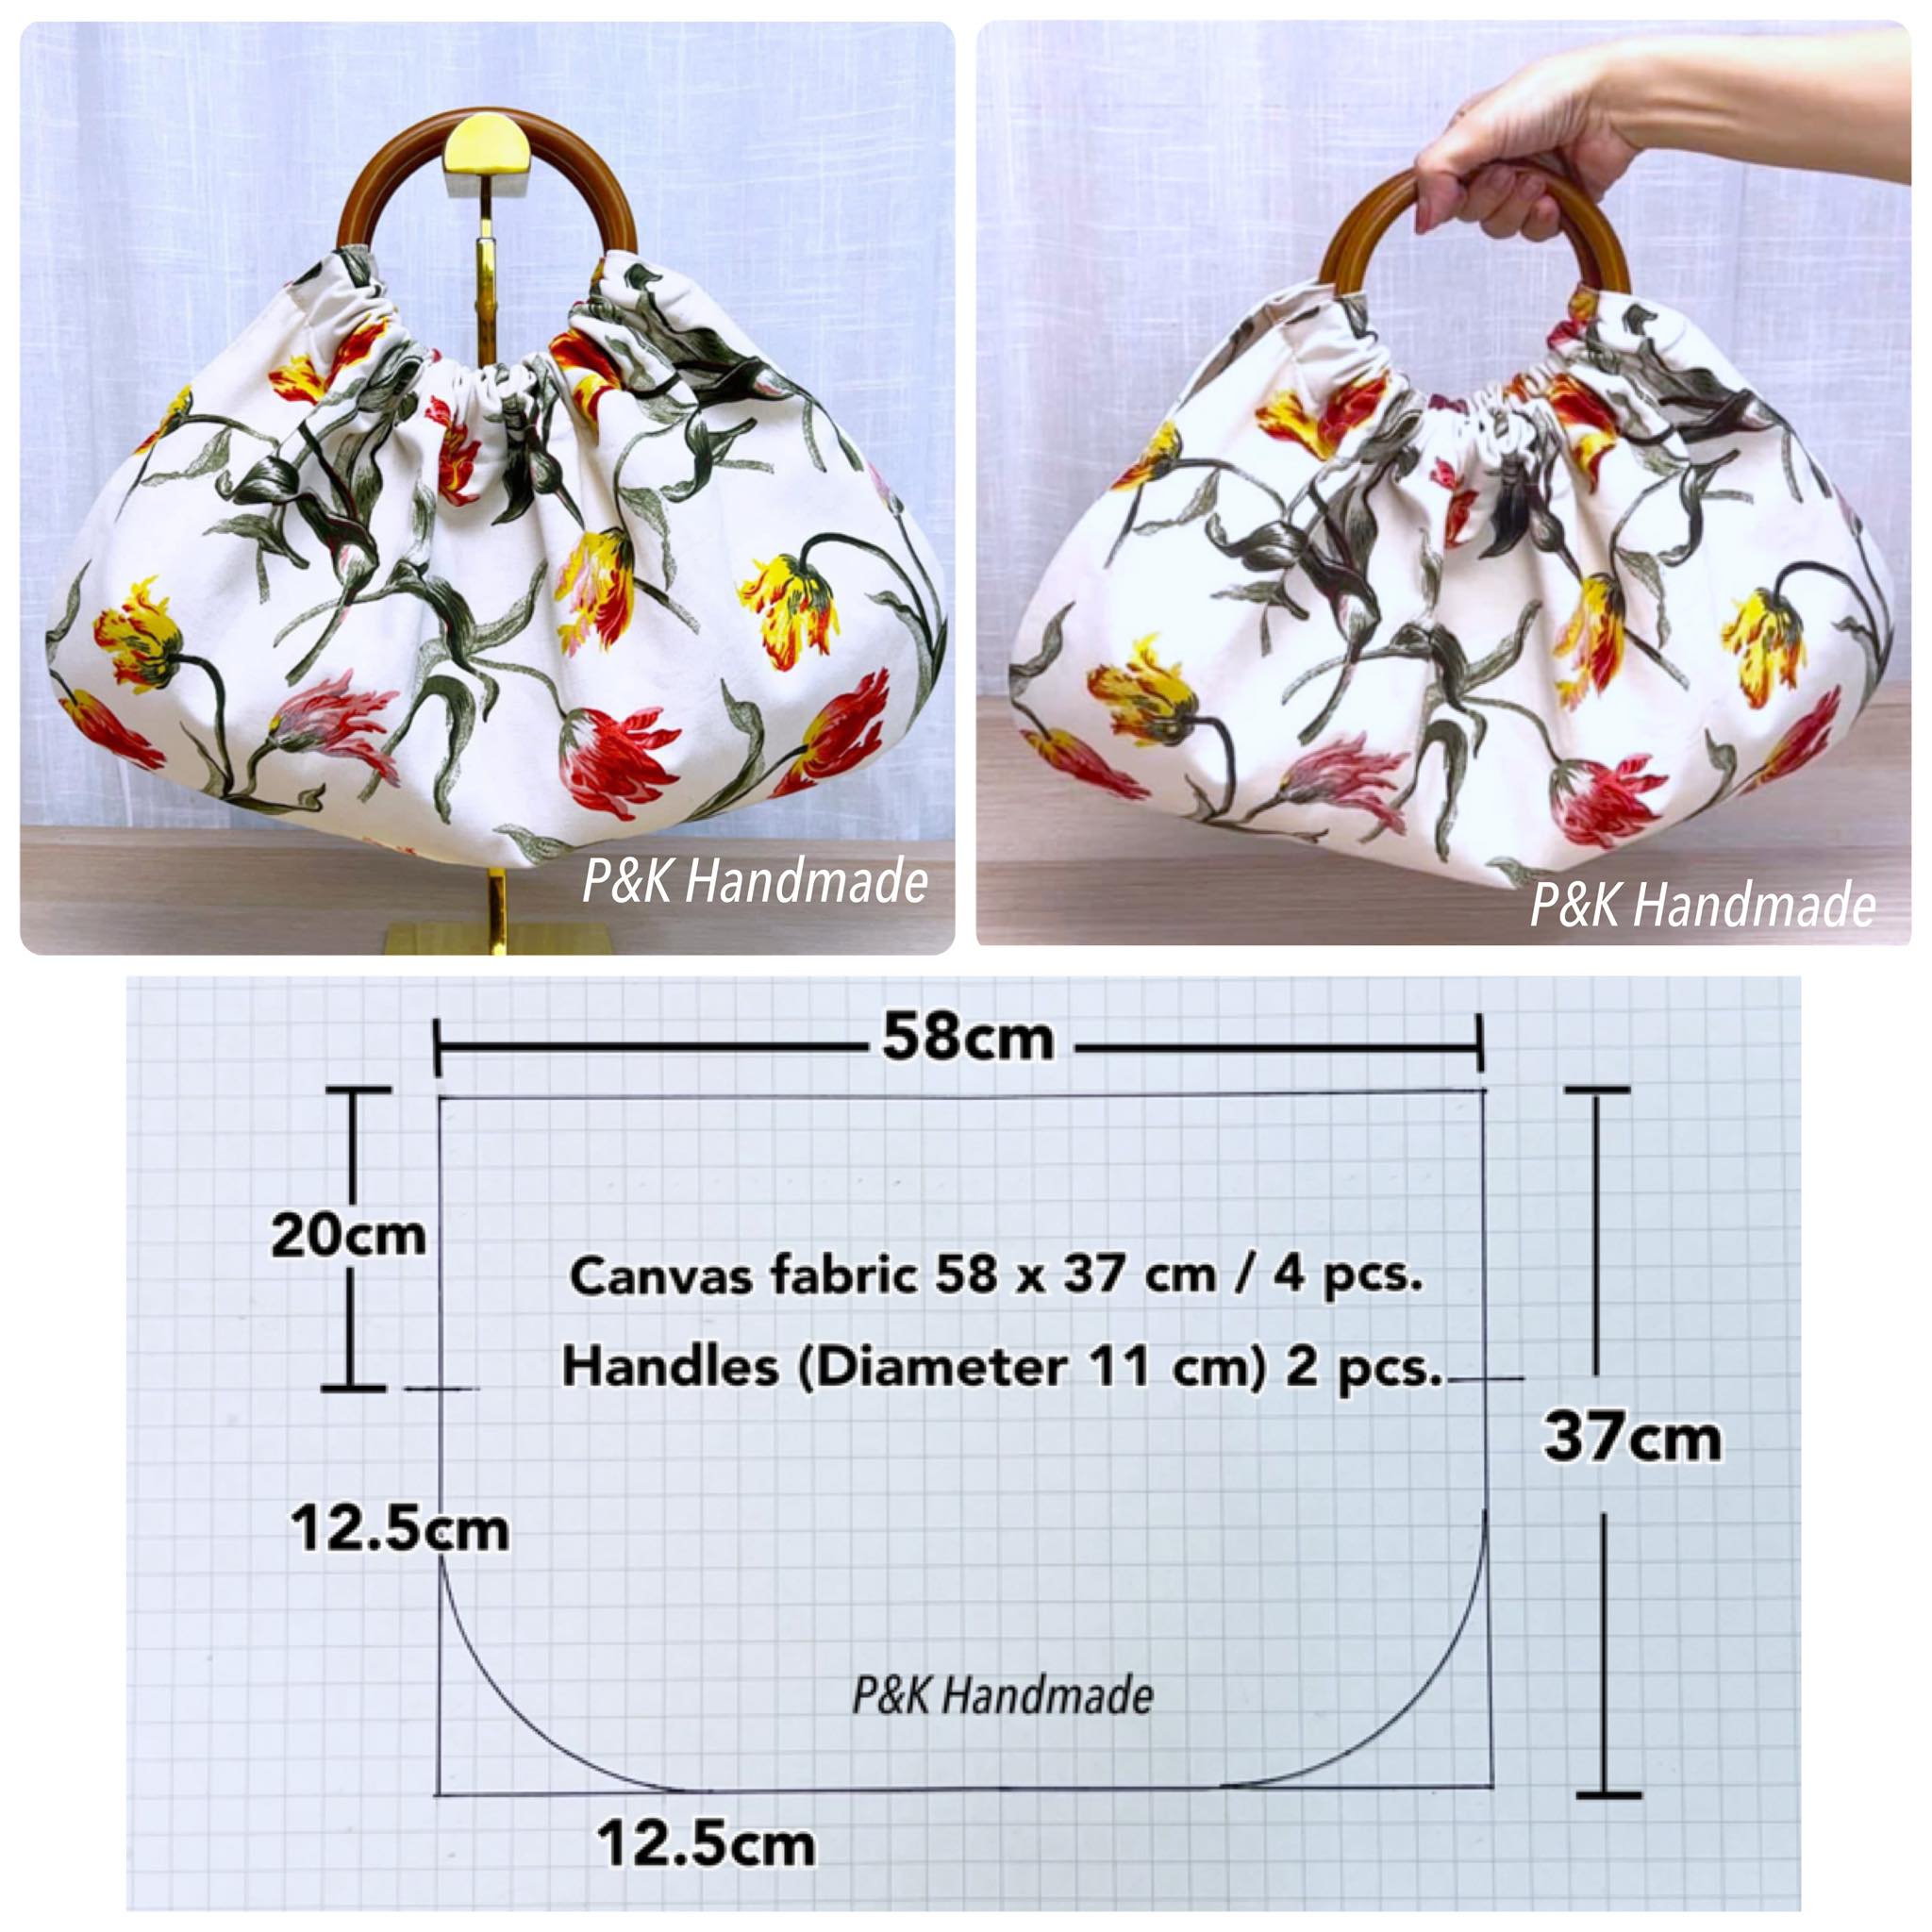
Before diving into the step-by-step instructions, take a moment to look closely at the bag’s shape. The rounded base, gathered top, and elegant handles create a soft structure that echoes the feel of a quilted piece—cozy yet refined. It’s the perfect project for anyone who enjoys mixing fabrics, experimenting with prints, and adding a personal handmade touch to their accessories.
Materials You Will Need
To make this Amazing Tote Bag Pattern, you will only need a few essential sewing tools and fabric pieces. The pattern is designed to be simple and accessible, so there is nothing complicated or advanced required. Even if you usually work with quilting pattern blocks or patchwork designs, you will find this project refreshingly easy. Here’s what you need to gather before beginning.
You will need canvas fabric measuring 58 x 37 cm (four pieces). Canvas is recommended because it provides structure without needing interfacing, but you can also experiment with quilted fabric or pre-quilted panels for extra softness and texture. Using quilted panels will give the bag a cozy, dimensional look similar to boutique-style quilt bags.
For the handles, you will need two round wooden handles with an 11 cm diameter. These handles complement the gathered top perfectly and give the bag a charming handmade aesthetic. If you prefer a different look, feel free to choose bamboo or acrylic handles instead. You will also need basic sewing tools: scissors, pins, matching thread, a sewing machine, and an iron for pressing your seams.
Cutting the Fabric
Cutting the fabric is the first step in bringing your tote bag to life. You will need four identical rectangles, each measuring 58 cm in width and 37 cm in height. Two of these will form the exterior of the bag, and the other two will be used as the lining. If you enjoy quilting, this is a wonderful opportunity to use fabric that features quilting pattern motifs or even patchwork-style prints.
To create the rounded shape at the bottom corners, measure 12.5 cm from the bottom edge horizontally and 12.5 cm vertically. Mark these points and use a curved ruler or freehand technique to draw a soft, rounded curve connecting them. This curve creates the elegant balloon shape of the finished tote bag. Repeat this on all four fabric panels to keep each piece uniform.
If you are using quilted fabric, take your time to ensure the quilt lines match when cutting. This will give your finished tote a professional, polished look. Once your pieces are cut and shaped, press them lightly with an iron to remove any wrinkles or fabric tension.

Assembling the Outer Bag
Take the two outer fabric panels and place them right sides together. Align all edges and pin around the sides and bottom. Sew along these edges with a straight stitch, leaving the entire top open. Make sure to sew slowly around the rounded corners to maintain a smooth curve. This step creates the main body of your tote bag and begins to reveal its beautiful shape.
Once the edges are sewn, trim any excess fabric around the curve to reduce bulk. You can clip small notches along the rounded corner seam to help it lay smooth when turned right side out. After trimming, turn the outer bag right-side out and gently press the seams using an iron. This is when the soft, rounded silhouette of your tote truly begins to appear.
If you want to add a quilt-inspired touch, you can sew a few decorative quilting lines along the body of the bag. Simple vertical stitching or wave-like lines will give the bag dimension while maintaining its soft and airy charm. This step is optional but is a great way to incorporate quilting pattern techniques into the project.
Assembling the Lining
Just as you did with the outer bag, place the two lining pieces right sides together, and sew along the sides and bottom. Be sure to leave a 10 cm opening at the bottom of the lining. This gap will be used later to turn the bag right-side out. Press the seams gently and clip the curves just as you did for the exterior pieces.
The lining should match the size and shape of the outer bag precisely. If you prefer a more structured lining, you can add a fusible interfacing before sewing. Another creative option is to use quilted lining fabric, giving the interior a luxurious and soft finish. Quilted linings add durability and beauty, making your handmade tote feel extra special.
Once the lining is ready, place it inside the outer bag with right sides facing each other. Align the top edges and pin them together. Make sure the seams line up neatly—this ensures that the top edge gathers smoothly later on.
Sewing the Casing for the Handles
With the lining and outer bag aligned, sew along the entire top edge with a clean straight stitch. After sewing, pull the bag right-side out through the opening you left in the lining. Once the bag is pulled through, sew the opening closed and push the lining inside the bag neatly. Now the structure of the tote is complete.
The top area of the tote needs a fabric channel, or casing, to hold the wooden handles. Measure the width of your handles and fold down the top edge of the bag to create a wide casing. Pin in place and sew a straight stitch along the folded edge, forming a tube-like opening. This area will gather beautifully once the handles are inserted.
Using a safety pin, thread each side of the handle through the casing. Gather the fabric evenly along the handle to create the iconic puffed and gathered look of the tote. Repeat this process on both sides, and tie or stitch the casing ends securely so the handles stay perfectly in place.
Ideas for Personalization
One of the joys of working with quilt and sewing projects is the opportunity to personalize every detail. You can use floral canvas, geometric quilting pattern fabrics, bold solids, or even repurposed quilt blocks to create a unique tote bag. The simple silhouette makes it easy to highlight any type of print or texture.
Add embellishments like lace trim, fabric appliqué, or quilted panels for a one-of-a-kind design. If you enjoy hand embroidery, consider adding a delicate floral motif or initials for a charming personalized touch. You can also play with quilting techniques by adding free-motion quilting on the outer fabric for extra texture.
Don’t be afraid to experiment. Your tote bag can reflect your personality, your favorite colors, and your love for handmade craft. Every version will look different and special, making it a project that you will want to create again and again.
Final Thoughts
Making your own Amazing Tote Bag Pattern is not only fun but incredibly satisfying. Whether you love quilt-making, sewing, or simply crafting beautiful items, this tote is a joy from start to finish. With just a few pieces of fabric and simple construction steps, you can create a stylish and durable accessory you will love using every day.
Now that you’ve completed your tote bag, I encourage you to share your creation with others. Post it on social media, show it in your quilting groups, or gift it to a friend who appreciates handmade treasures. Handmade items always carry a story—yours will inspire others to explore the world of sewing and quilting too.
Happy sewing, and may your creative journey continue to blossom!