
Creating Angels made from recycled ties is a wonderfully creative, heartwarming project that blends quilting, upcycling, and sentimental crafting into one beautiful design. Whether you’re working with ties from a loved one, thrifted collections, or simply fabrics you want to give a new life, this Quilting pattern offers a meaningful way to transform old materials into art. The gentle curves and flowing shapes of the angels make this Quilt project perfect for holidays, memorial gifts, or handmade décor that carries emotional value. This tutorial will guide you through every step of the process, from preparing the ties to assembling the angel blocks and finishing your Quilt. Even if you are a beginner, you’ll find the techniques simple, approachable, and incredibly rewarding. Each angel block becomes a unique piece of art because no two ties are alike. Vibrant prints, silky textures, and different colors come together in a stunning patchwork effect. What makes this Quilting pattern so special is its ability to tell a story. Ties often carry powerful memories, and turning them into quilted angels offers a beautiful way to preserve and celebrate those moments. Whether your Quilt is meant for a holiday wall hanging, a full quilted throw, or a charming table runner, each angel brings warmth, symbolism, and beauty into the project. Let’s begin turning your recycled ties into heartfelt quilted angels.
Materials You Will Need
Gathering your materials before starting will make the whole process smoother and more enjoyable. Since ties are made of delicate fabrics—usually silk or polyester—you’ll want additional stabilizing materials to help them behave like quilting cotton. A lightweight fusible interfacing is essential for maintaining structure and preventing fraying. Even beginners will find this step simple and quick once they see how ties transform into usable Quilt pieces. Here’s what you’ll need for this project: recycled ties (at least 5–8 ties per angel block depending on size), lightweight fusible interfacing, cotton background fabric, scissors or rotary cutter, cutting mat and ruler, iron and ironing board, sewing machine with a ¼-inch presser foot, pins or clips, optional embellishments like beads, lace, ribbon, or buttons, plus batting, backing fabric, and binding for finishing your Quilt. Once you gather these materials, take a moment to inspect your ties. Check for stains, loose threads, or areas needing repair. Ties with sentimental value may need gentle hand-washing or spot cleaning before being used. With everything prepared, you’re ready to begin transforming recycled ties into angel shapes for your Quilting pattern.
Preparing the Ties
Before you can sew your angels, you’ll need to prepare the ties so they become easy to cut and piece. Most ties are cut on the bias, meaning the fabric stretches easily, which can make quilting difficult if you don’t stabilize it first. Begin by opening each tie carefully using a seam ripper. Remove the inner lining and any labels, leaving you with a flat piece of fabric that is ready to be pressed. Once the ties are disassembled, gently press them with your iron on a low-heat setting. Silk responds best to low or medium heat, so avoid using high heat to prevent damage. After pressing, turn each piece wrong-side up and apply fusible interfacing to the entire back. This step transforms the slippery tie fabric into a stable material that behaves like quilting cotton, making it much easier to cut into the shapes needed for your Quilt. After stabilizing all your ties, sort them by color, pattern, or theme. This allows you to create harmonized angel designs or playful, eclectic combinations. Some ties may feature subtle stripes, bold paisleys, or elegant solids—each one contributing personality to your Quilting pattern. With all the ties prepped and organized, you’re ready to move on to assembling the angel shapes.
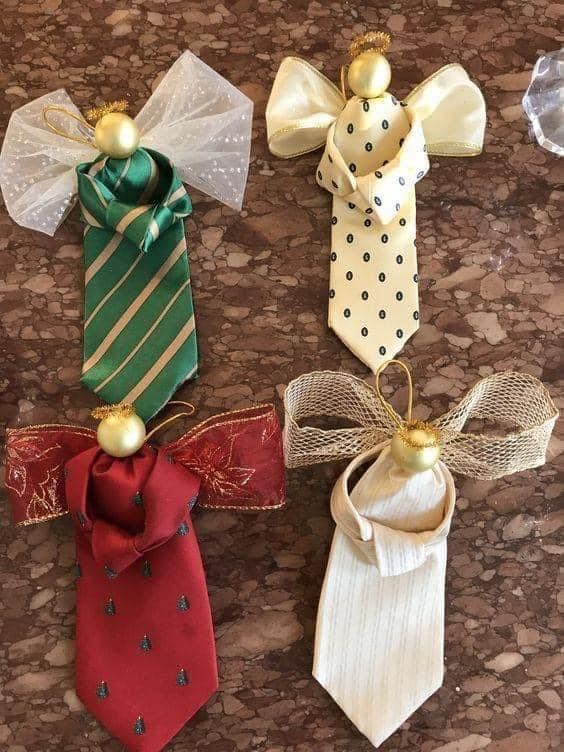
Cutting and Creating the Angel Shapes
To create the angel design, you’ll need templates for the dress, wings, and head. These can be purchased, downloaded, or hand-drawn based on the size you want your angel blocks to be. The dress is usually made from longer sections of tie fabric, while the wings benefit from contrasting colors or symmetrical patterns found within the ties. The head is typically a simple circle made from a neutral or light-colored fabric. Lay your templates on the stabilized tie fabric and trace them carefully. Because ties vary in texture and pattern, take your time placing the templates where the fabric looks most beautiful. For example, a paisley tie may create a lovely angel wing, while a striped tie can make an elegant dress shape. After tracing, cut the pieces using sharp scissors or a rotary cutter for clean edges. Once all the parts are cut, lay them out on your background fabric to visualize the angel. Adjust the placement of the wings, dress, and head until you achieve the look you want. This is a creative stage, so enjoy experimenting with symmetry, color contrast, or even layering multiple tie pieces for added texture. With your angel pieces arranged, it’s time to stitch them into place.
Assembling the Angel Block
Begin by stitching down the angel’s dress.
Because tie fabric can be thick or textured, use a small zigzag stitch or a blanket stitch to secure the edges.
This gives a clean decorative finish and prevents fraying.
Next, attach the wings on both sides, ensuring they curve naturally around the dress shape. Press gently after each piece is sewn to keep the block flat and smooth.
The head is usually added last. You can applique it using a satin stitch, hand stitch it with invisible thread, or even use a simple straight stitch close to the edge.
Some quilters like to add a tiny halo made of gold thread or ribbon, while others prefer a minimalist style with no embellishment. The beauty of this Quilting pattern is how customizable each angel can be.
After all the pieces are secured, trim the block to your desired size.
Ensure the angel is centered and that the background borders are even.
Each completed angel block becomes part of your larger Quilt layout or can be used as an individual decorative piece, such as a small wall hanging or quilted ornament.
Your angel block is now ready to join others in the next stage of assembly.
Joining the Angel Blocks
Once you have multiple angel blocks completed, it’s time to assemble them into a Quilt top.
Lay the blocks out on a flat surface and experiment with different arrangements.
You can place angels in neat rows, alternate the direction they face, or create a whimsical scattered layout.
The arrangement depends entirely on the style you want your Quilt to express.
Sew the blocks together using a standard ¼-inch seam allowance.
Press the seams open or to one side based on what feels best for your chosen fabrics.
Because tie fabrics sometimes create bulkier seams, pressing can help the Quilt lie flatter and look more polished.
Continue joining blocks row by row until your Quilt top is complete.
Add borders if you want to frame the angels or increase the final size of the Quilt.
Borders can be made from coordinating cotton or even additional tie fabric if you have leftovers.
Once your top is fully assembled, you’re ready to move on to quilting and finishing your beautiful creation.
Quilting and Finishing
Prepare your Quilt sandwich by layering the backing fabric, batting, and angel Quilt top.
Smooth out any wrinkles and baste the layers using spray adhesive, safety pins, or long basting stitches. Proper basting ensures that the delicate tie fabrics won’t shift during quilting.
You can quilt your angel Quilt by hand or machine. Simple quilting lines around each angel shape help highlight the design and keep the Quilt soft and flexible.
Free-motion quilting can also add beautiful swirls, halos, or feather designs around the angels. Stitch-in-the-ditch is another beginner-friendly option that keeps the focus on the tie fabric details.
Once the quilting is complete, trim the edges and add binding.
Bias binding works especially well, especially if your Quilt includes curved edges or thicker seams. Finally, give your Quilt a final press and admire the stunning angels you’ve created from recycled ties—each one unique and full of personality.
Ideas for Personalization
One of the most enjoyable parts of this Quilting pattern is the opportunity to give your angels special details.
You can add tiny beads or sequins to the wings for a sparkling effect. Lace trims around the dress hem create a vintage look, while embroidered halos add a soft handmade touch.
Even simple elements like buttons or ribbon bows bring charm and character to each angel.
Another personalization idea is using ties that hold sentimental value.
You might create angels from a collection of ties belonging to a father, grandfather, or loved one, turning the Quilt into a precious memory piece.
These Quilts make heartfelt gifts for holidays, memorials, or anniversaries. Each tie tells a story, and the angel design brings that story to life.
You can also experiment with the background fabric. Light neutrals offer a classic, clean look, while dark backgrounds create dramatic contrast that makes the angels stand out.
Mixing different backgrounds can add depth and movement to the Quilt.
No matter which direction you take, your finished project will be uniquely yours.
Final Thoughts – Share Your Angel Quilt
Creating Angels made from recycled ties is more than just a quilting project—it’s a beautiful way to honor memories, express creativity, and breathe new life into old materials.
This Quilting pattern encourages experimentation and welcomes beginners with open arms.
Whether you make one angel or a full Quilt filled with them, you’re crafting something meaningful and heartfelt.
Take a moment to appreciate the time, care, and emotion sewn into your angel blocks. Display your Quilt in your home, give it as a thoughtful gift, or use it as holiday décor.
Handmade items like this carry a special warmth that can’t be replicated. If this tutorial inspired you, feel free to share your project online or with your quilting community.
Seeing how other crafters use recycled ties to create angel Quilts sparks new ideas and spreads creativity.
Celebrate your work, enjoy the process, and keep quilting—your next beautiful creation is already waiting for you.