
If you love creating adorable and comfortable clothing for pets, the Ally Easy Fit Button Up Cat Sweater is the perfect project for you. This Crochet pattern is simple, customizable, and designed with both style and function in mind. Whether you’re a total beginner or someone with a bit of Crochet experience, this guide will walk you through every step in an inspiring, accessible way. Cat sweaters are increasingly popular among crafters because they allow for creativity while also giving pets that extra layer of warmth and cuteness.
One of the best things about this design is how quickly it works up. Even at a relaxed pace, most beginners can complete the sweater in an afternoon or over a cozy weekend. The button-up front makes it easy to put on and take off, especially for cats who may not enjoy tight pull-over garments. This approach keeps your pet comfortable while giving the sweater a polished look.
This tutorial will guide you through the materials you need, the essential stitches involved, and a detailed step-by-step on how to make the sweater from start to finish. You will also find customization ideas and tips to help make your version truly unique. Get your yarn ready—it’s time to Crochet with joy and confidence!
Materials You Will Need
Before starting this Crochet pattern, take a moment to gather all the necessary supplies. The great news is that this project uses very common materials, which means you might already have most of them at home. Choosing the right yarn and hook will help your sweater look neat and feel soft for your cat’s comfort.
Yarn: A medium-weight (category 4) soft acrylic or cotton yarn is ideal. It should feel smooth and gentle against your cat’s fur while still providing enough warmth. Avoid fuzzy yarns for this project, because they can shed and irritate pets with sensitive skin.
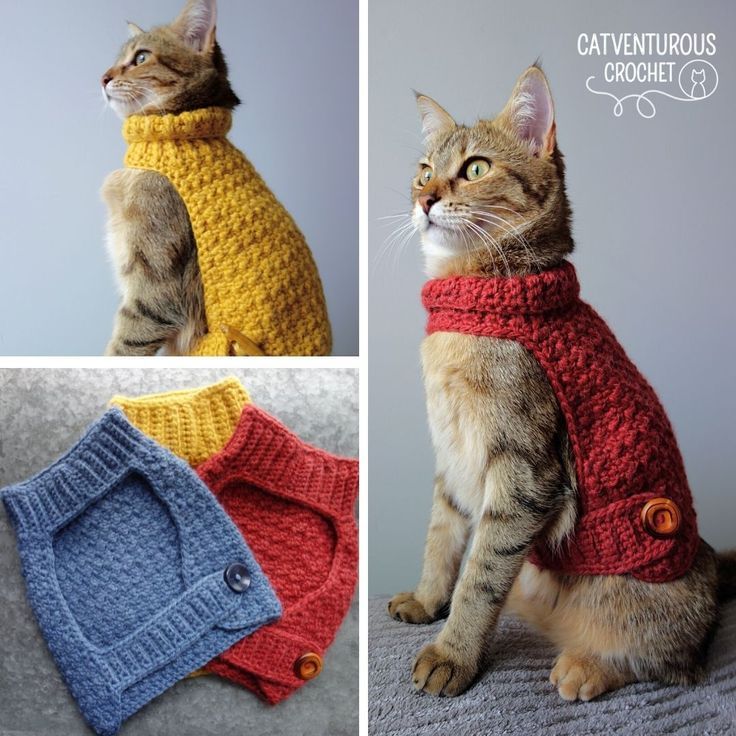
Tools: You will need a 4.0 mm (G) Crochet hook, a yarn needle for weaving in ends, stitch markers, scissors, and 3–4 small buttons. The buttons are essential for the easy-fit design, so choose ones that are smooth and secure. If your pet tends to chew on accessories, make sure the buttons are tightly sewn and durable.
Having these materials organized before you begin makes the entire process flow more smoothly. Set up a comfortable workspace with good lighting, and if possible, keep your cat nearby so you can check sizing as you go. It’s all part of the fun!
Understanding the Crochet Pattern Structure
The Ally Easy Fit Button Up Cat Sweater is constructed from a simple rectangle that is shaped slightly to fit comfortably around the chest. Because of its minimal shaping, this pattern is ideal for beginners who want to practice basic stitches while creating something practical and adorable.
The main body of the sweater is made using a combination of single crochet and half-double crochet stitches. These stitches provide a solid texture that is warm yet flexible. The overall fit is intentionally roomy, giving cats the freedom to move without restriction. The button band is added at the end, giving the sweater a neat, finished look.
Before you begin, take a quick measurement around your cat’s chest and length from neck to shoulder blades. This will help you adjust the number of starting chains or rows if needed. Even though this Crochet pattern is “easy fit,” personalizing the size ensures maximum comfort for your pet.
Step-by-Step: Creating the Body of the Sweater
Start by making a foundation chain that matches the width of your cat’s body from neck to belly. This chain typically ranges between 32 and 42 stitches for most cats, but you can adjust based on your measurements. Once the chain is ready, work one row of single Crochet across. This sets the foundation for a strong and sturdy edge.
For the main body section, switch to half-double Crochet and continue working row by row until the piece reaches the length needed to comfortably wrap around your cat. Most sweaters require approximately 18 to 24 rows, but feel free to test the fit as you go to ensure accuracy. Remember to keep your tension relaxed so the fabric remains soft and stretchy.
Once the rectangle reaches the desired size, you’re ready to shape the arm openings. This part might sound challenging, but it’s incredibly beginner-friendly. Simply mark two small gaps on both sides of your next row, skip the stitches within those areas, and continue working across the rest of the row. On the following row, Crochet normally into each stitch to complete the armhole structure.
Adding the Button Band
Now that your main rectangle is complete, it’s time to create the signature feature of this Crochet pattern: the button-up band. This band adds style, functionality, and makes dressing your cat easier than ever. Start by turning your piece so the shorter side faces you. Attach your yarn to the corner where you want the buttons to be placed.
Work single Crochet stitches evenly across the entire side edge. The number of stitches will depend on the height of your sweater, but aim for a smooth and even distribution. This row creates the first layer of stability. Work 2–3 more rows of single Crochet to build a thicker, more durable button band that will hold its shape over time.
On the opposite side of the sweater, repeat this process to create the buttonhole band. When working your second or third row, space out small chain gaps that match the size of your buttons. A typical buttonhole can be made by chaining 2–3 stitches and skipping the same number of stitches below. Finish the row normally, and your buttonhole band is complete.
With both bands completed, lay your sweater flat and align the sides. Try wrapping the sweater loosely around your cat to be sure everything fits properly. If adjustments are needed, you can easily add or remove a row of Crochet from the body section. Once you are happy with the fit, sew the buttons directly across from the buttonholes using a needle and yarn.
Next, it’s time to secure the armholes for added comfort. Using your hook and yarn, work a round of single Crochet around each armhole to give them a clean, professional edge. This step also prevents stretching over time. Be sure not to pull too tightly, or the holes may become restrictive.
Finally, weave in all loose ends with your yarn needle. Take your time during this step, as neatly woven ends help your sweater look polished and durable. Give the piece a gentle stretch to settle the stitches, and admire your finished Ally Easy Fit Button Up Cat Sweater—you made it!
Ideas for Customization
One of the joys of working with any Crochet pattern is the opportunity to customize it. You can easily tailor this cat sweater to fit your pet’s personality by playing with colors, stitch patterns, or embellishments. A striped version looks adorable, while solid pastel shades give the sweater a soft, cozy feel.
If you want to level up the design, try alternating rows of different stitches such as puff stitches or cross stitches for added texture. These modifications won’t change the basic construction but will give your sweater a unique visual appeal. Embroidery is another charming option—simple hearts, tiny paw prints, or your pet’s initials can be added after finishing the main piece.
For cats that love comfort, consider adding a soft ribbed collar. This small detail makes the sweater feel more snug while adding a stylish finishing touch. Since the sweater already features an easy button-up design, customizing the collar is optional but fun for crafters who enjoy experimenting.
Conclusion – Share Your Cozy Creation!
Congratulations! You’ve completed the Ally Easy Fit Button Up Cat Sweater, a Crochet project that is both cute and incredibly functional. Whether you followed the pattern exactly or added your own creative twists, your handmade piece is something to be proud of. Creating something with your own hands—especially something your pet can enjoy—is one of the most rewarding feelings in the Crochet world.
PATTERN HERE
Crochet – Tutorial
FULL PATTERN ACCESS
You will be redirected to another site
Now that your sweater is ready, don’t forget to try it on your cat and capture a few adorable photos. Sharing your work inspires other beginners to try Crochet and gives you a beautiful memory of your crafting journey. If you have a crafting group or online community, this is the perfect time to show off your finished project.
Feel free to share your version of this Crochet pattern, discuss your experience, and encourage others to give it a try. Handmade pieces carry love in every stitch—and your cat will surely feel it. Happy Crocheting!