
Creating handmade accessories is one of the most satisfying parts of the quilting journey, especially when the project is both adorable and useful. The Cat Zippered Pouch is a perfect example of how creativity and practicality can come together in one charming design. With its playful cat face shape and functional zipper closure, this pouch quickly becomes a favorite among crafters of all levels.
This tutorial was designed with beginners in mind, making it accessible even if you are new to sewing or quilting. The project introduces basic construction techniques while allowing room for creativity and personalization. Whether you are exploring quilting for the first time or looking for a quick and rewarding project, this pouch is an excellent choice.
Throughout this guide, you will find a complete step-by-step process, a detailed materials list, and plenty of ideas to make the pouch uniquely yours. The tutorial naturally incorporates Quilt and QuiltingPattern concepts, helping you build confidence while working on a fun and charming project.
Understanding the Cat Zippered Pouch Design
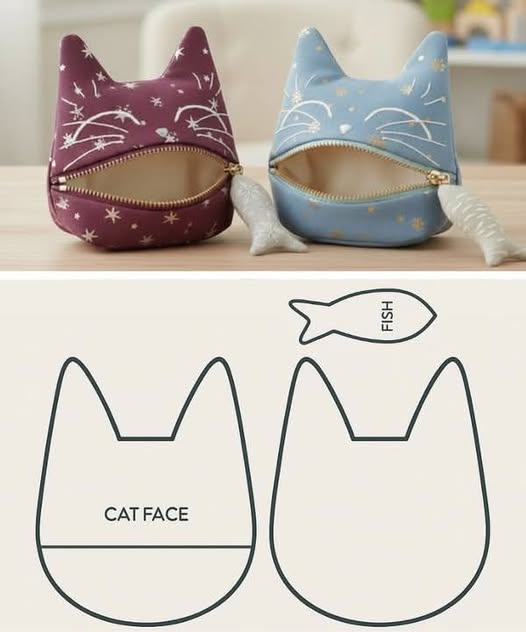
The Cat Zippered Pouch stands out because of its simple yet expressive shape. The curved bottom and pointed ears instantly give the impression of a cat’s face, while the zipper cleverly acts as the mouth. This design works beautifully for storing small items like makeup, sewing notions, coins, or even gifts.
From a quilting perspective, this project is an excellent way to practice working with layers. You will be combining outer fabric, batting, and lining, which reflects the core principles of a Quilt on a smaller scale. This makes the pouch a wonderful introduction to QuiltingPattern concepts without the commitment of a large project.
Another advantage of this design is its adaptability. You can keep it minimal for a clean, modern look or add embroidered whiskers, appliqué details, or decorative stitching. The base structure remains simple, while the surface design allows endless creative expression.
Materials and Tools You Will Need
Before starting your Cat Zippered Pouch, gathering the right materials will help ensure a smooth and enjoyable process. Choosing quality fabrics and tools also improves the final look and durability of your pouch. This project is small, making it ideal for using fabric scraps from other Quilt projects.
You will need two pieces of outer fabric, two pieces of lining fabric, and two pieces of lightweight batting. Cotton fabric works best, especially quilting cotton, because it is easy to handle and presses well. Using coordinating or contrasting prints can dramatically change the character of your pouch.
In addition to fabric, you will need a zipper that matches the width of your pouch, scissors or a rotary cutter, pins or clips, a sewing machine, thread, and a fabric marker. These basic tools are commonly used in QuiltingPattern projects, making this pouch a great way to become familiar with essential quilting supplies.
Preparing the Pattern and Cutting the Fabric
The first step in constructing your Cat Zippered Pouch is preparing the pattern. You can draw the cat shape on paper, focusing on a rounded base and two symmetrical ears at the top. Keeping the lines smooth helps ensure even stitching and a professional finish.
Once the pattern is ready, place it on your fabric and cut two outer pieces, two lining pieces, and two batting pieces. Precision during this step is important, as consistent shapes will make assembly much easier. Taking your time here prevents alignment issues later in the process.
This stage reflects a core principle of Quilt construction: accurate cutting leads to better results. Even in small QuiltingPattern projects, careful preparation makes sewing more enjoyable and reduces frustration, especially for beginners.
Quilting the Outer Panels
Quilting the outer panels adds structure and visual interest to your pouch. Place each outer fabric piece on top of a batting piece, right side facing up. You can quilt straight lines, gentle curves, or simple geometric patterns depending on your style.
For beginners, straight-line quilting is a great starting point. Use a walking foot if available, and stitch evenly spaced lines across the fabric. This not only secures the layers but also gives your pouch a polished, quilted appearance.
Quilting these panels transforms the pouch into a miniature Quilt, reinforcing essential QuiltingPattern techniques. It also adds durability, ensuring the pouch keeps its shape even with frequent use.
Installing the Zipper
Installing the zipper may feel intimidating, but breaking it into small steps makes it manageable. Place the zipper face down along the top edge of one outer quilted panel. Then place a lining piece on top, right side down, creating a fabric-zipper sandwich.
Sew along the zipper edge using a zipper foot, then repeat the process for the other side of the zipper with the remaining outer and lining pieces. Take your time to align edges carefully, as this ensures the zipper opens and closes smoothly.
This step introduces a valuable QuiltingPattern skill: precision assembly. Mastering zippers opens the door to many Quilt-inspired accessories, making this a very useful technique for future projects.
Assembling the Pouch Body
With the zipper installed, it is time to assemble the pouch body. Open the zipper halfway before sewing, which is essential for turning the pouch right side out later. Align the outer fabric pieces together and the lining pieces together, right sides facing.
Pin or clip around the edges, leaving a small opening in the lining for turning. Sew around the perimeter, carefully pivoting around the curves and ears. Clipping curves after sewing helps the fabric lie flat when turned.
This stage highlights how QuiltingPattern principles apply to three-dimensional projects. Careful seam allowance and attention to detail ensure the finished pouch looks neat and professional.
Once the pouch is sewn, gently turn it right side out through the opening in the lining. Push out the ears carefully using a blunt tool, taking care not to damage the fabric. Smooth the seams and press lightly with an iron.
Close the opening in the lining with a hand stitch or a narrow machine stitch. Tuck the lining inside the pouch and give it one final press to set the shape. The zipper should now form the cat’s mouth, completing the playful design.
This final step brings the project together and showcases the satisfaction of finishing a handmade Quilt-inspired accessory. Even beginners will feel proud seeing the pouch come to life.
Creative Personalization Ideas
One of the most enjoyable parts of this project is personalization. You can add embroidered eyes, whiskers, or noses to enhance the cat face. Appliqué details or fabric paint can also bring personality to your pouch.
Color choices play a big role as well. Soft pastels create a gentle, cute look, while bold prints make the pouch more playful and modern. Mixing textures, such as linen and quilting cotton, adds depth and visual interest.
These creative choices reflect the freedom found in Quilt and QuiltingPattern projects. Each pouch becomes a unique expression of your style, making it perfect for gifts or personal use.
Tips for Beginners and Common Mistakes to Avoid
If you are new to sewing or quilting, take your time and enjoy the process. Using clips instead of pins can make handling curved edges easier. Pressing seams frequently also helps achieve a cleaner finish.
One common mistake is forgetting to open the zipper before sewing the pouch closed. Always double-check this step to avoid frustration. Another tip is to test stitch length and tension on scrap fabric before starting.
Learning from small projects like this builds confidence and prepares you for larger Quilt and QuiltingPattern challenges. Every finished pouch is a step forward in your creative journey.
Why This Project Is Perfect for Quilters
The Cat Zippered Pouch is more than just a cute accessory. It reinforces essential quilting skills such as layering, quilting, precise cutting, and assembly. These techniques translate directly into larger Quilt projects.
Because the pouch is small, it is quick to complete and ideal for using leftover fabric. This makes it an excellent addition to any QuiltingPattern collection, especially for those who enjoy practical handmade items.
Whether you are practicing skills or creating gifts, this project offers both learning and enjoyment. It proves that quilting can be playful, functional, and deeply satisfying.
Share Your Finished Cat Zippered Pouch
Completing your Cat Zippered Pouch is an achievement worth celebrating. Every handmade project carries your creativity and effort, making it truly special. Sharing your finished pouch can inspire others to start their own quilting journey.
Consider posting photos on social media, sharing with friends, or adding your own creative variations. Each version adds to the rich world of Quilt and QuiltingPattern inspiration that connects crafters worldwide.
If you enjoyed this tutorial, don’t forget to share your project and spread the joy of handmade quilting. Your creativity might be exactly what inspires someone else to begin their next sewing adventure.