
Creating a tiny hummingbird with Crochet is not only relaxing but also deeply satisfying. From the very first stitch, this Tiny Hummingbird Crochet Pattern allows beginners to explore delicate details while still using simple and accessible techniques. Moreover, this project is ideal for anyone who enjoys small handmade decorations filled with personality and charm.
Hummingbirds symbolize joy, lightness, and resilience. Therefore, crocheting one can feel especially meaningful. In addition, this Crochet project works beautifully as home décor, a handmade gift, or even a unique accessory. Because of its small size, it is also a great option for using leftover yarn.
Throughout this step-by-step tutorial, you will learn how to create a Tiny Hummingbird Crochet Pattern from start to finish. Most importantly, the instructions are written in a clear and beginner-friendly way, ensuring that even those new to Crochet can follow along with confidence.
Materials and Tools You Will Need
Before you begin your Tiny Hummingbird Crochet Pattern, it is essential to gather all the necessary materials. Having everything prepared beforehand will help you stay focused and enjoy the process without interruptions. Additionally, using the right supplies ensures a cleaner and more professional result.
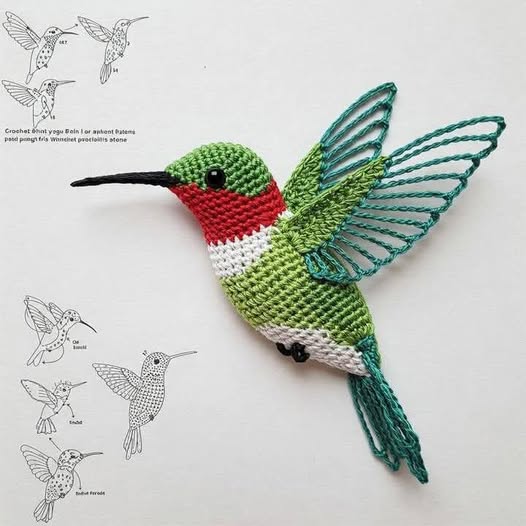
For this Crochet project, you will need lightweight yarn, preferably cotton or acrylic. Common color choices include green for the body, red and white for the chest, black for the beak, and a contrasting shade such as turquoise or light blue for the wings. Furthermore, a Crochet hook between 2.0 mm and 2.5 mm is ideal for maintaining tight and even stitches.
In addition to yarn and hook, you will also need fiberfill stuffing, safety eyes or embroidery thread, a yarn needle, scissors, and stitch markers. Altogether, these simple tools make this Crochet Pattern accessible and perfect for beginners.
Understanding the Tiny Hummingbird Crochet Structure
To begin with, this Tiny Hummingbird Crochet Pattern is based on basic amigurumi techniques. The bird is created in separate parts, which are later assembled to form a complete and charming piece. As a result, the pattern is easier to manage, especially for beginners.
Most of the Crochet work is done in continuous rounds using single crochet stitches. Therefore, it is important to keep track of your stitches and rounds. Increases and decreases are used gradually to shape the body and head, creating a smooth and natural form.
Meanwhile, the wings and tail are made separately using chain stitches. This technique creates a light and airy look, which perfectly matches the hummingbird’s delicate appearance. Overall, the structure of this Crochet Pattern balances simplicity with visual impact.
Step-by-Step Crochet Pattern: Body and Head
First, start your Tiny Hummingbird Crochet Pattern by creating a magic ring using green yarn. Work six single crochet stitches into the ring. Next, increase evenly in each round until the body reaches the desired width.
As you continue crocheting, you will begin shaping the body. At this stage, carefully introduce color changes to form the red and white chest area. Fortunately, these color transitions are simple and beginner-friendly. By changing yarn at the beginning of a round, you can create clean and defined color sections.
After that, continue crocheting in green yarn to form the upper body and head. Once the shape is almost complete, lightly stuff the piece with fiberfill. Then, gradually decrease the stitches to close the head. Finally, fasten off and weave in the yarn end securely.
Creating the Beak, Eyes, and Facial Details
Next, it is time to add the facial features that bring your Crochet hummingbird to life. The beak is made separately using black yarn. To do this, crochet a narrow tube using single crochet stitches, keeping your tension tight and consistent.
Once the beak is finished, sew it onto the front of the head using a yarn needle. Make sure it is centered and aligned properly. Meanwhile, add the eyes using small safety eyes or simple embroidery stitches, depending on your preference.
Although these details are small, they make a big difference. Therefore, take your time with this step. Even subtle adjustments can add personality and expression to your Tiny Hummingbird Crochet Pattern.
Crochet Wings and Tail Tutorial
After completing the body, you can move on to the wings, which are one of the most eye-catching parts of this Crochet Pattern. Begin by attaching yarn at the wing base and chaining several stitches to create the first feather strand.
Then, work back along the chain using slip stitches or single crochet stitches. Repeat this process multiple times to create layered wing strands. As a result, the wings will have a light, open, and elegant look.
Similarly, the tail is created using longer chains and simple stitches. Once finished, attach the wings to each side of the body and sew the tail at the back. At this point, adjust the angle slightly to create a natural flying pose.
Assembly and Finishing Touches
Now that all parts are complete, it is time to assemble your Tiny Hummingbird Crochet Pattern. Begin by positioning the wings evenly on both sides of the body. Then, sew them in place with small and secure stitches.
Next, attach the tail firmly at the back. Make sure all parts are balanced and symmetrical. Additionally, double-check that the beak and eyes are well secured, especially if the piece will be handled frequently.
Finally, weave in any remaining yarn ends and gently shape the bird with your hands. As a finishing touch, lightly adjust the wings and tail to enhance the overall appearance of your Crochet project.
Personalization Ideas for Your Crochet Hummingbird
One of the greatest advantages of this Tiny Hummingbird Crochet Pattern is its versatility. For example, you can easily change the color palette to match your personal style or home décor.
Moreover, using metallic or variegated yarn for the wings can add sparkle and texture. Alternatively, you can increase the size by choosing thicker yarn and a larger hook, resulting in a bigger decorative piece.
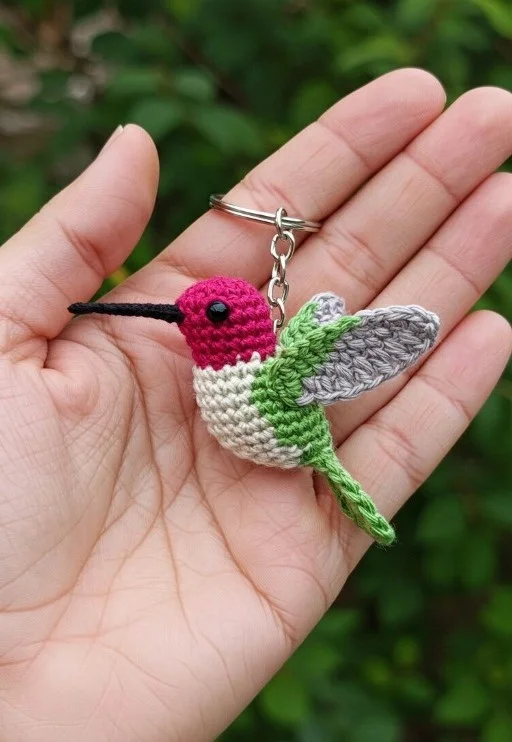
In addition, consider adding accessories such as beads, embroidery details, or a hanging loop. With these small changes, this Crochet Pattern can become a keychain, ornament, or thoughtful handmade gift.
Tips for Beginners Working with Tiny Crochet Patterns
Working with small Crochet projects can feel challenging at first. However, with patience and practice, it becomes much easier. Using a smaller hook helps maintain tight stitches and prevents gaps.
Furthermore, stitch markers are extremely helpful for keeping track of rounds. Take regular breaks to avoid hand strain, especially when working with fine yarn and tiny stitches.
Most importantly, remember that every handmade piece is unique. Therefore, do not worry about minor imperfections. Each Tiny Hummingbird Crochet creation has its own charm.
Final Thoughts and Invitation to Share Your Project
Overall, creating a Tiny Hummingbird Crochet Pattern is a delightful and rewarding experience. Not only does it help improve your Crochet skills, but it also results in a beautiful handmade piece filled with meaning.
By following this step-by-step tutorial, you can confidently complete your project and explore endless personalization options. As a result, each hummingbird becomes a reflection of your creativity.
Finally, once your Crochet hummingbird is finished, take photos and share your project with others. Inspire fellow crafters, spread creativity, and celebrate the joy of Crochet one stitch at a time.
Tiny Hummingbird Crochet – Materials Used
To make this Tiny Hummingbird Crochet project, you will need the following materials:
- Fine cotton or acrylic yarn (amigurumi weight)
- Light green (main body)
- Dark green or turquoise (wings and tail)
- Red (neck area)
- White (chest stripe)
- Black (beak and details)
- Crochet hook 2.0 mm or 2.5 mm
- Safety eyes 5 mm or 6 mm (or black yarn for embroidery)
- Fiberfill stuffing
- Yarn needle
- Scissors
- Stitch marker (optional but helpful)
Stitches Used
- Chain (ch)
- Single crochet (sc)
- Increase (inc)
- Decrease (dec)
- Slip stitch (sl st)
Step-by-Step Crochet Pattern – Body and Head
The body and head are worked in continuous rounds (do not join rounds).
- With green yarn, make a magic ring with 6 sc
- Round 2: inc in each stitch (12 sc)
- Round 3: (1 sc, inc) x6 (18 sc)
- Round 4: (2 sc, inc) x6 (24 sc)
- Rounds 5–8: 24 sc
Now begin the color changes to create the chest:
- Change to red yarn
Rounds 9–11: 24 sc - Change to white yarn
Rounds 12–13: 24 sc - Change back to green yarn
Rounds 14–18: 24 sc
Start shaping the head:
- (2 sc, dec) x6 (18 sc)
- (1 sc, dec) x6 (12 sc)
Insert the safety eyes between rounds 16 and 17
Stuff the body lightly with fiberfill
- Round 21: 6 dec
Fasten off and close the opening.
Step-by-Step – Beak
With black yarn:
- Chain 6
- Starting from the second chain, work 5 sc
- Work 2–3 more rows of 5 sc
Fasten off, leaving a long tail.
Sew the beak centered on the front of the head.
Step-by-Step – Wings (Decorative Open Wings)
Make two wings, using dark green or turquoise yarn.
- Attach yarn at the wing base
- Chain 12
- Slip stitch back along the chain
- Chain 14, slip stitch back
- Chain 16, slip stitch back
- Repeat until you have 5–6 feather loops
Fasten off, leaving yarn for sewing.
Sew one wing on each side of the body, slightly angled upward.
Step-by-Step – Tail
With the same wing color:
- Attach yarn at the back of the body
- Chain 14, slip stitch back
- Chain 16, slip stitch back
- Chain 18, slip stitch back
Fasten off and adjust the strands for a natural tail shape.
Assembly and Finishing
- Make sure all parts are firmly attached
- Weave in all loose ends
- Gently shape the wings and tail with your fingers
Your Tiny Hummingbird Crochet is now finished and ready to be used as decoration, ornament, or gift.
Crochet – Tutorial
FULL PATTERN ACCESS
Pattern Here
You will be redirected to another site