
Materials Needed
Before you begin, gather the following materials:
2 pieces of cotton fabric (about 16” x 16” each)
Fabric scraps (for ears, face, or appliqué details)
Polyester fiberfill stuffing
Matching sewing thread
Fabric marker or tailor’s chalk
Paper (to draw your cat template)
Scissors
Pins or fabric clips
Sewing machine (or hand sewing needle)
Iron
Optional: Buttons or safety eyes (if not for small children)
Step 1: Create Your Cat Template
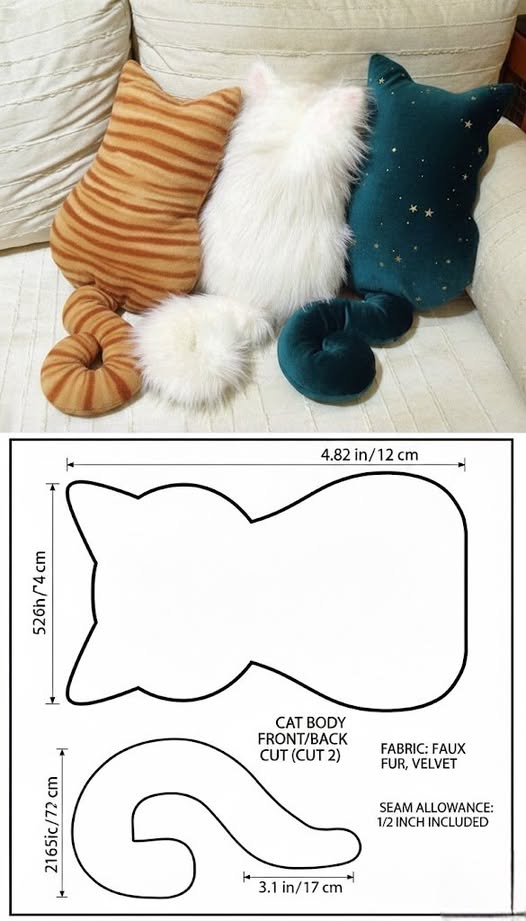
Start by drawing a simple cat shape on paper. Think of a rounded pillow shape with two small triangle ears at the top.
The size is up to you, but 14–16 inches tall is perfect for a decorative pillow.
Make sure both sides are symmetrical.
Cut out the paper template.
Place the template on your folded fabric (right sides together) and trace around it using tailor’s chalk.
Step 2: Cut the Fabric
Cut both layers of fabric at the same time to ensure identical shapes.
If you want contrast ears or belly patches, cut those pieces separately from scrap fabric.
Tip: If adding appliqué details, attach them to the front piece before sewing the pillow together.
Step 3: Add the Face Details
You can decorate the cat’s face in several ways:
Embroider eyes, nose, and whiskers
Sew small fabric pieces for eyes and nose
Use fabric paint
Add safety eyes (only if not for babies)
Keep the design simple for a modern look or add rosy cheeks and closed eyes for a sleeping cat style.
Step 4: Sew the Pillow
Place both main fabric pieces right sides together.
Pin all around the edges.
Sew around the entire shape using a ½ inch seam allowance.
Leave a 2–3 inch opening at the bottom for turning and stuffing.
Clip small notches around curves and near the ears (be careful not to cut the stitching).
This helps the pillow maintain a smooth shape after turning.
Step 5: Turn and Stuff
Turn the pillow right side out through the opening.
Use a pencil or chopstick to gently push out the ears and corners.
Fill the pillow with polyester fiberfill.
Make sure to stuff the ears firmly so they stand nicely. Add filling gradually and evenly for a soft but plump result.
Step 6: Close the Opening
Fold the raw edges inward.
Pin the opening closed.
Hand stitch using a ladder stitch (invisible stitch) for a clean finish.
Your pillow is now complete!
Optional Customization Ideas
You can easily customize your Sewing Cat Pillow:
Add a small bow tie or ribbon
Make different facial expressions
Use floral fabric for a feminine look
Create a black cat for Halloween
Sew a heart patch for Valentine’s Day
Make a larger version as a floor cushion
You could even create a matching set in different colors for a children’s room.
Care Instructions
Spot clean when possible
Hand wash gently if needed
Air dry to maintain shape
Final Thoughts
This Sewing Cat Pillow project is simple, adorable, and perfect for beginners. It’s a great way to practice curves, appliqué, and stuffing techniques without feeling overwhelmed.