Creating your own Bunny Backpack is a delightful and rewarding sewing adventure, especially if you love working with a Quilt aesthetic and playful designs. This tutorial is perfect for beginners who want to explore a functional yet adorable project using a quilt Pattern approach. Not only will you end up with a unique handmade backpack, but you’ll also gain valuable sewing skills along the way.
This Bunny Backpack combines practicality with creativity. Its soft structure, cute bunny ears, and customizable details make it ideal for kids, gifts, or even as a whimsical everyday accessory. Whether you’re new to quilting or already enjoy experimenting with quilt Pattern designs, this project is both approachable and inspiring.
In this step-by-step guide, you’ll learn everything from selecting materials to assembling your backpack, along with creative ideas to personalize your piece. Let’s get started on crafting a Bunny Backpack that’s as unique as you are.
Materials You Will Need
Before diving into your Bunny Backpack project, it’s important to gather all the necessary materials. Having everything ready will make the process smoother and more enjoyable. This project uses basic quilting supplies, making it a great introduction to Quilt techniques.
You will need cotton fabric for the outer layer, lining fabric, and batting to give your backpack that soft quilted texture. Choose fabrics that complement each other—pastel tones or playful prints work beautifully for a bunny theme. You’ll also need thread, scissors, pins or clips, a sewing machine, and a fabric marker. For straps, you can use cotton webbing or make your own fabric straps using your quilt Pattern pieces.
Additional items include a zipper or drawstring closure, depending on your preferred style, and optional embellishments like buttons, embroidery floss, or appliqué fabric. These extras allow you to personalize your Bunny Backpack and make it truly one of a kind.
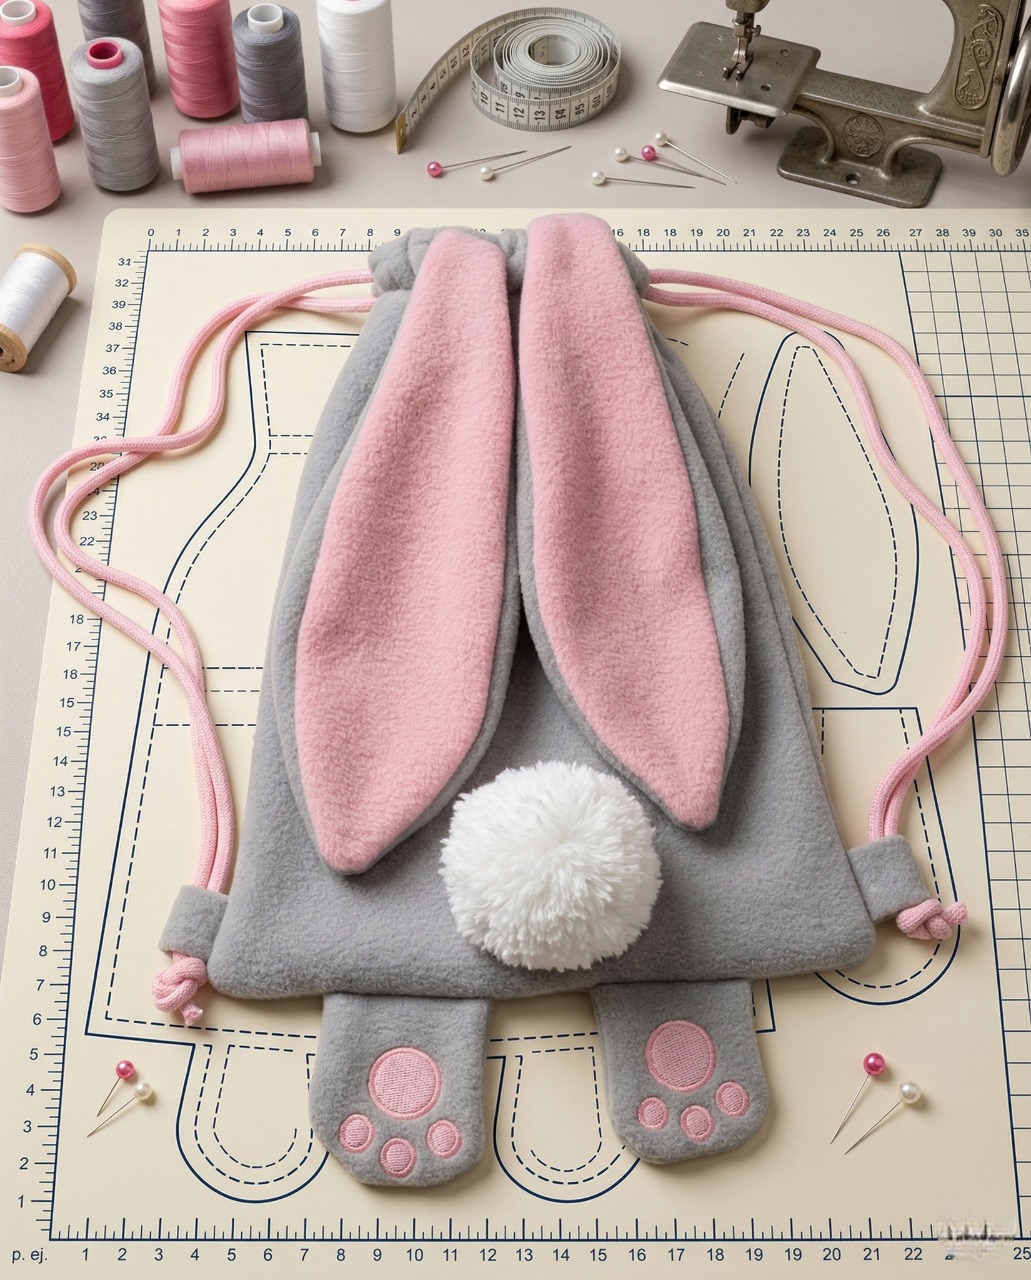
Understanding the Bunny Backpack Quilt Pattern
A well-structured quilt Pattern is the foundation of any successful sewing project. For this Bunny Backpack, the pattern includes several key components: the front and back panels, side panels, base, straps, and decorative bunny ears.
The front panel is where your creativity shines. You can incorporate quilt blocks, patchwork, or even a simple quilt Pattern design to add texture and visual interest. The bunny ears are usually sewn separately and attached to the top seam, giving the backpack its signature look.
Understanding how each piece fits together is crucial. Take a few minutes to review your pattern layout and label your fabric pieces before sewing. This preparation step helps prevent confusion later and ensures a smooth assembly process.
Cutting and Preparing Your Fabric
Start by cutting all your fabric pieces according to your quilt Pattern measurements. Accuracy is key here, as precise cuts will make sewing much easier and result in a more polished final product. Use a rotary cutter and ruler if possible for clean, straight edges.
Next, layer your outer fabric with batting and backing fabric to create quilted panels. You can stitch simple straight lines or experiment with decorative quilting patterns. This step not only strengthens your backpack but also enhances its visual appeal.
Once quilted, trim your panels back to their original dimensions. Be sure to mark important points such as seam allowances and placement lines for straps and ears. Proper preparation at this stage sets the foundation for a successful project.
Sewing the Bunny Ears and Details
The bunny ears are what make this backpack truly special. To create them, cut two pairs of ear shapes—one for the outer fabric and one for the lining. You can use a contrasting fabric for the inner ear to add a pop of color.
Sew each pair together, leaving the bottom open, then turn them right side out and press flat. For added structure, you can insert a small piece of batting or interfacing inside the ears. Topstitch around the edges to give them a clean, finished look.
If you’d like to add a bunny face, now is the perfect time. Use embroidery or fabric appliqué to create eyes, a nose, and whiskers. This step allows you to infuse personality into your Bunny Backpack, making it even more charming.
Assembling the Backpack Body
Now comes the exciting part—bringing your Bunny Backpack together. Start by attaching the front panel to the side panels, followed by the back panel. Sew slowly and carefully, especially around curves, to ensure smooth seams.
Before closing the top, position the bunny ears between the front and back panels. Make sure they are evenly spaced and securely pinned in place. Stitch across the top seam, capturing the ears in the process.
Next, attach the base of the backpack. This step gives your bag structure and stability. Take your time aligning the edges, and clip curves if necessary to help the fabric lay flat. Your backpack should now start to take shape.
Adding Straps and Closure
Straps are essential for functionality, and you have a few options here. You can use pre-made webbing for convenience or create your own straps using quilted fabric strips. Homemade straps allow you to match your quilt Pattern perfectly.
Attach the straps securely to the back panel, reinforcing the stitching for durability. Adjustable straps are a great addition if you want the backpack to grow with its user. You can add sliders and buckles for this purpose.
For the closure, choose between a zipper or a drawstring. A zipper provides a more secure finish, while a drawstring gives a softer, more casual look. Whichever you choose, make sure it is sewn neatly and functions smoothly.

Personalization Ideas for Your Bunny Backpack
One of the best parts of working with a Quilt project is the endless opportunity for customization. You can experiment with different quilt Pattern designs, color palettes, and fabric textures to create a backpack that reflects your personal style.
Consider adding pockets to the interior or exterior for extra functionality. You can also incorporate patchwork elements, mixing different prints to create a vibrant, eye-catching design. Quilting stitches themselves can become decorative features.
For a truly unique touch, try themed variations. Create a pastel bunny for spring, a floral version for summer, or even a festive design for holidays. The versatility of this project makes it perfect for gifts or seasonal crafting.
Tips for Beginners
If you’re new to quilting or sewing, don’t worry—this Bunny Backpack tutorial is beginner-friendly. Start by practicing basic stitches on scrap fabric before working on your main pieces. This helps build confidence and improve accuracy.
Take your time with each step, especially when following the quilt Pattern. Rushing can lead to mistakes, but patience ensures a better result. Use pins or clips generously to keep your fabric aligned while sewing.
Finally, embrace imperfections. Handmade projects have a unique charm that comes from their individuality. Each stitch is part of your learning journey, and every finished piece is something to be proud of.
Final Thoughts and Share Your Creation
Completing your Bunny Backpack is a wonderful achievement, especially if you’re just starting your journey with Quilt projects. This tutorial not only teaches you how to follow a quilt Pattern but also encourages creativity and self-expression.
Your finished backpack is more than just a functional item—it’s a reflection of your effort, imagination, and growing skills. Whether you keep it for yourself or gift it to someone special, it’s sure to bring joy and admiration.
Now it’s your turn to inspire others. Share your Bunny Backpack on social media, your blog, or with friends and family. Your creation might encourage someone else to start their own quilting adventure. Happy sewing!