
Creating your own handmade doll is one of the most rewarding projects in the world of Sewing. Not only do you get to craft something adorable from scratch, but you also create a meaningful piece that can be gifted, cherished, or even sold. This tutorial will guide you step by step through a Cute Doll Sewing pattern designed especially for beginners.
If you’ve ever felt intimidated by Sewing projects, this is the perfect place to start. Dolls are forgiving, fun, and incredibly customizable. You don’t need advanced skills—just a little patience, creativity, and a love for handmade crafts. By the end of this tutorial, you’ll have a finished doll and the confidence to try even more Sewing pattern ideas.
Let’s dive into this creative journey and bring your cute doll to life!
Materials You Will Need
Before starting your project, it’s important to gather all the necessary materials. Having everything ready will make your Sewing process smoother and more enjoyable. Most of these items are beginner-friendly and easy to find in craft stores or online.
You will need cotton fabric for the doll’s body, as it is soft and easy to sew. Choose neutral tones like beige, cream, or light pink. For the clothes, you can pick colorful patterned fabrics to make your doll stand out. You’ll also need polyester fiberfill for stuffing, which gives your doll a soft and plush feel.
Other essential tools include scissors, pins, a sewing needle or sewing machine, matching thread, fabric chalk or a washable marker, and embroidery thread for facial details. Optional items like ribbons, buttons, and lace can add extra charm to your doll and enhance your Sewing pattern.
Understanding the Sewing Pattern
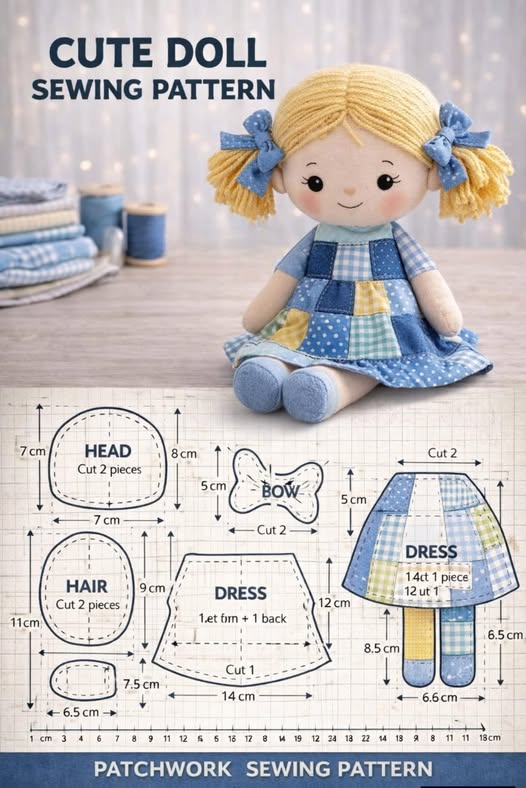
A Sewing pattern is your roadmap for creating the doll. It shows you the shapes and sizes of each piece you need to cut out. For this cute doll, the basic pattern includes the head, body, arms, and legs.
Start by printing or drawing your pattern on paper. Keep the shapes simple, especially if you’re a beginner. Rounded edges and basic forms are easier to sew and assemble. Make sure to label each piece clearly so you don’t get confused during the process.
Once your pattern is ready, place it on your fabric and trace around it using fabric chalk. Remember to leave a small seam allowance (about 0.5 cm) around each piece. This extra space ensures that your doll maintains the correct shape after Sewing.
Cutting and Preparing the Fabric
Careful cutting is an important step in any Sewing project. Take your time to cut each piece neatly, following the outlines of your Sewing pattern. Precision here will make your final result look much more polished.
Pin your fabric layers together before cutting to prevent shifting. This is especially helpful when cutting symmetrical parts like arms and legs. Double-check that you have mirrored pieces where needed.
After cutting, organize your pieces into groups: body, limbs, and clothing. This simple step helps you stay organized and makes the Sewing process more efficient and enjoyable.
Step-by-Step Sewing Instructions
Now comes the exciting part—bringing your doll together! Start by sewing the arms and legs. Place two fabric pieces together (right sides facing in), pin them, and sew along the edges, leaving a small opening for turning and stuffing.
Turn each piece right side out using a pencil or a turning tool. Then, fill them with polyester stuffing until they are soft but firm. Be careful not to overstuff, as this can make Sewing the pieces together more difficult.
Next, sew the body and head pieces in the same way. Once everything is turned and stuffed, attach the limbs to the body using a strong stitch. You can sew them by hand for better control, especially if you’re new to Sewing.
Assembling and Shaping the Doll
With all parts sewn and stuffed, it’s time to assemble your doll. Position the arms and legs where you want them and secure them with pins before stitching. This ensures symmetry and balance in your final piece.
Attach the head to the body carefully, making sure it is centered. Use small, tight stitches to keep it secure. This step is crucial, as the head is the focal point of your doll.
Take a moment to shape your doll by adjusting the stuffing if needed. Smooth out any lumps and ensure everything looks even. This attention to detail will elevate your Sewing pattern result.
Adding Facial Features and Details
This is where your doll truly comes to life. Use embroidery thread to create simple facial features like eyes, a nose, and a mouth. Keep the design minimal for a cute and timeless look.
You can also add blush to the cheeks using a bit of fabric paint or even makeup. This gives your doll a soft and charming expression. If you prefer, you can sew or glue on small beads for eyes, but embroidery is safer, especially for children.
Hair can be made using yarn, felt, or fabric strips. Sew or glue it onto the head, styling it however you like—pigtails, braids, or a simple bob. This step allows you to personalize your Sewing project even further.
Creating and Sewing Doll Clothes
No cute doll is complete without adorable outfits! Use your extra fabric to create simple clothing pieces like dresses, skirts, or overalls. This is a great way to practice more Sewing techniques.
Start with basic shapes and avoid complicated designs. A simple dress can be made with two fabric rectangles sewn together, leaving space for the arms. Add details like lace or buttons for extra charm.
You can even create interchangeable outfits by using snaps or Velcro instead of permanent stitches. This makes your doll more interactive and fun, especially if it’s a gift.
Personalization Ideas
One of the best things about working with a Sewing pattern is the ability to customize your project. You can make each doll unique by experimenting with colors, fabrics, and accessories.
Try different themes, such as seasonal dolls, holiday outfits, or character-inspired designs. You can also vary the size of your pattern to create a whole family of dolls. This adds a creative and playful dimension to your Sewing journey.
Consider adding small accessories like bags, hats, or even tiny plush pets. These details not only enhance your doll but also give you more opportunities to practice and improve your Sewing skills.
Tips for Beginners
If you’re new to Sewing, don’t worry—everyone starts somewhere. Take your time with each step and don’t rush the process. Mistakes are part of learning and help you improve.
Practice basic stitches on scrap fabric before working on your doll. This builds confidence and helps you understand how your sewing machine or needle behaves. Consistency is more important than perfection.
Keep your workspace organized and well-lit. This makes a big difference in your Sewing experience and helps you focus on the details. Most importantly, enjoy the process and celebrate your progress.
Final Thoughts and Share Your Creation
Congratulations! You’ve just completed a Cute Doll Sewing pattern from start to finish. This project is not only a great introduction to Sewing but also a wonderful way to express your creativity.
Handmade dolls carry a special kind of magic. They reflect your effort, imagination, and personal touch. Whether you keep it, gift it, or sell it, your doll is something truly unique.
Now it’s your turn—share your finished project! Post it on social media, show it to friends, or inspire others to start their own Sewing journey. Your creativity might be the spark someone else needs to begin.