
Creating something handmade for your home is always special, and this Bear Rug & 3D Head project is one of those pieces that instantly brings warmth and charm to any space. Whether you’re decorating a nursery, crafting a thoughtful gift, or simply exploring a new crochet pattern, this project is both fun and rewarding.
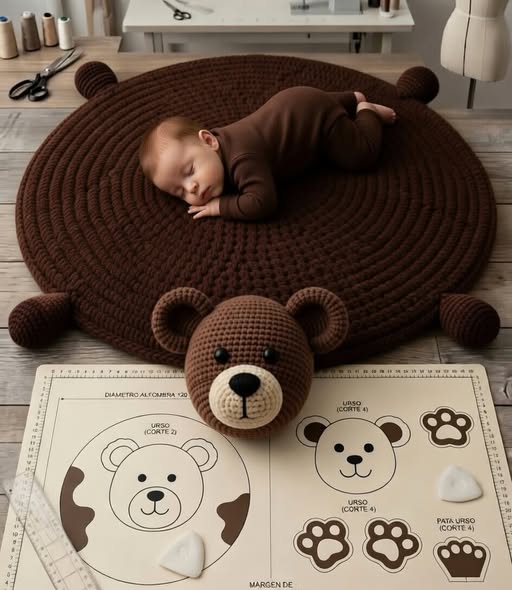
In this tutorial, you’ll learn how to create a soft, round bear rug along with an adorable three-dimensional bear head that gives the piece personality and life. Don’t worry if you’re still a beginner—this guide is designed to walk you through each step in a clear and friendly way.
Let’s dive into this cozy crochet journey and create something truly heart-melting together.
Why You’ll Love This Crochet Project
One of the best things about this bear rug is how versatile it is. You can use it as a decorative rug, a baby play mat, or even a photography prop. The soft texture and cute design make it a favorite for both kids and adults.
Another reason to love this project is that it combines simple crochet techniques with a creative twist. The circular rug uses basic stitches, making it ideal for beginners, while the 3D bear head adds a fun challenge that helps you grow your skills.
Finally, this crochet pattern allows for endless customization. You can change colors, adjust sizes, or even add personal details to make it uniquely yours.
Materials You Will Need
Before starting your crochet project, it’s important to gather all the necessary materials. Having everything ready will make the process smoother and more enjoyable.
You will need bulky or super bulky yarn to give the rug its plush and cozy feel. Cotton or acrylic yarn works well, depending on your preference. Choose soft yarn if the rug is intended for babies or sensitive skin.
Other materials include a large crochet hook (usually 8mm to 12mm depending on your yarn), stuffing for the bear head, a yarn needle, stitch markers, and scissors. Safety eyes or black yarn can be used to create the facial features.
Basic Crochet Skills Required
This project is beginner-friendly, but it does require knowledge of a few basic stitches. If you’re familiar with single crochet, double crochet, and working in the round, you’re ready to go.
You’ll also need to know how to increase stitches to expand your circular rug evenly. This is a key technique that ensures your rug lays flat instead of curling.
For the 3D bear head, basic shaping techniques such as decreasing and stuffing will be used. Don’t worry if this sounds new—practice makes perfect, and this project is a great way to learn.
Step 1: Creating the Circular Rug Base
Start by making a magic ring. This will form the center of your rug. Work several single crochet stitches into the ring and pull it tight to close the center.
Continue working in rounds, increasing evenly in each round. For example, in the second round, increase in every stitch. In the third round, increase every two stitches, and so on. This will help your rug grow into a perfect circle.
Keep expanding until you reach your desired size. Remember to check that your rug is lying flat as you go. If it starts to curl, you may need to add more increases.
Step 2: Adding Texture and Thickness
Once your base is complete, you can add texture by switching stitches. Try using half double crochet or double crochet for a few rounds to create variation.
You can also crochet in the back loop only to give the rug a ridged appearance. This adds depth and makes your project look more detailed and professional.
If you want an extra thick rug, consider holding two strands of yarn together while crocheting. This technique creates a plush and durable finish.
Step 3: Making the Bear Head (3D Piece)
To create the bear head, start with a magic ring and work in continuous rounds. Increase gradually to form a sphere shape.
Once the head reaches the desired size, begin decreasing to close it. Before fully closing, stuff it with fiberfill to give it a soft and rounded look.
Make sure the stuffing is evenly distributed to avoid lumps. A well-shaped head will make your finished project look much more polished.
Step 4: Creating the Ears and Snout
The ears are made by crocheting small circles or semi-circles. You can make two identical pieces and lightly stuff them if you want a more dimensional look.
For the snout, crochet a small oval or circle and attach it to the front of the head. This is where you will add the nose and mouth details.
Use contrasting yarn to embroider the nose and mouth, or attach a safety nose for a more realistic appearance.
Step 5: Assembling the Bear Face
Now comes the fun part—bringing your bear to life. Sew the ears onto the top of the head, making sure they are evenly spaced.
Attach the snout to the center of the face and add the eyes. Positioning is key here, so take your time to get the expression just right.
Once everything is attached, secure all ends tightly. Your 3D bear head is now complete and ready to be added to the rug.
Step 6: Attaching the Head to the Rug
Place the bear head on the edge of the rug to decide the best position. Typically, it sits slightly overlapping the circular base.
Use a yarn needle to sew the head securely onto the rug. Make sure it is firmly attached, especially if the rug will be used by children.
You can also add small crocheted paws around the edges of the rug to enhance the bear design and make it even cuter.
Customization Ideas
One of the most exciting parts of any crochet pattern is making it your own. You can experiment with different colors like beige, white, gray, or even pastel tones for a softer look.
Consider adding a bow, a small hat, or even a name tag to personalize your bear rug. These little details can make your project truly unique.
You can also adjust the size by using thicker yarn or a larger hook. This allows you to create anything from a small mat to a large statement rug.
Tips for Beginners
Take your time with each step and don’t rush the process. Crochet is meant to be relaxing, so enjoy every stitch along the way.
If you make a mistake, don’t be afraid to undo a few rows and try again. Every project is a learning experience that helps you improve your skills.
Finally, keep your tension consistent. This will ensure your rug looks even and professional when finished.
Final Thoughts
This Bear Rug & 3D Head project is a perfect combination of creativity and comfort. It’s a wonderful way to practice your crochet skills while making something functional and adorable.
Whether you’re crafting for yourself or as a gift, this crochet pattern is sure to bring smiles and warmth to anyone who sees it.
Now it’s your turn. Grab your yarn, start stitching, and bring your own bear rug to life. When you’re done, don’t forget to share your creation and inspire others to start their own crochet journey.