
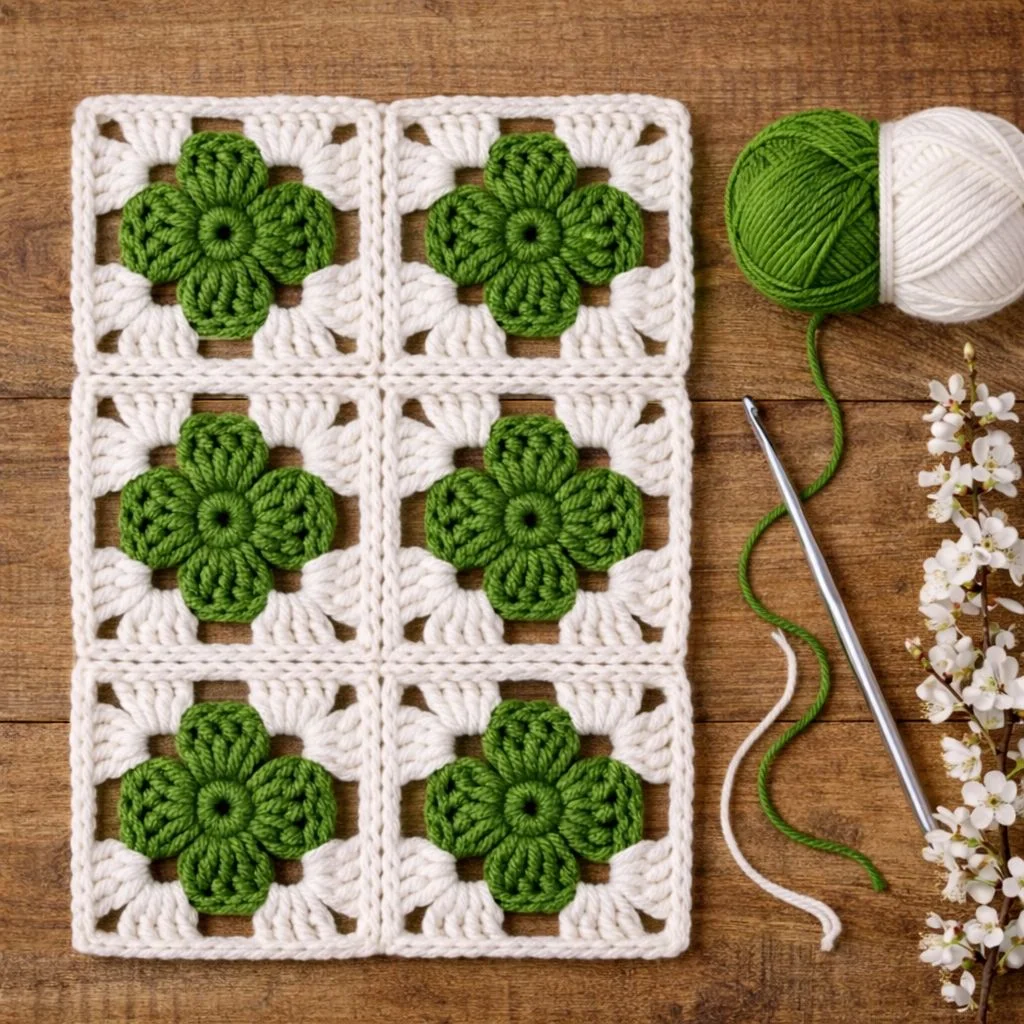
Crochet is one of the most relaxing and rewarding crafts you can learn, and few projects are as iconic as the flower granny square. This beautiful design combines a delicate floral center with a classic square frame, creating a timeless piece that can be used in blankets, bags, cushions, and more. If you’re just starting your crochet journey, this project is a wonderful way to practice essential stitches while creating something truly charming.
The flower granny square is especially popular because it blends creativity with structure. You begin with a simple circular flower and gradually build outward into a square, learning how stitches interact and how shapes are formed. This makes it an excellent crochet pattern for beginners who want to go beyond basic rows and explore more dynamic designs.
In this tutorial, you’ll find everything you need to confidently create your own crochet flower granny square. From materials and step-by-step instructions to customization ideas, this guide is designed to be approachable, inspiring, and easy to follow. Grab your yarn and hook, and let’s get started.
Materials You Will Need
Before diving into your crochet pattern, it’s important to gather the right materials. Having everything ready will make your experience smoother and more enjoyable. The good news is that this project requires only a few basic supplies, making it perfect for beginners.
You will need medium-weight yarn in at least two colors: one for the flower center and petals, and another for the square background. Cotton yarn is a great choice for beginners because it’s easy to handle and provides good stitch definition. You’ll also need a crochet hook that matches your yarn weight, typically around 4.0 mm to 5.0 mm.
Additional tools include a pair of scissors, a yarn needle for weaving in ends, and optional stitch markers to help keep track of your rounds. With these simple materials, you’re ready to begin your crochet flower granny square and bring your pattern to life.
Understanding Basic Crochet Stitches
Before starting the flower granny square, it’s helpful to review a few basic crochet stitches. Most crochet patterns, including this one, rely on foundational techniques such as chain (ch), slip stitch (sl st), single crochet (sc), and double crochet (dc). Mastering these stitches will make the process much easier.
The chain stitch forms the base of many crochet projects and is used to start your work. Slip stitches are often used to join rounds or move your yarn without adding height. Single crochet creates a tight, compact fabric, while double crochet is taller and gives your work a more open, airy feel.
If you’re new to crochet, take a moment to practice these stitches before starting the pattern. Once you feel comfortable, you’ll find that combining them into a flower granny square becomes much more intuitive. This is where the magic of crochet truly begins to shine.
Step-by-Step: Creating the Flower Center
To begin your crochet flower granny square, start with a magic ring or chain four and join with a slip stitch to form a loop. This will serve as the center of your flower. Into this ring, work a series of stitches that will form the base for your petals.
Next, create the first round by working double crochet stitches into the center ring. Typically, you’ll make 12 double crochets, evenly spaced, then join with a slip stitch to the top of the first stitch. This creates a full, rounded base that gives your flower a solid foundation.
For the petals, switch to your second color if desired. Chain stitches and clusters of double crochet or half-double crochet are used to form petal shapes. Repeat the pattern around the circle until you have a complete flower. At this stage, your crochet pattern begins to take on its signature floral look.
Turning the Flower into a Square
Once your flower is complete, it’s time to transform it into a granny square. This is done by building corners around the circular shape. Start by attaching your background color yarn in any space between petals.
Work a combination of double crochets and chain stitches to create the corners. Typically, corners are formed by working two or three double crochets, followed by chain stitches, and then more double crochets in the same space. This creates the sharp angles needed for a square.
Continue working around the flower, placing corner stitches at evenly spaced intervals. By the end of the round, your circular flower will be neatly framed בתוך a square shape. This transformation is one of the most satisfying parts of the crochet process.
Building Additional Rounds
After forming the initial square, you can continue adding rounds to make your granny square larger. Each round follows a similar pattern: double crochets along the sides and corner increases to maintain the square shape.
As your square grows, you’ll notice the pattern becoming more rhythmic and relaxing. This repetitive motion is one of the reasons crochet is so calming. You can easily adjust the size of your square depending on your project needs.
Whether you’re making a blanket or a small decorative piece, adding extra rounds allows you to customize your crochet pattern. Experiment with different color changes to create unique and eye-catching designs.
Tips for Beginners
Starting a new crochet project can feel a bit overwhelming, but a few simple tips can make all the difference. First, keep your tension consistent. This helps your stitches look even and prevents your square from becoming too tight or too loose.
Don’t worry if your first few attempts aren’t perfect. Crochet is a skill that improves with practice, and each square you make will look better than the last. Take your time and enjoy the learning process.
It’s also helpful to follow your crochet pattern step by step without rushing. If you make a mistake, simply undo a few stitches and try again. Patience is key, and soon you’ll be creating beautiful flower granny squares with confidence.
Creative Customization Ideas
One of the best things about crochet is the ability to personalize your projects. With flower granny squares, the possibilities are endless. You can experiment with different color combinations to match your style or seasonal themes.
Try using pastel shades for a soft, romantic look, or bold, vibrant colors for a modern twist. You can also vary the size of your flower petals or add textured stitches for extra dimension. Each variation makes your crochet pattern unique.
Another idea is to combine multiple squares into larger projects like blankets, tote bags, or pillow covers. Mixing and matching colors and layouts allows you to create something truly one-of-a-kind.
Finishing and Joining Squares
Once you’ve completed several flower granny squares, the next step is joining them together. There are several methods you can use, including slip stitch joining, whip stitch, or single crochet joins.
Before joining, make sure all your squares are the same size. Blocking your squares can help even out the edges and improve the overall appearance. This step is especially useful for beginners.
After joining, weave in any loose ends using a yarn needle. This gives your project a clean, polished finish. Taking the time to properly finish your work will make your crochet project look more professional and long-lasting.
Share Your Crochet Creation
Completing your first flower granny square is a wonderful achievement, and it’s something to be proud of. Whether you turn it into a full project or keep it as a sample, each piece represents your growing crochet skills.
Sharing your work is a great way to stay motivated and connect with other crochet enthusiasts. Post your creation on social media, join crochet groups, or gift your handmade piece to someone special. Your creativity can inspire others to start their own crochet journey.
Now it’s your turn to pick up your hook and try this beautiful crochet pattern. Have fun, experiment with colors, and don’t forget to share your finished project. Your flower granny square could be the beginning of many amazing crochet creations to come.
1. Understanding the Crocheted Flower Granny Square Pattern
The crocheted flower granny square pattern starts with a floral design at the center, which gradually expands into a square shape.
This central flower is often made using stitch groups such as clusters, puff stitches, or petal-style stitches that create a rich, textured appearance.
Once the flower is finished, additional rounds are worked to reshape the circular motif into a square form.
One of the most charming aspects of the crocheted flower granny square pattern is the contrast between the rounded flower center and the clean, structured edges of the square.
This pattern is typically created in continuous rounds, beginning in the center and moving outward.
Understanding how each round evolves from a circular flower into a defined square is key to achieving a neat and symmetrical result.
2. Choosing the Right Materials for the Pattern
Selecting appropriate materials plays a big role in the final outcome of your crocheted flower granny square pattern.
Cotton yarn is a popular choice because it offers clear stitch definition and long-lasting durability.
Acrylic yarn is another good option, especially if you prefer a softer and more flexible texture.
Your crochet hook size should suit your yarn type while helping you maintain even and consistent stitches.
Using a variety of colors enhances the flower design and creates beautiful visual contrast.
You will also need basic tools like scissors, a yarn needle, and stitch markers to make the process easier.
Using good-quality materials will improve both the look and the lifespan of your finished squares.
3. Step-by-Step Process for the Flower Granny Square
Making your own crocheted flower granny square pattern becomes much easier when you follow clear steps.
Begin with a magic ring or a chain loop to form the center of the flower.
Work the first round by creating stitches that build the foundation for the petals.
Continue adding rounds to shape and highlight the flower, using stitch groups like clusters or puff stitches.
After completing the flower, start forming the square by adding corner spaces.
Keep working evenly in rounds, expanding all sides to maintain the square shape.
Finish your piece by fastening off the yarn and neatly weaving in all loose ends.
4. Creative Ideas for Flower Granny Squares
The crocheted flower granny square pattern allows for endless creativity and customization.
You can join multiple squares together to create vibrant blankets filled with floral details.
This pattern is also ideal for making pillow covers, tote bags, or decorative wall pieces.
It can even be incorporated into clothing items like cardigans, tops, or scarves.
Playing with different color combinations helps you create unique and eye-catching designs.
Adding borders or textured stitches can give your project extra character.
You can also combine this pattern with other granny square styles for a more interesting and dynamic look.
PATTERN HERE
Crochet – Tutorial
FULL PATTERN ACCESS
You will be redirected to another site