
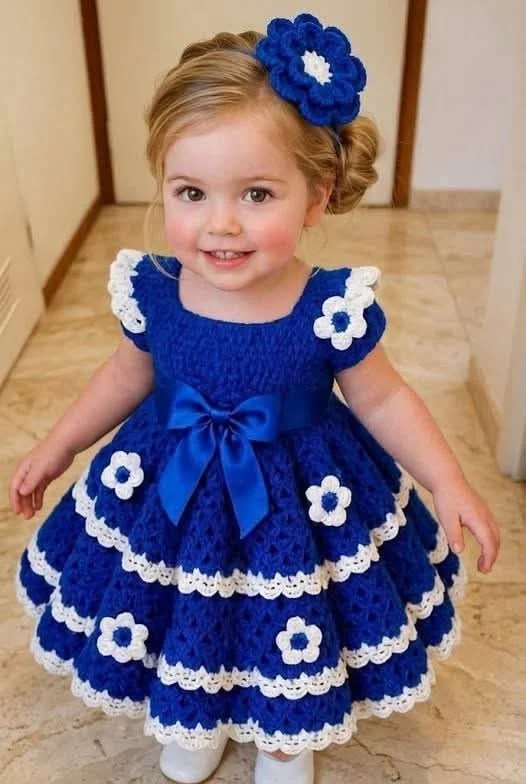
Creating a children’s crochet dress is a rewarding and heartwarming project. Not only do you get to craft something beautiful with your own hands, but you also create a unique piece full of love and personality. This tutorial will guide you through the full process of making a charming crochet dress, similar to the one shown, using simple techniques that are perfect for beginners.
Materials You Will Need
Before starting your children’s crochet dress, gather all the necessary materials. Having everything ready will make the process smoother and more enjoyable.
You will need:
- Medium-weight cotton yarn (Category 3 or 4) in two colors (main color + accent color)
- Crochet hook (size 3.5 mm to 4.5 mm depending on your yarn)
- Scissors
- Yarn needle (for weaving in ends)
- Stitch markers (optional but helpful)
- Satin ribbon (optional for decoration)
- Measuring tape
Choosing soft, breathable yarn is especially important for children’s clothing, as it ensures comfort and flexibility. Cotton yarn is a great option because it is gentle on the skin and easy to work with.
Understanding the Basic Structure
A crochet dress is typically made in sections, starting from the top (yoke) and working downward. This method allows you to easily adjust the size as you go.
The dress is divided into three main parts:
- The top (bodice or yoke)
- The skirt
- Decorative elements (flowers, edging, bow)
Most beginner-friendly crochet dress patterns use basic stitches such as chain (ch), single crochet (sc), double crochet (dc), and slip stitch (sl st). If you are familiar with these, you are ready to begin.
Step 1: Creating the Bodice (Top Part)
Start by making a foundation chain that fits comfortably around the child’s chest. Make sure it is not too tight. Join the chain with a slip stitch to form a circle.
Work in rounds using double crochet stitches to build the bodice. You can add slight increases evenly around to shape the chest area. Continue crocheting until you reach the desired height for the top section.
To create armholes, divide your stitches into front and back sections. Skip stitches where the sleeves will be, and continue working the remaining stitches in the round. This creates space for the arms while maintaining the structure of the dress.
Step 2: Expanding into the Skirt
Once the bodice is complete, it’s time to create the skirt. This is where the dress becomes more flowy and decorative.
Begin increasing stitches evenly around to create a flared effect. You can use a pattern like:
- 2 double crochets in one stitch, then 1 double crochet in the next stitch
Repeat this pattern to gradually widen the skirt. Continue working in rounds, adding more rows until the skirt reaches the desired length.
For a more decorative look, you can alternate rows with different stitches or colors. This creates texture and visual interest in your crochet dress.
Step 3: Adding Decorative Edging
To give your dress a polished and elegant finish, add edging to the skirt and sleeves.
A simple and beautiful edging pattern is:
- Single crochet, chain 2, skip one stitch, repeat
You can also use scallop edging by working multiple double crochets into the same stitch to create a shell-like design. Using a contrasting color for the edging adds a lovely detail, just like in the example dress.
This step enhances the overall appearance and gives your crochet pattern a more professional look.
Step 4: Creating Crochet Flowers
The small crochet flowers are what make this dress truly special. They are simple to make and can be attached anywhere on the dress.
Basic flower pattern:
- Make a magic ring
- Chain 2, then work 10 double crochets into the ring
- Join with a slip stitch
- For petals: chain 2, 2 double crochets, chain 2, slip stitch in next stitch
Repeat around to form petals. Fasten off and leave a tail for sewing.
Make several flowers in your accent color and attach them to the dress using a yarn needle. You can place them along the skirt, near the neckline, or on the sleeves.
Step 5: Adding Finishing Touches
Once all the main pieces are complete, it’s time to assemble and finish your crochet dress.
Weave in all loose ends carefully using a yarn needle. Make sure everything is secure and neat on the inside. Attach your crochet flowers in your desired arrangement.
If you want to add an extra touch of elegance, thread a satin ribbon through the waist area and tie it into a bow. This not only looks beautiful but also allows slight size adjustment.
Try the dress on the child to ensure a good fit. Make any final adjustments if necessary.

Customization Ideas
One of the best parts of working with a crochet pattern is the freedom to customize.
You can:
- Change colors to match seasons (pastels for spring, bold tones for winter)
- Add more layers to the skirt for a fuller look
- Use different flower styles or even add bows
- Experiment with lace stitches for a more delicate design
Each small change can transform the dress into a completely new creation.
Tips for Beginners
If this is your first time making a crochet dress, keep these tips in mind:
Start with a simple design and take your time. Don’t rush through the steps—crochet is meant to be relaxing.
Always check your stitch count at the end of each round. This helps avoid mistakes that can affect the shape of the dress.
Practice your tension. Consistent stitches make a big difference in how the final piece looks.
Final Thoughts
Making a children’s crochet dress is a beautiful and meaningful project. It combines creativity, patience, and skill into something truly special.
This crochet tutorial is designed to be simple, accessible, and enjoyable, even if you are just starting out. With basic stitches and a little dedication, you can create a stunning handmade dress that will be cherished.
Now it’s your turn—grab your yarn and hook, follow this crochet pattern, and start creating. When you finish, share your dress with friends or on social media. Your work might inspire someone else to begin their crochet journey too!
PATTERN HERE
Crochet – Tutorial
FULL PATTERN ACCESS
You will be redirected to another site