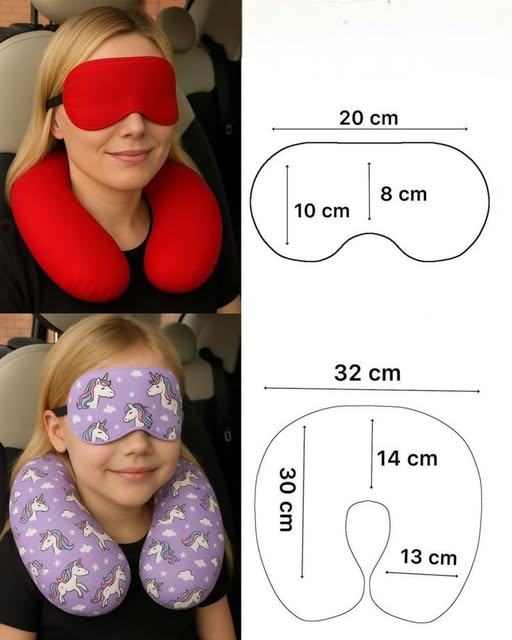
A comfortable neck pillow can make a huge difference during long flights, road trips, train rides, or even while relaxing at home. Instead of purchasing an expensive travel pillow, why not create your own? This easy sewing project is beginner-friendly, requires minimal materials, and can be completed in less than an hour.
The unique U-shaped design provides excellent neck support and helps reduce strain while traveling. Plus, this DIY neck pillow includes a convenient strap that can be attached to luggage, making it easy to carry wherever you go.
Why Make Your Own Travel Neck Pillow?
Sewing your own neck pillow allows you to choose fabrics that match your style while creating a pillow that offers personalized comfort. Handmade travel accessories are also great gifts for family members, frequent travelers, and children.
This project is simple enough for beginners and can even be a fun sewing activity for older kids learning basic sewing skills.
Materials Needed
Before you begin, gather the following supplies:
- 1/4 yard quilting cotton fabric
- 1/4 yard anti-pill fleece fabric
- Lightweight fusible interfacing
- Matching sewing thread
- Polyester fiberfill stuffing
- Snap fastener or Velcro
- Sewing pins or clips
- Fabric scissors
- Measuring ruler
- Iron and ironing board
- Sewing machine
- Hand sewing needle
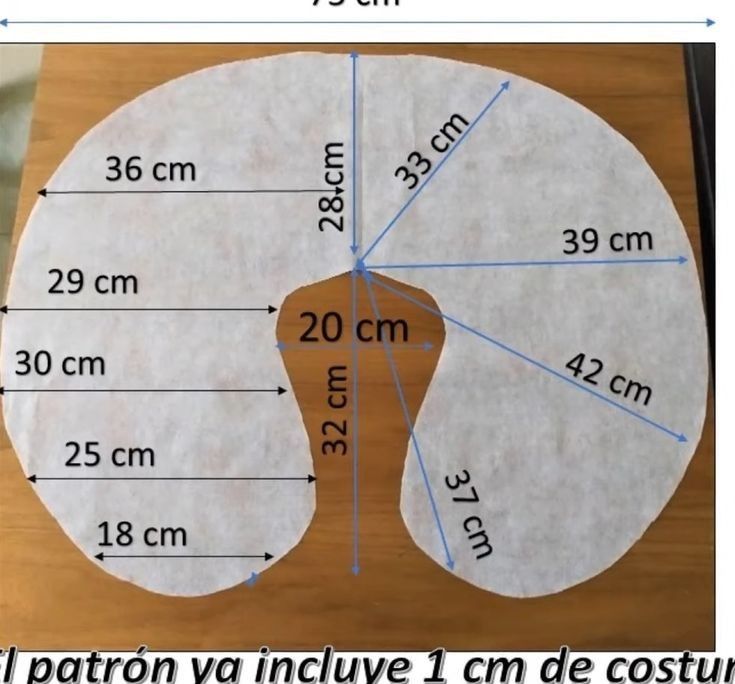
Print and Prepare the Pattern
Download and print the neck pillow pattern at full size on standard Letter or A4 paper.
Carefully trim the pattern pieces and tape them together according to the matching guide marks. Verify that both pieces are printed at the same scale before cutting.
The pattern already includes seam allowances, but you can enlarge the pattern if you prefer a larger pillow.
Cut the Fabric Pieces
Using the pattern template, cut:
- One neck pillow piece from quilting cotton
- One neck pillow piece from fleece
If your fleece has stretch, align the stretch direction according to the pattern markings for maximum comfort and durability.
For the carrying strap, cut:
- Two fabric rectangles measuring approximately 2.5 x 4.75 inches
- Two matching pieces of fusible interfacing
Fuse the interfacing to the wrong side of the fabric pieces using an iron.
Create the Carrying Strap
Fold each strap piece lengthwise with right sides together.
Sew along one long edge and one short edge, leaving one end open.
Trim the corners to reduce bulk, then turn the straps right side out. Use a turning tool or blunt object to push out the corners neatly.
Press the straps flat with an iron.
Assemble the Neck Pillow
Position the finished straps on the outer curve of the cotton neck pillow piece, aligning the raw edges.
Place the fleece piece on top with right sides facing together.
Pin around the entire pillow shape.
Using a 1/4-inch seam allowance, sew around the pillow, leaving a small opening for turning and stuffing.
Backstitch at the beginning and end of the seam for extra strength.
Turn and Stuff the Pillow
Carefully turn the pillow right side out through the opening.
Use a blunt tool to gently shape the curves and edges.
Fill the pillow with polyester fiberfill until it reaches your preferred firmness. Distribute the stuffing evenly throughout the pillow to prevent lumps.
Close the Opening
Hand sew the opening closed using an invisible ladder stitch.
This technique creates a clean, professional finish that blends seamlessly with the rest of the pillow.
Secure the thread with a hidden knot and trim any excess.
Install the Fastener
Attach a snap fastener or sew Velcro onto the ends of the straps.
The strap allows the pillow to be secured around luggage handles, backpacks, or travel bags, making transportation much easier.
Final Touches
Fluff the stuffing and gently massage the pillow to distribute the filling evenly.
Give the pillow a final press if necessary and inspect all seams to ensure durability.
Your handmade travel neck pillow is now ready for your next adventure.
Helpful Tips for Success
- Use high-quality fleece for extra softness.
- Add more stuffing for firmer neck support.
- Choose fun fabric prints to personalize your pillow.
- Wash and dry your fabric before sewing to prevent future shrinkage.
- Consider adding a removable cover for easy cleaning.
Frequently Asked Questions
What is the best filling for a travel neck pillow?
Polyester fiberfill is lightweight, affordable, and easy to wash, making it one of the most popular choices.
Can beginners make this project?
Absolutely. This is an excellent sewing project for beginners and can typically be completed in under one hour.
Can I make a larger pillow?
Yes. Simply enlarge the pattern before cutting your fabric.
Is fleece necessary?
No. You can use minky fabric, flannel, cotton, or other soft materials depending on your preference.
Final Thoughts
This DIY travel neck pillow is a quick, practical, and enjoyable sewing project. Whether you’re preparing for a vacation, making handmade gifts, or looking for a beginner-friendly sewing pattern, this comfortable neck pillow is a great addition to your sewing collection. With just a few basic materials and simple sewing techniques, you can create a professional-looking travel accessory that provides comfort wherever you go.