
A Multipurpose Organizer Pattern is one of the most practical sewing projects you can make. Whether you need to organize sewing supplies, makeup, office accessories, travel essentials, crochet hooks, knitting needles, or everyday items, this organizer offers a stylish and functional solution.
The best part is that this project is beginner-friendly while still allowing experienced sewists to personalize it with creative details. Using cotton fabric, interfacing, and a few simple sewing techniques, you can create a durable organizer that folds neatly and keeps everything in its place.
This tutorial will guide you through every step, from choosing fabrics to assembling the organizer, making it easy to create a professional-looking project you’ll enjoy using every day.
Why You’ll Love This Organizer
A handmade multipurpose organizer is:
- Perfect for beginners
- Quick to sew
- Great for organizing small accessories
- Easy to customize
- Wonderful as a handmade gift
- Ideal for travel
- Eco-friendly and reusable
You can adjust the pocket sizes to fit almost anything, making this one of the most versatile sewing projects.
Finished Size
Approximate finished size (closed):
8 x 10 inches (20 x 25 cm)
Opened:
16 x 10 inches (40 x 25 cm)
Feel free to resize according to your needs.
Materials Needed
- 2 pieces of cotton fabric for the exterior
- 2 pieces of coordinating cotton fabric for the lining
- Medium-weight fusible interfacing
- Lightweight batting (optional)
- Matching sewing thread
- Fabric clips or pins
- Rotary cutter
- Cutting mat
- Acrylic ruler
- Fabric scissors
- Iron
- Sewing machine
- Wonder clips (optional)
- Elastic band (optional)
- Ribbon or fabric tie
- Snap button, magnetic snap, or Velcro
- Water-soluble fabric marker
Fabric Cutting Guide
Exterior Fabric
- 2 rectangles measuring 9 x 11 inches
Lining Fabric
- 2 rectangles measuring 9 x 11 inches
Interfacing
- 2 rectangles measuring 9 x 11 inches
Batting (Optional)
- 1 rectangle measuring 9 x 11 inches
Pocket Pieces
- 1 large rectangle: 9 x 8 inches
- 2 medium rectangles: 9 x 6 inches
- 2 small rectangles: 9 x 4 inches
Adjust these measurements depending on the items you plan to store.
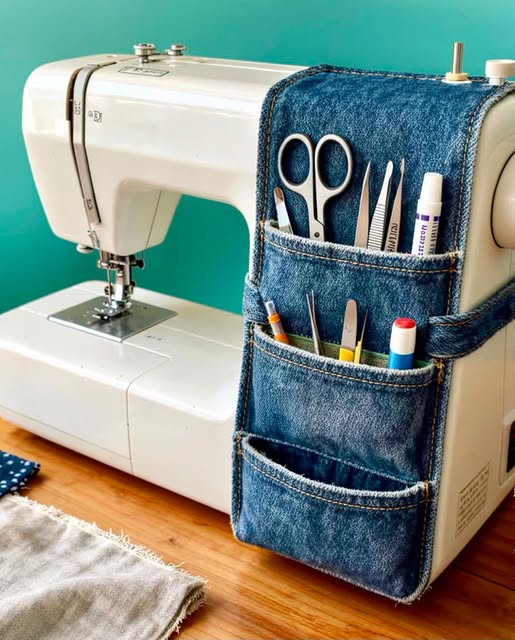
Step 1 – Prepare the Fabrics
Wash and press all fabrics before cutting.
Fuse the interfacing to the wrong side of the exterior fabric according to the manufacturer’s instructions.
If using batting, layer it behind the exterior fabric to provide extra stability while maintaining flexibility.
Step 2 – Prepare the Pocket Pieces
Fold each pocket piece in half with the right sides together.
Sew along the long edge.
Turn the pockets right side out.
Press each pocket flat and topstitch along the folded edge for a clean professional finish.
Repeat for all pocket pieces.
Step 3 – Arrange the Pockets
Lay one lining panel flat.
Position the largest pocket near the bottom and pin it in place.
Sew along both sides and the bottom edge.
Repeat with the medium and small pockets, leaving enough space between each section for easy access.
Step 4 – Divide the Pockets
Use a ruler and fabric marker to draw vertical stitching lines.
These stitching lines create individual compartments for different tools.
Sew along each marked line and reinforce the beginning and end of every seam with backstitching.
Step 5 – Add Elastic Holders (Optional)
Cut several pieces of elastic.
Pin them into loops sized for your tools.
Sew each end securely.
Elastic loops are ideal for crochet hooks, knitting needles, pens, makeup brushes, scissors, or small tools.
Step 6 – Install the Closure
Choose your preferred closure.
Options include:
- Fabric ties
- Ribbon
- Velcro
- Magnetic snap
- Snap button
- Elastic loop and button
Attach the closure before joining the exterior and lining pieces.
Step 7 – Assemble the Organizer
Place the exterior and lining right sides together.
If using batting, place it behind the exterior fabric.
Clip all layers together.
Sew around the organizer using a ¼-inch seam allowance, leaving a 4-inch opening for turning.
Trim the corners.
Turn the organizer right side out.
Push the corners into shape and press thoroughly.
Step 8 – Finish the Organizer
Close the turning opening with a narrow topstitch around the entire organizer.
This strengthens the edges while giving the project a polished finish.
Press once more.
Your organizer is now complete and ready to use.
Creative Customization Ideas
Personalize your organizer by adding:
- Patchwork panels
- Quilted exterior
- Decorative embroidery
- Personalized labels
- Monograms
- Lace trim
- Decorative buttons
- Printed fabrics
- Color-block designs
- Vinyl zipper pockets
- Mesh pockets
- Transparent vinyl sections
Every organizer can be completely unique.
What Can You Store?
This organizer is perfect for storing:
- Sewing supplies
- Crochet hooks
- Knitting needles
- Embroidery floss
- Quilting clips
- Rotary cutter accessories
- Makeup brushes
- Cosmetics
- School supplies
- Office accessories
- Phone chargers
- USB cables
- Travel documents
- Jewelry
- Art supplies
- First aid essentials
Sewing Tips
- Use high-quality quilting cotton.
- Add interfacing for extra structure.
- Press after every seam.
- Reinforce stress points.
- Match your thread color to the fabric.
- Test pocket sizes before sewing permanently.
- Clip corners before turning.
- Sew slowly through thick layers.
Care Instructions
Machine wash on a gentle cycle using cold water.
Avoid bleach.
Air dry whenever possible.
Press with a warm iron.
Store in a dry place to help your organizer last for many years.
Great Gift Ideas
A handmade multipurpose organizer makes a thoughtful gift for:
- Quilters
- Sewists
- Crochet enthusiasts
- Teachers
- Students
- Travelers
- Artists
- Makeup lovers
- Office workers
- Friends and family
Pair it with sewing notions, crochet hooks, or craft supplies for an even more memorable handmade gift.
Final Thoughts
A Multipurpose Organizer Pattern is a rewarding sewing project that combines functionality, organization, and creativity. Whether you use it for sewing supplies, crochet tools, makeup, office accessories, or travel essentials, this organizer is both practical and beautiful.
With just a few pieces of fabric, basic sewing supplies, and a little creativity, you can create a durable organizer that reflects your personal style. Experiment with different fabrics, quilting techniques, pocket layouts, and decorative details to make every organizer unique. Once you’ve completed your first one, you’ll likely find yourself making more for family, friends, and every room in your home.