
Handmade baby shoes are one of the most rewarding sewing projects for beginners and experienced crafters alike. They are practical, adorable, and make thoughtful gifts for baby showers, birthdays, or newborn keepsakes. Using a simple sewing pattern, you can create soft, comfortable shoes that are gentle on tiny feet while showcasing your favorite fabrics.
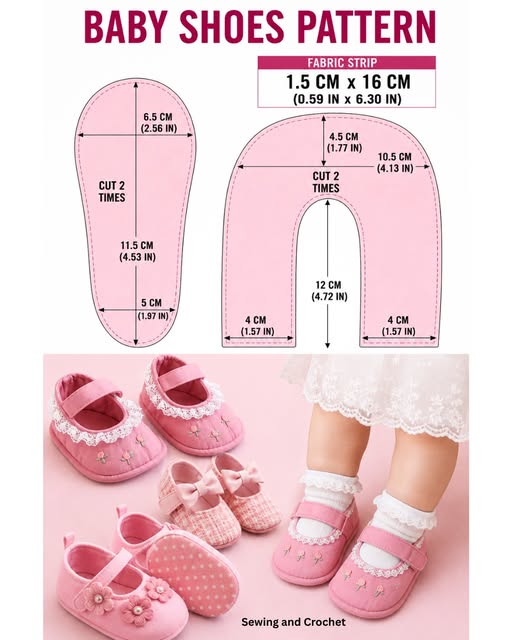
This Baby Shoes Sewing Pattern includes three easy pattern pieces: the sole, the upper, and a fabric strip. Once you prepare your materials and cut your fabric accurately, the assembly process is straightforward and enjoyable. Whether you choose cotton prints, linen, or quilting fabrics, every pair can be customized with different colors and embellishments.
In this tutorial, you’ll find the complete materials list, printable pattern measurements, cutting guide, and detailed sewing instructions to help you create beautiful handmade baby shoes.
Materials Needed
Before you begin, gather the following supplies:
- Cotton fabric (outer fabric)
- Cotton fabric for lining
- Lightweight fusible interfacing (optional but recommended)
- Thin batting or soft fleece (optional for extra cushioning)
- Matching sewing thread
- Fabric scissors
- Rotary cutter and cutting mat (optional)
- Sewing clips or straight pins
- Measuring tape
- Fabric marker or tailor’s chalk
- Iron and ironing board
- Sewing machine
- Hand sewing needle (for finishing if necessary)
Pattern Pieces
Sole
Cut 2 Times
- Overall Length: 11.5 cm (4.53 in)
- Top Width: 6.5 cm (2.56 in)
- Bottom Width: 5 cm (1.97 in)
Upper
Cut 2 Times
- Overall Width: 10.5 cm (4.13 in)
- Top Height: 4.5 cm (1.77 in)
- Center Opening Height: 12 cm (4.72 in)
- Bottom Width (Each Side): 4 cm (1.57 in)
Fabric Strip
- Size: 1.5 cm × 16 cm
- 0.59 in × 6.30 in
Follow the pattern exactly as shown and verify all measurements before cutting your fabric.
Preparing the Fabric
Wash and press your fabric before cutting to prevent shrinkage after the shoes are finished. If you’re using quilting cotton, applying lightweight fusible interfacing will help the shoes hold their shape while remaining soft and comfortable.
Lay your fabric flat and pin the pattern pieces securely. Carefully trace around each piece using tailor’s chalk or a washable fabric marker before cutting.
Take your time during this step because accurate cutting will make sewing much easier.
Cutting Instructions
Cut the following pieces:
Outer Fabric
- 2 Sole Pieces
- 2 Upper Pieces
- 1 Fabric Strip
Lining Fabric
- 2 Sole Pieces
- 2 Upper Pieces
Optional Batting
- 2 Sole Pieces
- 2 Upper Pieces
If using batting, quilt it to the outer fabric before assembling the shoes.
Step-by-Step Sewing Instructions
Step 1 – Prepare the Upper
Place the outer upper fabric and the lining upper fabric with right sides together.
Sew around the curved top edge using a ¼-inch (6 mm) seam allowance.
Turn the piece right side out and press it neatly with an iron.
Topstitch close to the edge if desired for a professional finish.
Step 2 – Prepare the Fabric Strip
Fold the fabric strip in half lengthwise with right sides together.
Sew along the long edge using a narrow seam allowance.
Turn the strip right side out using a safety pin or turning tool.
Press it flat with the seam centered underneath.
This strip can be used as a decorative trim or loop depending on your preferred design.
Step 3 – Attach the Upper to the Sole
Find the center front of the sole and the center of the upper.
Pin or clip the upper evenly around the curved front portion of the sole.
Slowly sew the upper to the sole, easing the fabric gently around the curves without stretching.
Check that both sides remain symmetrical as you sew.
Step 4 – Add the Lining
Place the lining sole over the assembled shoe with right sides facing.
Sew around the entire edge, leaving a small opening of about 5 cm (2 inches).
Clip the curved seam allowances carefully.
Turn the shoe right side out through the opening.
Push out the curves gently using a blunt tool.
Step 5 – Close the Opening
Fold the seam allowance inward.
Hand stitch the opening closed using an invisible ladder stitch, or edge stitch close to the opening with your sewing machine.
Press the shoe once more for a crisp finish.
Step 6 – Finish the Pair
Repeat the entire process for the second shoe.
Compare both shoes to ensure they match in size and shape.
Trim any loose threads and give the shoes one final press.
Your handmade baby shoes are now complete.
Helpful Sewing Tips
- Use clips instead of pins on curved sections.
- Sew slowly around rounded edges.
- Press every seam before moving to the next step.
- Test the pattern using inexpensive fabric before cutting your favorite prints.
- Add non-slip fabric to the sole if the shoes will be used by toddlers learning to walk.
- Choose soft, breathable fabrics for maximum comfort.
Fun Customization Ideas
Make each pair unique with creative embellishments:
- Fabric bows
- Crochet flowers
- Tiny decorative buttons
- Lace trim
- Embroidered initials
- Animal ears
- Patchwork fabric combinations
- Contrast topstitching
- Decorative piping
- Personalized labels
These small details transform a simple sewing project into a memorable handmade gift.
Caring for Handmade Baby Shoes
Wash the shoes gently in cold water using a mild detergent. Allow them to air dry naturally to preserve their shape. If needed, lightly press with a warm iron after drying.
Avoid using bleach or high heat in the dryer, as these may damage delicate fabrics or decorative elements.
Final Thoughts
This Baby Shoes Sewing Pattern is a wonderful beginner-friendly sewing project that comes together quickly while producing a beautiful handmade result. With only a few pattern pieces and basic sewing techniques, you can create soft, comfortable baby shoes that are perfect for everyday wear or as heartfelt gifts.
Experiment with different fabric collections, seasonal prints, or coordinated nursery colors to make every pair unique. Handmade baby shoes are a timeless keepsake that combines creativity, practicality, and the joy of sewing into one delightful project.