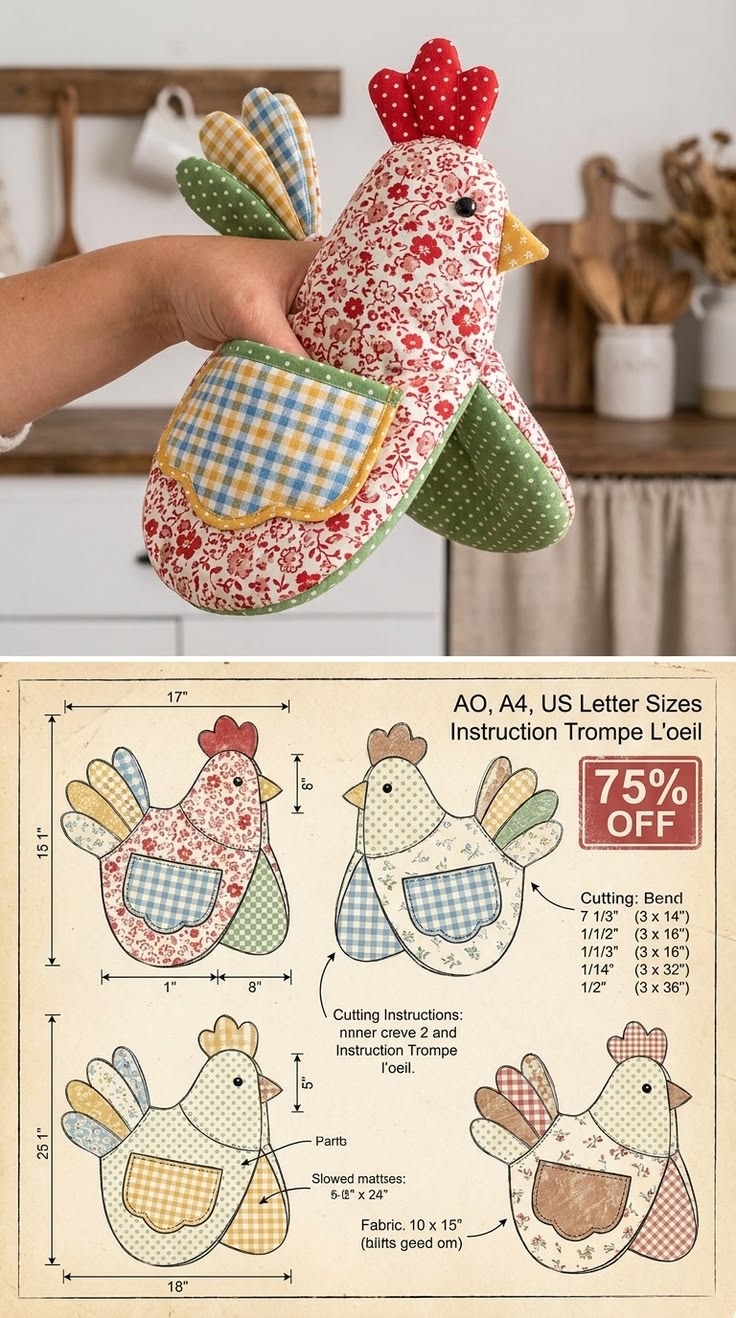
If you love charming farmhouse-style sewing projects, this Chicken Oven Mitt Pattern is a wonderful project to add to your handmade kitchen collection. This adorable chicken-shaped oven mitt combines practical functionality with beautiful patchwork-inspired details, making it perfect for your own kitchen, a handmade gift, or even a craft fair project.
The design features a soft floral chicken body, contrasting gingham details, decorative tail feathers, a comb, beak, wings, and a useful front pocket. You can easily customize the colors and fabrics to match your kitchen décor.
This tutorial explains how to make the chicken oven mitt step by step, including the materials needed, cutting instructions, sewing process, assembly, and finishing details.
Materials Needed
For one chicken oven mitt, you will need:
- Cotton fabric for the chicken body
- Cotton fabric for the lining
- Coordinating fabric for the wings
- Gingham fabric for decorative details
- Floral fabric for the pocket
- Cotton batting or heat-resistant batting
- Sewing machine
- Matching sewing thread
- Hand-sewing needle
- Fabric scissors
- Rotary cutter and cutting mat, optional
- Fabric clips or pins
- Fabric marking pen or pencil
- Iron and ironing board
- Ruler
- Paper for making the pattern
- Embroidery thread, optional
- Small black button or safety eye for the eye
- Small amount of felt or fabric for the beak
- Stuffing, optional for a slightly padded decorative look
Important: For an oven mitt that will actually be used with hot cookware, choose heat-resistant batting specifically designed for oven mitts. Ordinary cotton batting alone should not be relied upon for high-heat protection.
Choosing Your Fabrics
One of the most fun parts of this project is choosing the fabrics.
For the main chicken body, a small floral print works beautifully. Soft green, cream, beige, blue, or country-style fabrics create a charming farmhouse appearance.
For the wings, tail feathers, and comb, gingham is an excellent choice. Blue and white gingham gives the chicken a traditional country look, but you can replace it with red, yellow, pink, green, or any color you prefer.
For the pocket, choose a contrasting floral fabric. A small-scale print is especially attractive because the pattern remains visible even on the relatively small pocket.
Try to select fabrics that coordinate with one another without being identical.
Chicken Oven Mitt Pattern Pieces
The chicken design can be divided into several simple pieces.
You will need:
1. Body Piece A
This is the main front body of the chicken.
2. Body Piece B
This is the back body piece.
The front and back should be approximately the same size and shape.
3. Wing Pieces
Cut two wing pieces if you want a wing on both sides of the chicken.
4. Tail Feathers
Create several feather-shaped pieces in different fabrics. Three to five feathers give the tail a fuller appearance.
5. Comb
The comb is the decorative piece placed on top of the chicken’s head.
6. Beak
Cut a small triangular or diamond-shaped piece for the beak.
7. Pocket
The pocket is positioned on the front of the chicken and can be made from a contrasting floral fabric.
8. Batting
Cut batting to fit the body pieces. For maximum protection, follow the batting manufacturer’s instructions regarding layering.
How to Make the Chicken Oven Mitt
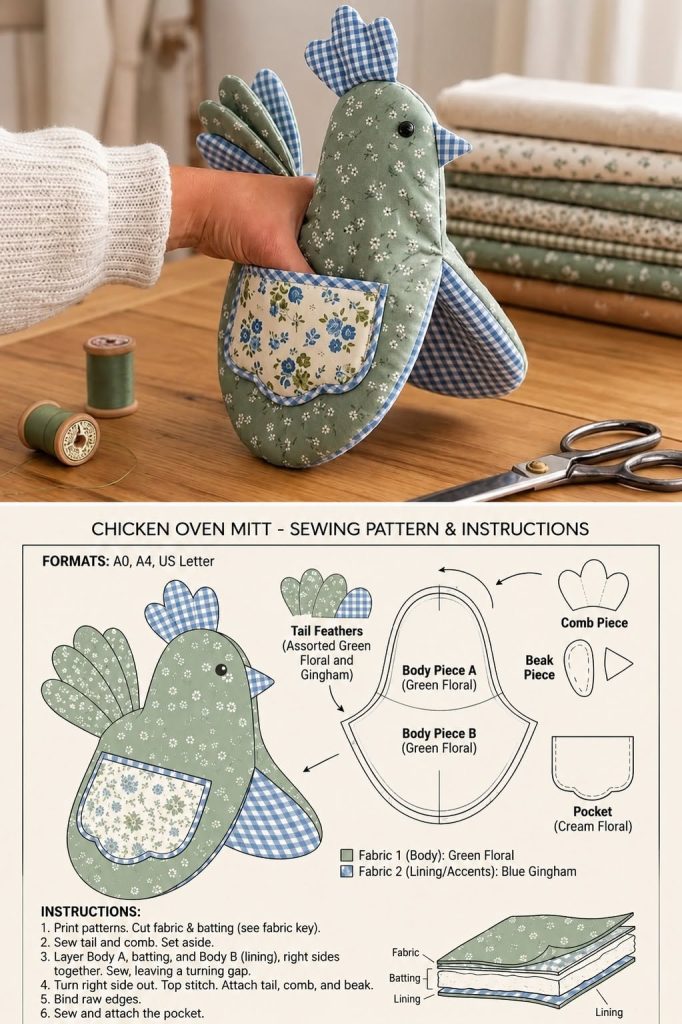
Step 1: Prepare the Pattern
Begin by drawing the chicken body on paper.
Create a rounded chicken silhouette with a slightly larger lower section and a rounded head. The finished chicken should be large enough for an adult hand to comfortably fit inside the opening.
You can use the proportions shown in the reference design as inspiration.
Create a separate paper pattern for the wing, tail feathers, comb, beak, and pocket.
Add a small seam allowance around pieces that will be sewn together. A seam allowance of approximately 1/4 to 3/8 inch (0.6–1 cm) works well for most cotton fabrics.
Cut out all paper pieces.
Step 2: Cut the Fabric
Place each paper pattern piece on the appropriate fabric.
Cut:
- 2 chicken body pieces from the main fabric
- 2 body pieces from lining fabric
- 2 body pieces from heat-resistant batting
- 2 wing pieces
- 3–5 tail feather pieces
- 2 comb pieces
- 2 beak pieces
- 1 or 2 pocket pieces, depending on your construction method
Label your pieces as you cut them so you don’t accidentally mix them up.
Step 3: Prepare the Tail Feathers
Take the fabric pieces selected for the tail.
You can use several coordinating fabrics to create a colorful patchwork appearance.
Place two matching feather pieces right sides together and sew around the curved edges, leaving the bottom open.
Turn the feather right side out and press it carefully.
Repeat for the remaining feathers.
If desired, add a small amount of batting between the layers to give the feathers more body.
Step 4: Make the Comb
Place the two comb pieces right sides together.
Sew around the outer edge, leaving the bottom open.
Trim the seam allowance around the curves and turn the piece right side out.
Press carefully.
Topstitch around the edge if desired.
Step 5: Make the Beak
Place the two small beak pieces together.
Sew around the edges, leaving a small opening.
Turn the beak right side out and press.
For a simpler version, you can also cut a single piece of felt and sew it directly onto the chicken.
Step 6: Prepare the Wings
Place the wing pieces right sides together.
Sew around the curved edge, leaving a small opening.
Turn the wing right side out and press.
Topstitch around the wing for a decorative finish.
You can also add a few curved lines with your sewing machine to create the appearance of feathers.
Step 7: Make the Pocket
The pocket is one of the most attractive details of this chicken oven mitt.
Cut the pocket from a contrasting floral fabric.
For a more finished appearance, place two pocket pieces right sides together and sew around the edges, leaving an opening for turning.
Turn the pocket right side out and press.
Topstitch around the upper edge.
If you want the pocket to have a decorative scalloped bottom, create the scallops in your paper pattern before cutting the fabric.
Step 8: Assemble the Front
Place the chicken body front on your work surface with the right side facing up.
Position the tail feathers behind the body at the tail area.
Arrange the feathers so they overlap slightly.
Baste or pin them in position.
Place the comb at the top of the head and secure it.
Position the beak at the front of the head.
Baste these pieces in place.
Step 9: Add the Wing
Place the wing on the chicken body.
Pin it carefully.
Sew around the curved outer edge of the wing, leaving the inner edge free if you want the wing to look dimensional.
For a decorative oven mitt, you can add a second line of stitching around the wing.
Step 10: Add the Pocket
Position the pocket on the lower front portion of the chicken.
Make sure it is centered.
Pin it securely.
Sew around the sides and bottom of the pocket, leaving the top open.
Backstitch at the beginning and end to reinforce the stitching.
The pocket can be used as an additional decorative element or as part of the hand-opening design, depending on how you adapt the pattern.
Step 11: Add the Chicken’s Eye
For the eye, you can use:
- A small black button
- Embroidery
- Black felt
- Fabric paint
- A safety eye
If the oven mitt will be used around children, pets, or high heat, avoid loose decorative pieces that could come off.
For a simple finish, embroider a small black circle using embroidery thread.
Step 12: Assemble the Body Layers
Place the layers together in the following order:
Main fabric → batting → lining
Make sure the right sides of the fabrics are positioned correctly according to your construction method.
Pin or clip the layers together.
Sew around the outer edge, leaving the hand-opening area unsewn.
Take your time around the curves of the chicken.
Step 13: Turn the Oven Mitt
Carefully trim the seam allowance around curved areas.
Make small clips around tight curves without cutting through the stitching.
Turn the chicken right side out.
Use a blunt turning tool to gently push out the rounded areas.
Press the entire piece carefully with an iron using the appropriate temperature for your fabric and batting.
Step 14: Finish the Opening
The opening where your hand enters needs to be reinforced.
Fold the raw edge toward the inside.
Press it.
Topstitch around the opening.
For additional durability, sew a second line of stitching approximately 1/8 inch from the first line.
This will give the oven mitt a clean and professional appearance.
Step 15: Add Decorative Topstitching
Topstitching can make a huge difference in the finished appearance.
You can use:
- Straight stitching
- Decorative machine stitches
- Quilting lines
- Curved feather lines
- Contrasting thread
For a farmhouse look, simple straight stitching with a contrasting thread works beautifully.
How to Make the Chicken More Padded
If you want a thicker oven mitt, you can add additional layers of heat-resistant batting designed for oven mitts.
Create a sandwich with the outer fabric, batting layers, and lining.
Quilt the layers together before assembling the chicken.
However, don’t make the mitt excessively thick, because it should remain flexible enough for you to grip cookware safely.
Sewing Tips for Beginners
If you are new to sewing, don’t worry if the first chicken isn’t perfect.
Start with inexpensive cotton fabric while you become familiar with the pattern.
When sewing curves, use a slower machine speed and keep your needle positioned close to the seam line.
Small clips around curved seam allowances can also help the fabric turn smoothly.
Pressing each section as you go will make the final project look much more professional.
Ideas for Customizing Your Chicken Oven Mitt
There are many ways to personalize this project.
Try a traditional farmhouse palette using:
- Green floral
- Blue gingham
- Cream
- Beige
- White
For a more colorful chicken, use:
- Yellow
- Red
- Turquoise
- Pink
- Orange
- Purple
You can also create seasonal chickens.
For Christmas, use red and green fabrics.
For spring, use pastel florals.
For autumn, choose orange, brown, mustard, and cream fabrics.
For Valentine’s Day, use pink and red fabrics with small hearts.
Make a Matching Kitchen Set
Once you have mastered the chicken oven mitt, you can use the same fabrics to create a complete kitchen collection.
Consider making:
- Chicken pot holders
- Matching trivets
- Kitchen towels
- Aprons
- Table runners
- Mug rugs
- Bowl cozies
- Fabric baskets
A matching set can also make a beautiful handmade gift.
Frequently Asked Questions
Is this chicken oven mitt suitable for beginners?
Yes. The basic construction uses simple sewing techniques, although working around curves may require a little practice.
What fabric should I use?
100% cotton quilting fabric is an excellent choice for the outer fabric and lining.
Can I use scraps?
Absolutely. This project is perfect for using leftover quilting and sewing scraps.
Small pieces of gingham and floral fabric can be used for the wings, tail feathers, comb, and pocket.
Can I make the chicken larger?
Yes. You can enlarge the paper pattern to create a larger oven mitt.
Just remember that the hand opening should remain comfortable for the person who will use it.
Can I sell chicken oven mitts made from this design?
If you created your own pattern and construction, you can generally sell your finished handmade items, but you should not claim someone else’s copyrighted pattern or instructions as your own. If you’re adapting a specific published pattern, check its licensing terms before selling finished products.
Final Thoughts
This Chicken Oven Mitt Pattern is a fun combination of sewing, quilting, and appliqué techniques. The floral body, gingham details, decorative tail feathers, wings, and front pocket give this project a charming farmhouse personality.
It is also a great scrap-fabric project because you don’t need large amounts of fabric for the decorative pieces. Experiment with different color combinations and create a whole family of colorful chickens for your kitchen.
Whether you’re making one for yourself, creating a handmade gift, or building a coordinated farmhouse kitchen collection, this chicken oven mitt is a creative project that is both decorative and useful.