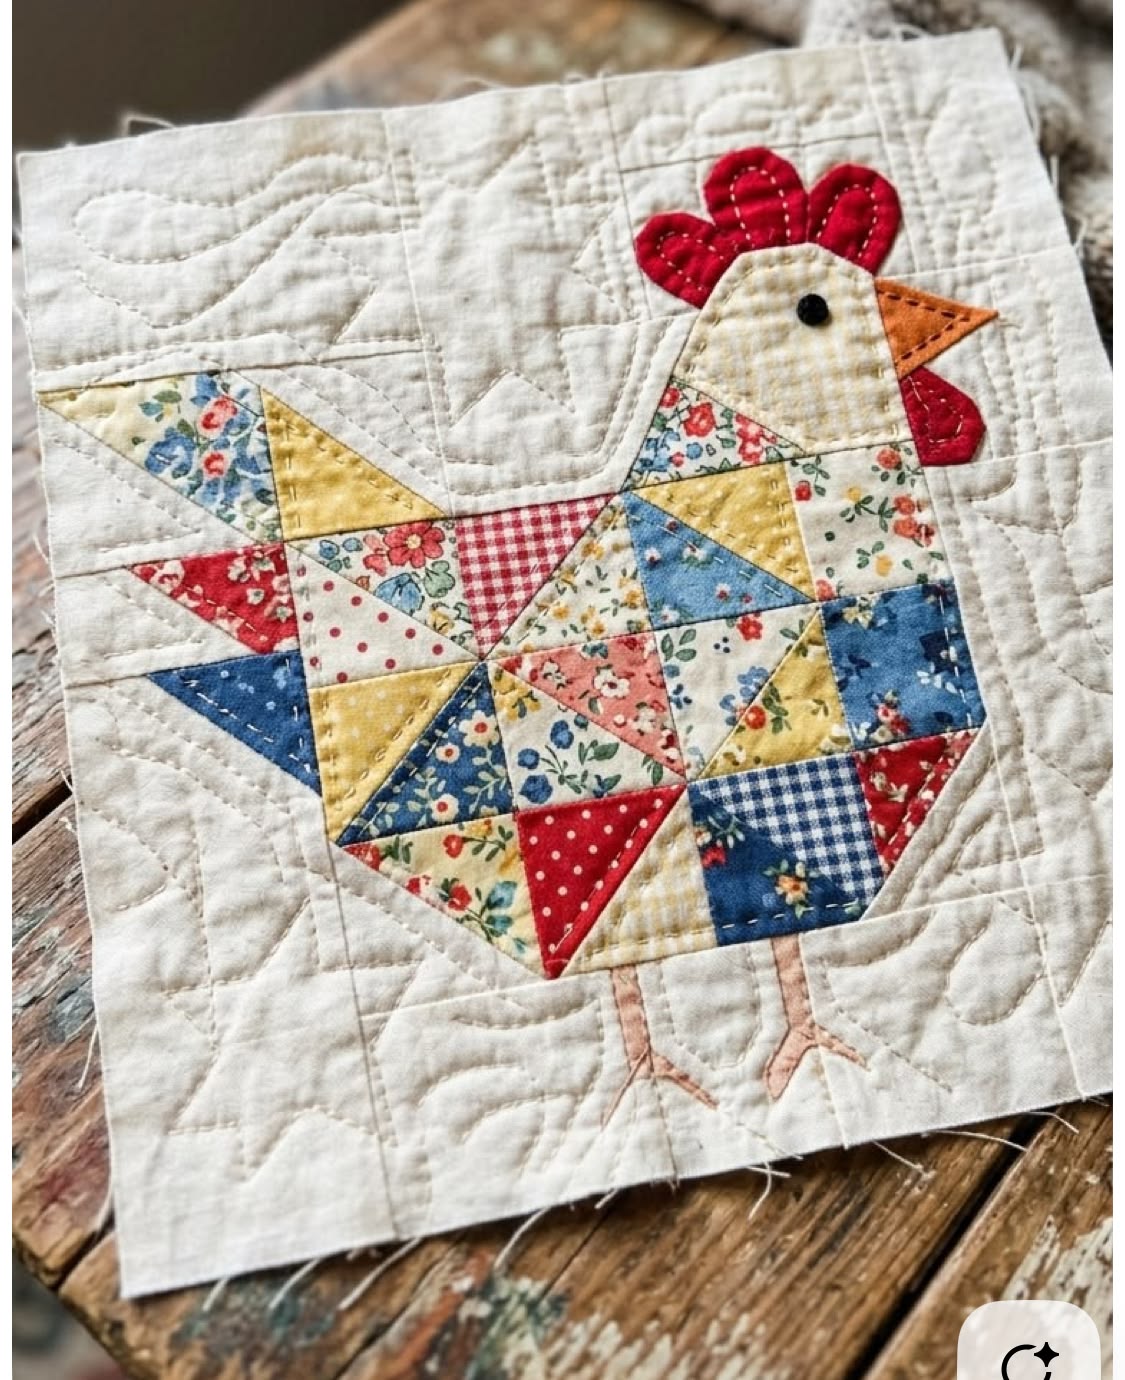
Chicken Quilt Block Pattern is a cheerful patchwork project that combines traditional quilting techniques with a playful chicken silhouette made from colorful fabric sections. Based on the reference design, the finished block measures approximately 12″ x 12″ (30.5 cm x 30.5 cm) and uses a grid-based construction to help organize the body, tail, head, comb, beak, legs, and background.
The combination of floral prints, gingham, polka dots, tone-on-tone fabrics, and solid colors gives the chicken a charming scrappy appearance while keeping its outline easy to recognize. This project is especially appealing for quilters who enjoy turning simple geometric pieces into an illustrated quilt block.
One of the most useful features of this Chicken Quilt Block Pattern is the 24 x 24 grid shown in the reference. Each square represents approximately 1/2″ x 1/2″ (1.25 cm x 1.25 cm) in the finished design. Instead of trying to reproduce the entire chicken as one complicated shape, you can study the grid section by section and construct manageable patchwork units. The body contains many triangles, squares, and rectangular sections, while the head uses a lighter cream fabric surrounded by distinctive red and orange details. A consistent 1/4″ (0.6 cm) seam allowance is important when piecing the units so that the final measurements remain as close as possible to the intended size.
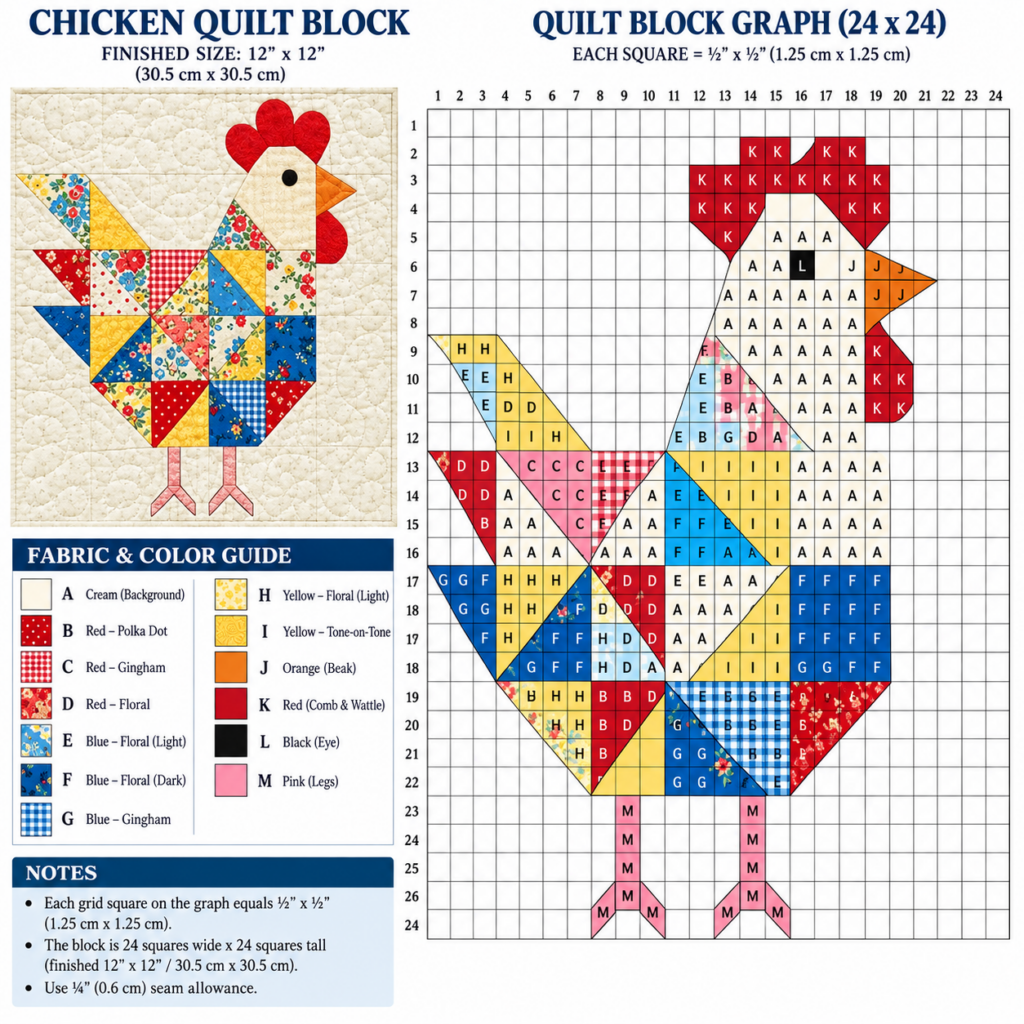
The colorful character of this project makes it suitable for using a carefully coordinated fabric scrap collection. The reference design combines cream for the background and head, several red prints, light and dark blue prints, blue gingham, yellow floral and tone-on-tone fabrics, orange for the beak, bright red for the comb and wattle, black for the eye, and pink for the legs. You do not have to own identical prints to create a similar result. What matters most is maintaining enough contrast between neighboring pieces so that the patchwork body remains lively while the chicken silhouette stays visually clear. Before cutting, read through the complete construction process and organize your fabrics by color or letter.
Materials, Fabric Colors, Cutting Preparation, and Quilt Terms
Begin your Chicken Quilt Block Pattern by gathering quilting cotton, a rotary cutter, cutting mat, acrylic quilting ruler, fine pins or clips, neutral sewing thread, an iron, and a sewing machine. A small square ruler is particularly helpful because many areas of this block depend on accurate geometric piecing. If you plan to turn the finished block into a potholder, mini quilt, wall hanging, pillow front, or larger quilt, you can prepare batting and backing fabric after completing the patchwork top.
The reference uses a useful fabric and color guide. Fabric A is cream and forms much of the background and chicken head. B represents red polka dot, C red gingham, D red floral, E light blue floral, F dark blue floral, and G blue gingham. H is light yellow floral, while I is yellow tone-on-tone. These prints create the scrappy body and tail. Choosing several prints from the same color families creates variety without making the design look disconnected.
The remaining colors define the recognizable features of the chicken. Fabric J is orange for the beak, K is red for the comb and wattle, L is black for the eye, and M is pink for the legs. Solids work especially well for these areas because they separate the facial and anatomical details from the busy patchwork body. For a more traditional appearance, choose muted country colors; for a modern version, brighter solids and contemporary prints can work beautifully.
Before cutting fabric, understand the term seam allowance. A seam allowance is the narrow amount of fabric between the raw edge and the stitching line. For this project, work with a consistent 1/4″ seam allowance, approximately 0.6 cm. Accuracy matters because a tiny difference repeated across several patchwork units can noticeably alter the final dimensions. Test your machine’s quarter-inch seam before beginning the main block.
Another important quilting technique is half-square triangle construction, often abbreviated as HST. An HST is a square divided diagonally into two fabric triangles. The chicken’s patchwork body contains numerous diagonal color changes that can be recreated with HST units or carefully cut triangular pieces. When possible, constructing an oversized HST and trimming it accurately afterward is easier than handling tiny bias-edge triangles individually.
Finally, prepare a simple organization system before sewing. Label fabric groups A through M according to the color guide and keep the pieces arranged in the same general positions shown on the grid. You can work row by row or assemble larger recognizable sections first. The second method is often easier because you can construct the tail, body, neck, head, comb, beak, and legs as individual areas before bringing everything together.
Building the Patchwork Tail and Chicken Body Step by Step
Start with the tail section on the left side of the design. The tail uses yellow, blue, cream, pink, and red fabrics arranged into long diagonal shapes. Notice how the upper tail feathers rise diagonally toward the left while the lower portion slopes downward toward the main body. Rather than focusing only on individual colors, first identify the large triangular boundaries. These boundaries are the framework that keeps the finished tail recognizable.
Construct the smaller tail units using squares, rectangles, and half-square triangles. Join neighboring pieces into short rows, pressing each seam after stitching. When two seams must intersect, press them in opposite directions whenever practical. This creates a nesting effect: the two seam allowances fit against one another and make it easier to achieve clean points. Pin important intersections before sewing so the colorful sections remain aligned.
Next, begin the lower and central patchwork chicken body. The photograph shows a wonderfully scrappy arrangement containing red floral, red polka dot, blue floral, blue gingham, yellow floral, yellow tone-on-tone, and cream sections. Several larger geometric units are divided diagonally, creating the appearance of pinwheels and angular patchwork. Build these smaller units first instead of attempting to sew the entire body in long rows immediately.
Continue upward through the body, checking the graph frequently. The chicken’s back rises from the tail toward the neck, while the breast curves visually downward through stepped and diagonal patchwork sections. Because fabric itself cannot form a smooth curve through conventional straight-seam patchwork without more advanced techniques, the design creates the impression of a curved chicken through carefully placed diagonal seams and color transitions.
As the body grows, place the completed units on a flat surface without sewing everything immediately. This is sometimes called a design layout. Compare the arrangement with the reference image and make sure that similar colors have not accidentally been exchanged. Scrappy quilts allow creative freedom, but maintaining the main light, medium, and dark values helps preserve the chicken’s shape.
After the body and tail units have been joined, carefully press the completed section. Avoid dragging the iron back and forth because this can stretch diagonal edges. Instead, lower and lift the iron with gentle pressure. Measure important sections before moving forward. Small differences can often be corrected while units are still separate, whereas fixing alignment becomes more difficult after the head and background have been attached.
Creating the Chicken Head, Comb, Beak, Eye, and Legs
The chicken head is primarily made from cream fabric A. This lighter area provides a visual resting place next to the highly patterned body. Construct the neck so it rises diagonally from the body toward the head. The graph uses straight and diagonal boundaries to create the appearance of a naturally shaped neck. Keep these seams smooth and accurately pressed because they form one of the most noticeable outlines in the entire block.
For the head itself, use cream pieces to establish the main shape before adding the surrounding red details. The red comb sits along the top of the head and is one of the strongest identifying features of the pattern. In the finished example, the comb has rounded lobes. Depending on your preferred technique, those curves can be created through appliqué over the pieced foundation rather than forcing every rounded shape into traditional straight-line patchwork.
Use the same approach for the red wattle below and behind the beak area. Fabric K represents the bright red comb and wattle. If using appliqué, prepare the shapes with turned edges, fusible appliqué, or another familiar quilting method. Fusible appliqué means attaching a fabric shape with a heat-activated adhesive before securing its perimeter with stitching. A narrow zigzag, blanket stitch, or small straight stitch can finish the edges.
Fabric J forms the orange beak. The beak is essentially a pointed triangular feature extending to the right. Cut or piece the orange section carefully so its point remains crisp. If the triangle is pieced, avoid pulling the bias edges while sewing. Press from the wider base toward the point. Strong contrast between the orange beak, cream face, and red wattle makes this small feature immediately visible.
Add the black eye using fabric L. A small appliquéd circle is one simple method. You could also use a securely stitched fabric dot or embroidered eye if the finished item is decorative. For projects intended around young children, permanently stitched fabric or embroidery is preferable to loose dimensional embellishments. Position the eye according to the reference so the face maintains balanced proportions.
The two pink legs, represented by fabric M, extend below the body. Each leg is narrow and finishes with angled toes. Because these elements are relatively thin, appliqué is a practical construction option. Position both legs before permanently stitching them, checking that the chicken stands evenly. Once satisfied, secure the legs and toes carefully around their edges and press the block from the back with appropriate heat for your fabrics.
Completing, Squaring, Pressing, and Using the Finished Quilt Block
With the main chicken assembled, fill the remaining space with cream background fabric. The goal is to create a square composition measuring approximately 12″ x 12″ finished. Depending on your piecing method, background sections may be attached progressively during construction or added around completed chicken units. Either method can work as long as the outline remains accurate and the final block can be squared without cutting into important features.
Press the completed Chicken Quilt Block Pattern carefully from both sides. First set the seams by placing the iron briefly over the stitched areas. Then press seam allowances according to the direction that produces the flattest result. In bulky intersections, consider pressing seams open if necessary. The objective is a flat quilt block with minimal distortion, especially around the many diagonal intersections in the body.
Now square the quilt block. Squaring means trimming a completed block so its sides are straight, its corners form accurate 90-degree angles, and its measurements are correct. Place the block on a cutting mat and use a large acrylic ruler. Check the center and outer boundaries before trimming. Never automatically cut a block down to size if doing so would remove the chicken’s beak, comb, tail, feet, or necessary seam allowance.
If you want the finished project to resemble the quilted example, layer the block with batting and backing fabric. Baste the three layers together and quilt around the chicken or across the background. Gentle free-motion quilting can add texture without competing with the colorful patchwork. Alternatively, simple straight-line quilting is approachable for beginners and can emphasize the geometric structure of the design.
After quilting, this block can become much more than a sample. Use it as the center of a mini quilt, add borders for a wall hanging, turn it into a decorative pillow front, or repeat several chickens to create a larger farm-inspired quilt. Multiple blocks could use different combinations of scraps while maintaining the same chicken silhouette, creating an especially lively finished quilt.
Most importantly, treat the graph as a visual construction guide rather than rushing through every small section. Accurate cutting, consistent 1/4-inch seams, careful pressing, and frequent comparison with the layout are more important than sewing quickly. Once you understand how the larger shapes interact, the seemingly complicated Chicken Quilt Block Pattern becomes a series of manageable patchwork and appliqué steps.
Frequently Asked Questions About the Chicken Quilt Block Pattern
What is the finished size of the Chicken Quilt Block Pattern?
The reference indicates a finished measurement of approximately 12″ x 12″ (30.5 cm x 30.5 cm). The graph is based on a 24-square-wide layout where each finished grid square represents about 1/2″ (1.25 cm). Remember that fabric pieces being sewn together require seam allowances beyond their finished dimensions.
What seam allowance should I use?
Use a consistent 1/4″ (approximately 0.6 cm) seam allowance for traditional patchwork seams. Maintaining the same allowance throughout construction is essential because this block contains numerous small units. Even minor inconsistencies can accumulate and affect alignment.
Is this Chicken Quilt Block Pattern suitable for beginners?
A confident beginner can attempt it, although the numerous small geometric sections make it more detailed than a basic four-patch block. Beginners may find it easier to construct the design in sections: tail first, body second, head and neck third, and appliqué details last.
Do I need exactly the same fabrics shown in the image?
No. The prints can be substituted freely. Try to preserve the general color values: cream for light areas, multiple reds, blues and yellows for the body, orange for the beak, bright red for the comb and wattle, black for the eye, and pink for the legs. Maintaining contrast is more important than finding identical prints.
What does HST mean in quilting?
HST stands for half-square triangle. It is a square patchwork unit made from two triangular pieces of fabric, usually contrasting colors. HST units are extremely useful for creating diagonal lines, and this chicken design contains many areas that can be interpreted and constructed using them.
What does “squaring a block” mean?
Squaring means checking and trimming a quilt block so that all sides are straight, corners are square, and dimensions are correct. This step makes it much easier to add borders or join the chicken block to other quilt blocks.
Can I use appliqué for the comb, wattle, eye, and legs?
Yes. In fact, appliqué is a convenient way to reproduce smaller or curved details. The rounded comb and wattle are particularly well suited to appliqué because their organic shapes would otherwise require more complicated curved piecing.
Should I press seams open or to one side?
Both approaches can be useful. Pressing seams to one side allows intersecting seams to nest, which helps align patchwork points. Pressing seams open can reduce bulk where several pieces meet. Choose the method that keeps each particular section flat and accurate.
How can I keep triangle points from disappearing?
Accurate cutting and a consistent quarter-inch seam are essential. Before sewing across an intersection, check where the diagonal seam meets the seam allowance. Pinning at important points can prevent layers from shifting. Avoid trimming units too aggressively before they are joined.
Can the chicken be made in different colors?
Absolutely. A scrappy chicken quilt block is an excellent opportunity to experiment with fabric combinations. Blue, red, and yellow create the lively traditional look shown in the example, but pastel, farmhouse, autumn, Christmas, or modern color palettes can also work.
Why does the graph use letters?
The letters act as a fabric placement guide. Each letter corresponds to a particular fabric or color family. This makes it easier to reproduce a complex arrangement without relying solely on visual color matching.
Can I enlarge the Chicken Quilt Block Pattern?
Yes, provided all parts are enlarged proportionally. For example, increasing the size of every grid unit will enlarge the complete chicken. Remember that seam allowances should be handled separately rather than simply scaling them blindly with the finished grid dimensions.
What can I make with the completed block?
The finished block can become a pillow cover, wall hanging, mini quilt, table decoration, quilt center, tote bag panel, or part of a larger patchwork quilt. If you repeat the design, changing the fabrics in each chicken can create a colorful coordinated collection.
How should I quilt the background?
The cream background can be quilted with gentle curves, loops, straight lines, or simple echo quilting around the chicken. Keeping the quilting relatively subtle allows the colorful patchwork to remain the main focus.
How can I make the block look neat and professional?
Take time at every stage. Cut accurately, sew with a consistent 1/4-inch seam, press rather than stretch fabric, trim individual units when necessary, match important intersections, and square the final block carefully. Precision in small steps produces a much cleaner finished result.
Do I have to construct every tiny grid square individually?
No. The grid primarily helps establish proportions and fabric placement. Where several adjacent squares use the same fabric, they can often be interpreted as a larger piece. Likewise, repeated geometric sections may be constructed as larger patchwork units. This reduces unnecessary seams and makes assembly more manageable.
What is the best way to organize all the different fabrics?
Create labeled piles or small containers corresponding to A through M. Keep cut pieces with their appropriate letter until they are sewn into larger units. A design board is also extremely useful because you can arrange the patchwork pieces before stitching and immediately spot misplaced colors.
Should I wash the fabrics before making the block?
That depends on your normal quilting method and the intended project. The important point is consistency. If you decide to prewash, prewash all compatible quilting cottons rather than treating only selected fabrics. Afterward, press them thoroughly before accurate cutting.
How do I prevent the block from becoming distorted?
Handle diagonal or bias edges gently, avoid pulling the fabric while sewing, use a properly adjusted machine feed, and press with an up-and-down motion instead of aggressively sliding the iron. Checking dimensions after completing each major section can also catch problems early.
What makes this Chicken Quilt Block Pattern visually interesting?
The strongest feature is the contrast between a recognizable chicken silhouette and a highly varied scrappy patchwork body. Floral prints, gingham, dots, solids, triangles, and geometric color changes create movement, while the cream head and background keep the overall composition balanced.
Conclusion
The Chicken Quilt Block Pattern transforms a collection of colorful fabric pieces into an expressive patchwork chicken by combining careful grid planning, half-square triangles, geometric piecing, appliqué, accurate quarter-inch seams, pressing, and block squaring. Starting with the tail and body allows you to establish the colorful foundation before constructing the cream neck and head and adding the red comb, wattle, orange beak, black eye, and pink legs.
Throughout the project, the most important lesson is to work in manageable sections. The 24 x 24 quilt grid may initially appear complex, but breaking it into tail, body, neck, head, facial details, legs, and background makes the construction much easier to understand. Careful fabric organization also prevents confusion when working with several similar prints.
This project is also an excellent way to use quilting fabric scraps creatively. You can follow the red, blue, yellow, cream, orange, black, and pink palette from the reference or personalize the chicken with your own favorite fabrics. Maintaining strong contrast and the original proportions will preserve the recognizable silhouette even when the prints are completely different.
Once completed, the approximately 12-inch Chicken Quilt Block can stand alone as a decorative project or become part of something larger. Whether you turn it into a mini quilt, pillow, wall hanging, or repeat it across a full quilt, the same construction principles can be used again and again.
The techniques practiced here—including HST construction, patchwork alignment, nesting seams, appliqué, accurate pressing, and squaring—are valuable beyond this particular pattern. Mastering them will make many other geometric and pictorial quilt projects easier to approach.
If you make your own Chicken Quilt Block Pattern, leave your sincere opinion about the project and share your suggestions. Which part of the chicken did you enjoy making most, and what colors or fabric prints would you choose for your own version?