
A Crochet Belt is a beautiful and practical handmade accessory that can add a special touch to dresses, skirts, jeans, tunics, and even oversized shirts. This project combines a decorative crochet stitch with a simple adjustable belt construction, making it a great choice for crocheters who want to create something useful without needing a complicated pattern.
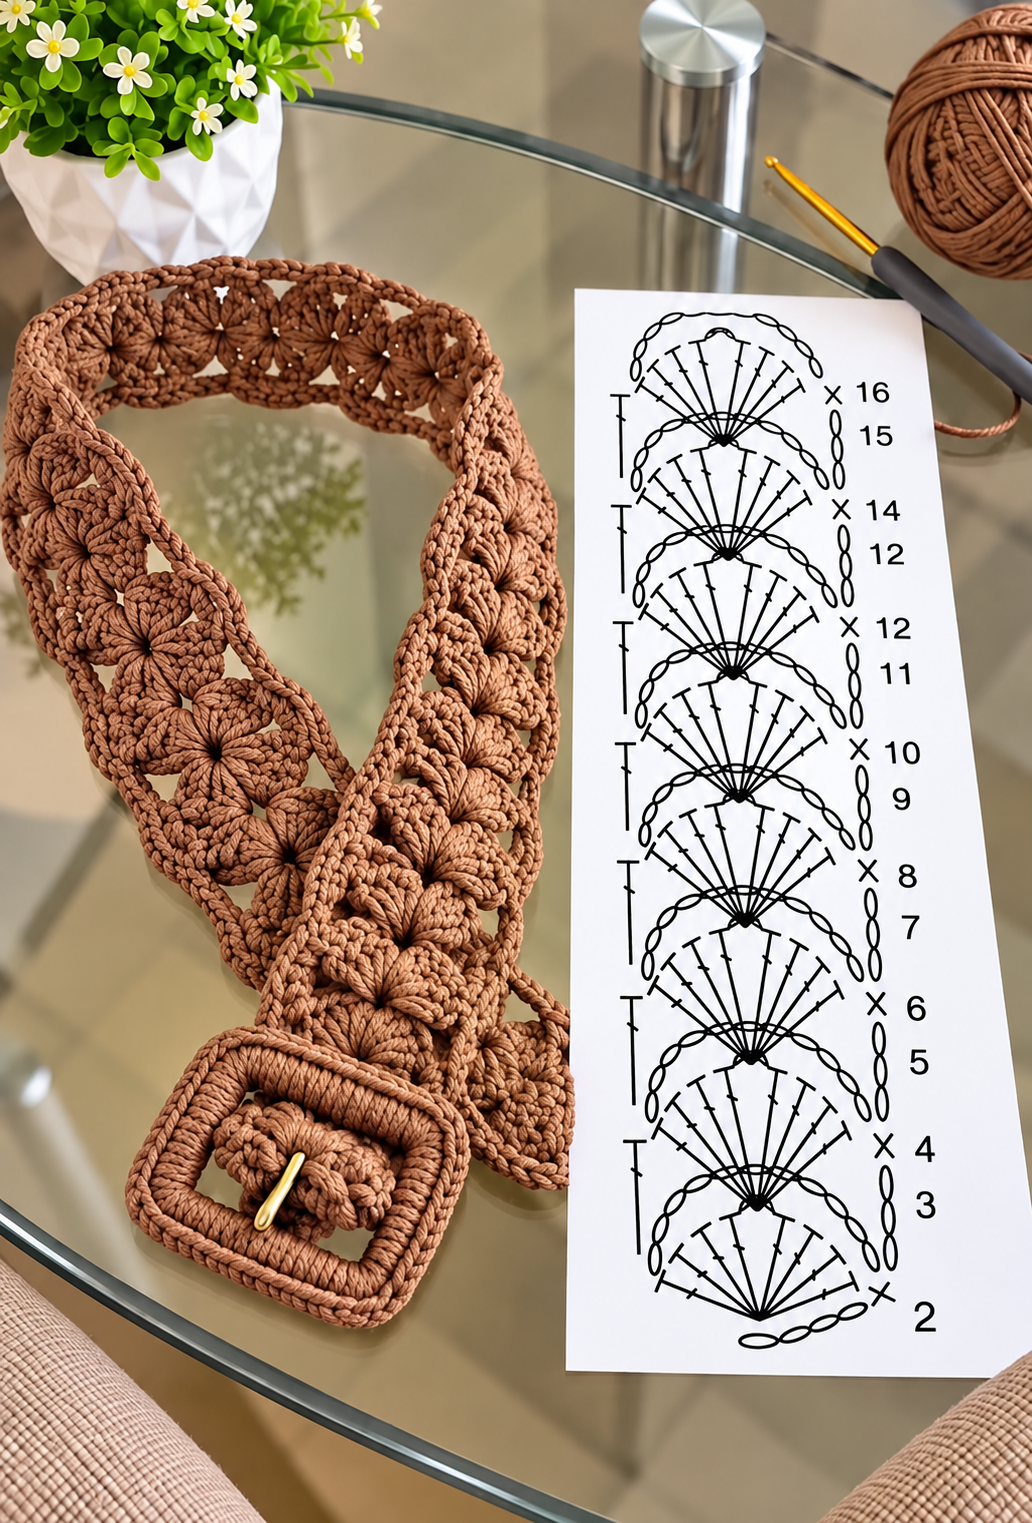
The design featured here uses a textured, openwork crochet motif that creates a delicate floral appearance while keeping the belt flexible and comfortable to wear. You can make it in a single color for an elegant look or experiment with different colors to create a more personalized accessory.
This project is also a wonderful way to use your favorite yarn and practice basic crochet stitches such as chain stitches, single crochet, double crochet, slip stitches, and cluster-style groups.
Materials Needed
For this Crochet Belt, you will need:
- Medium-weight cotton yarn or another durable yarn
- Crochet hook appropriate for your yarn
- Yarn needle
- Scissors
- Measuring tape
- Belt buckle
- Stitch markers, optional
- Small amount of fabric or felt, optional, for reinforcing the buckle area
Recommended Yarn
Cotton yarn is an excellent choice because it is durable, holds its shape well, and is comfortable against the skin.
You can choose:
- Green for a natural, elegant look
- Cream or white for a delicate accessory
- Black for a classic belt
- Brown or beige for a rustic style
- Pink, blue, or purple for a colorful version
- Multiple colors for a boho-inspired belt
Crochet Terms Used
This tutorial uses US crochet terminology.
- ch – chain
- sl st – slip stitch
- sc – single crochet
- dc – double crochet
- st – stitch
- sp – space
- sk – skip
- rep – repeat
Before You Begin
Measure the area where you want to wear the belt.
For a comfortable fit, measure around your waist or hips, depending on where you want the belt to sit.
A good starting point is:
Finished belt length = your waist measurement + approximately 2–4 inches
The exact amount of extra length depends on the type of buckle and how you want the belt to fit.
Because crochet can stretch slightly, avoid making the belt excessively long.
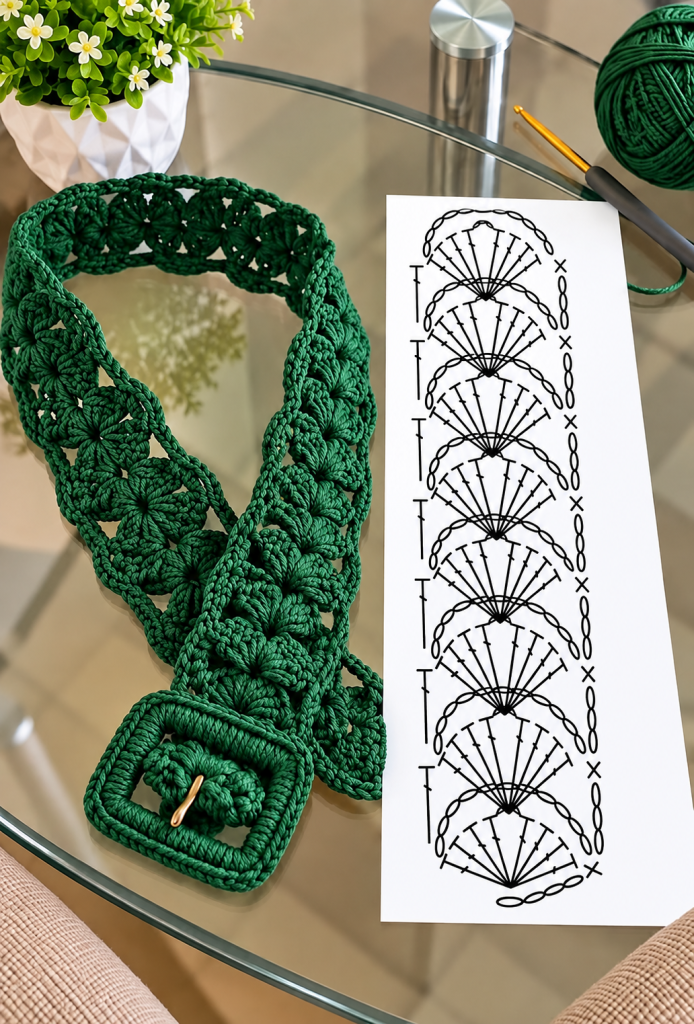
Step 1: Create the Foundation Chain
Begin by making a foundation chain.
The number of chains will depend on the desired width of your belt.
For a narrower belt, make fewer chains. For a wider decorative belt, increase the number of chains.
For example, you can begin with approximately:
16 chains
This creates a decorative belt similar in width to the one shown in the inspiration photo.
Important
If you want the belt wider or narrower, adjust the foundation chain while keeping the stitch repeat consistent.
After making your foundation chain, add one or more chains if necessary to create the turning chain required for your chosen stitch pattern.
Step 2: Work the First Row
Insert your hook into the appropriate chain and begin working single crochet stitches across the foundation chain.
Work one single crochet into each chain.
At the end of the row:
- Chain 1
- Turn your work
The first row creates a stable base for the decorative portion of the belt.
Try to keep your tension even. A very tight tension can make the belt stiff, while very loose tension can make it lose its shape.
Step 3: Begin the Decorative Crochet Pattern
The next rows create the openwork and floral-style texture.
Begin with a series of chain stitches to create the spaces between the motifs.
A simple repeat can be created using:
Chain stitches + double crochet groups + chain spaces
Work a group of double crochet stitches into the designated space, then create a chain space before moving to the next section.
Continue this pattern across the row.
The groups of stitches will gradually form fan-like or flower-like motifs.
Step 4: Create the First Fan Motif
To create the decorative fan, work several double crochet stitches into the same chain space.
A typical fan can contain:
5 double crochet stitches
worked into the same space.
After completing the fan:
- Chain 1
- Skip the appropriate stitches or space
- Work the next group
Repeat across the belt.
This creates the characteristic scalloped appearance.
Step 5: Build the Flower-Like Texture
On the following row, work your stitches into the spaces created by the previous row.
Instead of working directly into the tops of every stitch, concentrate on the chain spaces.
This technique allows the crochet groups to overlap slightly and creates a dimensional texture.
Continue working:
chain space → crochet group → chain space → crochet group
across the belt.
As additional rows are added, the motifs will begin to resemble small flowers or fans connected together.
Step 6: Continue the Pattern
Repeat the decorative row until the belt reaches the length you need.
Keep checking the measurement as you work.
For example:
- Small waist: approximately 28–30 inches
- Medium waist: approximately 30–34 inches
- Larger waist: approximately 34–40 inches
These are only general examples. Always use your own body measurement for the best fit.
Tip for a Custom Fit
Place the crochet belt around your waist every few rows.
This allows you to check both the length and the amount of stretch before finishing the project.
Step 7: Create the Belt End
Once the main decorative section reaches the desired length, work several rows of single crochet.
This gives the end of the belt a firmer structure.
Work approximately 3–5 rows of single crochet, depending on the size of your buckle.
The end should be firm enough to pass through or attach securely to the buckle.
Step 8: Prepare the Buckle
Choose a belt buckle that is appropriate for the width of your crochet belt.
A metal buckle gives the project a more traditional appearance, while a wooden or decorative buckle can create a handmade, bohemian style.
Place the end of the crochet belt through the buckle.
Fold the end backward and use your yarn needle to sew it securely.
For additional strength, sew several rows of stitches rather than relying on only one line of sewing.
Step 9: Reinforce the Buckle Area
Because the buckle receives more tension than the rest of the belt, reinforcement is important.
You can reinforce this area by:
- Adding additional single crochet rows
- Sewing the folded end securely
- Adding a small piece of fabric behind the crochet
- Using strong matching thread for extra reinforcement
This helps prevent the crochet from stretching or becoming damaged with regular use.
Step 10: Finish the Other End
The opposite end of the belt can be finished with a simple pointed or rounded shape.
For a traditional belt appearance, gradually decrease the number of stitches toward the end.
For example, you can decrease one stitch at each side every few rows until the end becomes narrower.
Alternatively, keep the end straight for a simple modern look.
Fasten off and leave a yarn tail.
Use a yarn needle to weave the tail securely into the back of the crochet.
Step 11: Add Belt Holes
If your design uses a traditional buckle, you will need holes for adjusting the belt.
You can create the holes using small chain spaces.
One simple method is to leave a small opening at regular intervals along the belt end.
For example, create adjustment holes approximately:
1–1.5 inches apart
Make sure the holes are large enough for the buckle pin but not so large that the belt becomes loose.
Step 12: Weave in All Ends
Use your yarn needle to carefully weave all loose yarn ends into the back of the project.
Weave the yarn through several stitches in different directions.
Trim the excess yarn only after it has been securely woven in.
This gives your Crochet Belt a clean and professional finish.
Step 13: Block the Crochet Belt
Blocking is optional, but it can make a significant difference in the final appearance.
Lightly dampen the belt and place it on a flat surface.
Gently stretch it into the desired shape.
Pay particular attention to:
- The edges
- The decorative motifs
- The belt width
- The buckle area
Allow it to dry completely before removing it from the blocking surface.
Avoid excessive stretching because you want the belt to maintain its structure.
How to Customize Your Crochet Belt
One of the best things about making a crochet belt is that you can easily personalize the design.
Change the Width
Use more foundation chains to create a wider belt.
A wider belt works beautifully over:
- Dresses
- Long cardigans
- Tunics
- Oversized shirts
A narrow belt is perfect for:
- Jeans
- Skirts
- Summer dresses
- Everyday outfits
Change the Colors
Try combining two or more colors.
For example:
Cream + Brown for a rustic look.
Black + Gold for an elegant accessory.
Pink + White for a feminine style.
Green + Cream for a natural botanical look.
You can also change color after every few rows to create stripes.
Add Decorative Details
You can personalize your belt with:
- Crochet flowers
- Small bows
- Wooden beads
- Decorative buttons
- Tassels
- Embroidery
- Different belt buckles
A few small details can completely change the appearance of the finished accessory.
Crochet Belt for Beginners
This project is suitable for beginners who already know the basic crochet stitches.
If you are new to crochet, practice these stitches before beginning:
- Chain stitch
- Single crochet
- Double crochet
- Slip stitch
The most important part is maintaining consistent tension.
Don’t worry if your first few motifs are not perfectly identical. As you continue working, your tension will become more consistent and the pattern will look more uniform.
How to Make the Belt More Durable
If you plan to wear your Crochet Belt frequently, consider using cotton yarn or another strong fiber.
Avoid extremely soft yarns that stretch significantly.
You can also reinforce the belt by:
- Using a smaller crochet hook.
- Adding a firm single crochet section near the buckle.
- Sewing the buckle attachment several times.
- Adding a fabric backing to the buckle area.
- Avoiding excessive tension when attaching the belt.
Care Instructions
Because crochet belts can stretch with use, proper care is important.
For cotton yarn, hand washing in cool or lukewarm water is usually a good option.
Avoid twisting the belt aggressively.
Instead:
- Gently wash.
- Remove excess water by pressing the belt between towels.
- Reshape it while damp.
- Allow it to dry flat.
Always follow the washing instructions for the specific yarn you used.
Styling Ideas for a Crochet Belt
A handmade crochet belt can be worn in many different ways.
Wear it around the waist of a flowing dress to create a more defined silhouette.
Pair it with jeans and a simple blouse for a casual handmade look.
You can also wear it over a long cardigan, tunic, or oversized shirt.
For a bohemian style, choose natural colors and add wooden beads or tassels.
For a more elegant accessory, choose black, cream, or neutral yarn with a simple metal buckle.
Frequently Asked Questions
Can I make this Crochet Belt in a different size?
Yes. The easiest way to customize the size is to measure your waist or hips and adjust the length of the belt accordingly.
What yarn is best for a Crochet Belt?
Cotton is one of the best choices because it is durable and generally holds its shape well. You can also experiment with cotton blends and other sturdy yarns.
Can I make the belt without a buckle?
Yes. You can replace the buckle with crochet ties, a button, a bow, or a decorative closure.
Can I make a wider Crochet Belt?
Absolutely. Simply increase the width of your foundation chain and maintain the stitch repeat throughout the project.
Is this project good for beginners?
Yes. Beginners familiar with basic crochet stitches can make this project. The decorative section may require a little practice, but the repeated motifs make it easier to understand as you progress.
Final Thoughts
Making a Crochet Belt is a fun way to turn simple yarn into a beautiful and functional fashion accessory. The combination of decorative crochet motifs, textured stitches, and a traditional belt buckle creates a handmade piece that can be customized to match almost any wardrobe.
Experiment with different yarn colors, widths, lengths, and buckles to create your own version. You can even make several belts in different colors for different seasons and outfits.
Whether you are making one for yourself, creating a handmade gift, or adding a new project to your crochet collection, this Crochet Belt Pattern is a creative project that combines style, practicality, and the beauty of handmade crochet.