
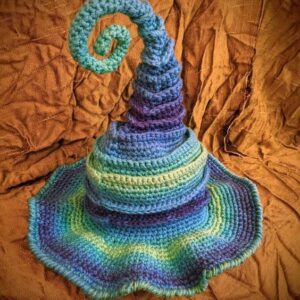
Crocheted witch hat pattern is a charming project for anyone who enjoys combining crochet with seasonal handmade decorations.
One of the most enjoyable things about this Crocheted witch hat pattern is how easily it can be personalized. Traditional Halloween colors such as black, purple, orange, and green work beautifully, but there is no need to limit yourself to a classic palette.
This tutorial uses simple stitches and gradual shaping to create a pointed crown followed by a wider brim. The instructions are written using standard US crochet terminology, and the stitch counts are included to make the construction easier to follow. Beginners should read through the entire crochet witch hat pattern before starting, especially the sections explaining increases and continuous rounds. Gauge is not extremely important for a decorative project, but maintaining consistent tension will help the hat keep a smooth and attractive shape. The finished dimensions can also be adjusted by changing the yarn weight, hook size, or number of rounds.
Materials, Crochet Abbreviations, and Preparation
For this Crocheted witch hat pattern, choose a medium-weight or light worsted yarn if you want a small but sturdy decorative hat. Approximately 30 to 50 yards of the main color should be enough for most miniature versions. You will also need a small amount of contrasting yarn for the decorative band. A 3.5 mm to 4 mm crochet hook usually works well, although the ideal hook depends on your yarn and personal tension.
You will also need scissors, a yarn needle, and a stitch marker. A stitch marker is especially useful because the crown is worked in continuous rounds. If you would like the hat to maintain a firmer three-dimensional shape, a small amount of polyester fiberfill can be placed inside the crown. Stuffing is optional, particularly when the hat will be attached to another crochet project.
The main crochet abbreviations used throughout the pattern are MR = magic ring, ch = chain, sc = single crochet, sl st = slip stitch, inc = increase, st = stitch, sts = stitches, and BLO = back loop only. An increase means working two single crochet stitches into the same stitch. This simple technique gradually expands the circumference of the hat.
The magic ring (MR) creates the very top of the pointed crown. To make one, form an adjustable loop with the yarn, insert the hook into the loop, pull up a loop, and begin crocheting the required stitches inside it. After completing the first round, gently pull the yarn tail until the center closes. If you prefer not to use a magic ring, chain two and work the first-round stitches into the second chain from the hook.
A single crochet (sc) is made by inserting the hook into the indicated stitch, yarning over, pulling up a loop, yarning over again, and pulling through both loops on the hook. Single crochet creates a dense fabric that works especially well for structured miniature projects. Keeping these stitches relatively firm helps the crown maintain its shape without leaving large gaps.
Before beginning the Crocheted witch hat pattern, check your tension by making several single crochet stitches with your chosen yarn and hook. The fabric should feel flexible but fairly compact. If the stitches are extremely tight and difficult to enter, move up one hook size. If they appear loose or have large spaces between them, try a slightly smaller hook. Consistent tension is more important than matching an exact gauge for this decorative design.
Step-by-Step Crochet Pattern for the Pointed Crown
Begin the crown with a MR and work 4 sc into the ring (4 sts). Pull the ring closed carefully. Place a stitch marker in the first stitch so you always know where each round begins. The hat will be worked in continuous spirals, meaning you do not need to join each round unless you prefer that method.
For Round 2, work 1 sc in each st around (4 sts). Round 3: work inc in each st around (8 sts). Round 4: 1 sc in each st around (8 sts). These alternating plain and increase rounds begin forming the narrow pointed tip of the witch hat. Do not worry if the tip initially looks very small; the shape becomes more obvious as additional rounds are completed.
For Round 5, work (1 sc, inc) x4 (12 sts). Round 6: 1 sc in each st around (12 sts). Round 7: (2 sc, inc) x4 (16 sts). Round 8: 1 sc in each st around (16 sts). At this point, the project should begin resembling a small cone. The gradual increases prevent the crown from becoming too wide too quickly.
Continue with Round 9: (3 sc, inc) x4 (20 sts). Round 10: 1 sc in each st around (20 sts). Round 11: (4 sc, inc) x4 (24 sts). Round 12: 1 sc in each st around (24 sts). These rounds establish the characteristic tapered shape that makes the Crocheted witch hat pattern instantly recognizable.
For a slightly taller crown, add one or two additional rounds of 1 sc in each st around before continuing. You can also create a gently bent tip by shaping the upper section with your fingers once the crochet fabric is finished. If you plan to stuff the crown, add the fiberfill gradually rather than pushing a large amount into the hat at once. Light stuffing preserves the tapered silhouette better than dense stuffing.
Round 13: (5 sc, inc) x4 (28 sts). Round 14: 1 sc in each st around (28 sts). Round 15: (6 sc, inc) x4 (32 sts). Round 16: 1 sc in each st around (32 sts). The crown is now approaching its full width. Check that the increases are evenly distributed and that the fabric is not twisting excessively.
Finish the crown with Round 17: (7 sc, inc) x4 (36 sts). Round 18: 1 sc in each st around (36 sts). Do not fasten off because the brim will continue directly from the crown. If you want a visible transition between the crown and brim, work the next round through the BLO. This creates a subtle horizontal ridge and helps define the base of the hat.
Creating the Brim, Hat Band, and Decorative Details
Begin the brim with Round 19 worked in BLO: (2 sc, inc) x12 (48 sts). Working through the back loops encourages the new section to extend outward instead of continuing vertically. This is an important shaping step because a witch hat needs a clearly defined brim surrounding the pointed crown.
For Round 20, work 1 sc in each st around (48 sts). Round 21: (3 sc, inc) x12 (60 sts). Round 22: 1 sc in each st around (60 sts). These increases spread the brim outward. Lay the hat on a flat surface occasionally to check its shape. A slight natural wave can add personality, but excessive rippling usually indicates that the brim is increasing too quickly.
For a wider brim, add Round 23: (4 sc, inc) x12 (72 sts) followed by Round 24: 1 sc in each st around (72 sts). If you prefer a compact hat, you can stop after Round 22. Finish the final round with a sl st, cut the yarn, and pull the tail through securely. Use a yarn needle to weave the tail discreetly into the underside of the brim.
Now make the decorative band. Using your contrasting yarn, ch 37 or enough chains to fit comfortably around the base of the crown. Beginning in the second chain from the hook, work 1 sc in each ch across. Fasten off, leaving a long tail for sewing. Wrap the strip around the crown just above the brim and sew the ends together, then secure it to the hat with several small stitches.
A tiny buckle can make the Crocheted witch hat pattern even more decorative. With yellow or gold yarn, ch 10, then join with a sl st to form a small loop. Shape the loop into a square or rectangle and sew it to the front of the band. Another option is to embroider a simple buckle directly onto the band using a yarn needle.
You can also decorate the hat with small crocheted stars, flowers, tiny pumpkins, beads, or embroidered details. When creating decorations intended for young children, avoid loose beads, buttons, or other small detachable pieces. Embroidered or securely crocheted embellishments are a more practical choice for projects that may be handled frequently.
Once all decorative pieces are attached, gently shape the crown and brim by hand. Bend the tip slightly to one side if you want a whimsical silhouette. Flatten the brim with your fingers and adjust any uneven stitches. This finishing stage can make a significant difference, transforming a simple crochet cone into a polished handmade witch hat with plenty of character.
Finishing, Customization, and Creative Uses
Weave in every remaining yarn tail carefully. Insert the yarn needle through several stitches on the wrong side, change direction, and pass through several more stitches before trimming the excess yarn. This technique helps keep the ends secure while maintaining a clean appearance. Avoid cutting tails too close to the fabric before they have been properly woven in.
If the brim curls more than desired, lightly shape it by hand. Depending on the fiber content of your yarn, gentle blocking may help. Acrylic and natural fibers respond differently to heat and moisture, so always follow the care instructions provided for your particular yarn. The goal is simply to encourage the brim to sit neatly without damaging the crochet stitches.
Changing the yarn weight is one of the easiest ways to customize the Crocheted witch hat pattern. Fine cotton yarn and a smaller hook can create a tiny ornament suitable for a keychain or garland. Medium-weight yarn produces a larger decorative piece, while bulky yarn can create a more substantial hat. When changing yarn thickness, select a hook that produces firm, even stitches.
Color combinations can dramatically change the finished design. A black crown with an orange band creates a traditional Halloween appearance, while purple with lime green feels playful and colorful. Dark gray with burgundy can produce a more rustic look, and cream with dusty pink can transform the design into softer seasonal décor. Using variegated yarn is another simple way to introduce several colors without changing yarn repeatedly.
The completed crochet witch hat can be used in many handmade projects. Sew a small hanging loop to the top for an ornament, attach a keychain ring for a bag charm, incorporate several hats into a seasonal garland, or place them around a table as handmade decorations. The same hat can also become an accessory for a crocheted doll or amigurumi figure if you adjust the circumference to fit.
Once you understand the shaping method, experiment with the proportions. Add more plain rounds to make the crown taller, increase more frequently for a wider cone, or extend the brim with additional rounds. Keeping notes about every adjustment is helpful, especially if you want to reproduce the same size later. This flexibility is one reason the Crocheted witch hat pattern is such an enjoyable project for both beginners and experienced crocheters.
FAQ About the Crocheted Witch Hat Pattern
Is the Crocheted witch hat pattern suitable for beginners?
Yes. The pattern primarily uses single crochet, increases, chains, slip stitches, and continuous rounds. Beginners who already understand these basic techniques should be able to follow the project. Using a stitch marker makes the continuous-round construction much easier to manage.
What yarn is best for a crochet witch hat?
Cotton, acrylic, and cotton-blend yarns can all work well. For a structured miniature hat, choose yarn that produces a firm fabric without becoming difficult to crochet. Medium-weight yarn is beginner-friendly, while thinner cotton yarn works nicely for very small ornaments.
How much yarn do I need?
A small decorative hat generally requires only a modest amount of yarn. Approximately 30 to 50 yards of the main color should be sufficient for many versions, plus a small quantity for the contrasting band and embellishments. The exact amount changes according to yarn thickness, hook size, and finished dimensions.
Why is my witch hat brim becoming wavy?
A strongly wavy brim often means there are too many increases for your particular tension. Try removing one increase round or adding a plain round between increase rounds. Slight waviness is not necessarily a problem, however, because an irregular brim can enhance the whimsical witch-hat appearance.
How can I make the hat larger?
Continue increasing the crown gradually before starting the brim. For example, after reaching 36 stitches, you could work (8 sc, inc) x4 (40 sts) and continue using the same progression. Add plain rounds between increase rounds if you also want additional height.
Can I make the hat smaller?
Yes. Use thinner yarn and a smaller hook, or stop increasing the crown earlier. If you finish the crown at 24 or 28 stitches instead of 36, the resulting hat will be significantly smaller. Remember to adjust the brim proportionally so the finished design remains balanced.
Do I need to stuff the crown?
No. Stuffing is optional. A tightly crocheted crown may hold its shape without any filling. Light fiberfill can be useful when you want a firm three-dimensional decoration, while an unstuffed hat is usually more flexible and easier to attach to another crochet project.
How do I keep the pointed tip from looking too round?
Begin with only a few stitches in the magic ring and include plain rounds between the increase rounds. This slows the expansion and creates a longer, narrower point. Firm tension also helps preserve the shape.
Can this pattern be turned into a keychain?
Yes. Make the hat with lightweight yarn and a smaller hook, then securely attach an appropriate keychain ring or loop. A miniature version can become a colorful seasonal accessory for keys, bags, backpacks, or handmade gifts.
Can I use different colors instead of traditional Halloween colors?
Absolutely. The pattern works with virtually any color combination. Black, orange, purple, and green provide a classic seasonal look, but pink, turquoise, cream, blue, burgundy, or multicolored yarn can create a completely different style.
Conclusion
The Crocheted witch hat pattern is a versatile project that combines simple crochet techniques with creative shaping. Beginning with a small magic ring, the crown develops through carefully spaced increases and plain rounds, gradually forming the distinctive pointed silhouette. The brim is then expanded outward with additional increases, giving the project its recognizable witch-hat shape.Throughout this tutorial, you learned how to use MR, sc, inc, sl st, ch, BLO, and continuous-round construction. These techniques are valuable beyond this individual project because the same principles appear frequently in amigurumi, baskets, ornaments, and other three-dimensional crochet designs.
You also learned how to customize the basic pattern through yarn choices, hook sizes, color combinations, crown height, brim width, and decorative details. A simple change to the band or buckle can completely alter the finished appearance, making it easy to create several hats that look different while following the same fundamental instructions.Most importantly, use this pattern as a starting point for your own creativity. Try different colors, experiment with the shape of the pointed crown, or create miniature versions for seasonal decorations and handmade gifts. Crochet becomes especially enjoyable when a basic pattern develops into something that reflects your individual style.
If you make this Crocheted witch hat pattern, leave your sincere opinion about the project and share any suggestions you have. Your ideas about colors, decorations, sizing, or alternative uses can inspire other crocheters and help make future handmade projects even more creative.