
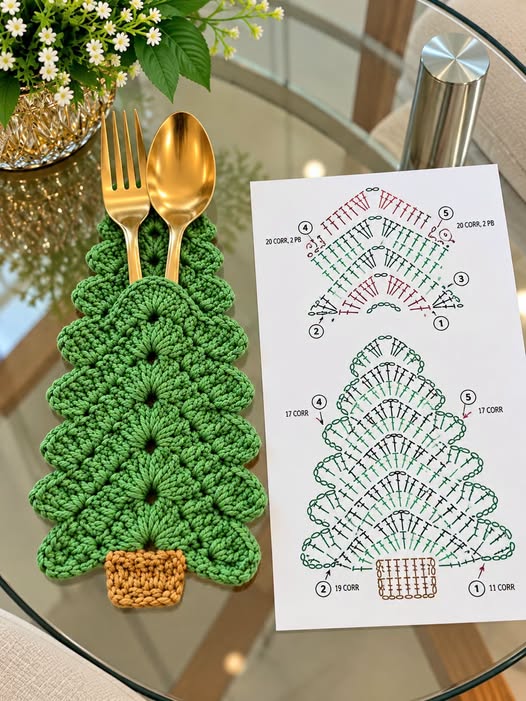
The Crochet Cutlery Holder Pattern is a charming way to bring handmade texture and festive personality to a holiday table. Inspired by a Christmas-tree silhouette made from layered crochet fans, this project turns simple crochet stitches into a practical holder for a fork, spoon, or knife. The finished piece can be placed beside each dinner plate, used on a buffet table, or included in a handmade Christmas décor collection. Although the design looks detailed, the construction is based on familiar stitches such as chain stitches, single crochet, double crochet, slip stitches, and increases. Once you understand how the fan-shaped sections are built and connected, the project becomes pleasantly repetitive. It is also a wonderful pattern for using small amounts of yarn left from other holiday crochet projects.
One of the most attractive features of this Crochet Cutlery Holder Pattern is the dimensional tree shape. Instead of making one flat triangle, the design is constructed with several rounded crochet sections that overlap visually and create the appearance of evergreen branches. The wider sections are positioned toward the bottom while progressively smaller sections form the upper part of the tree. A small brown rectangle creates the trunk and provides a contrasting finish at the base. Green yarn gives the holder a classic Christmas appearance, but the same construction can be customized with sage green, forest green, white, cream, metallic yarn, or even several coordinating shades. Because the project is relatively small, experimenting with color is easy and inexpensive.
This tutorial uses U.S. crochet terminology and explains the construction in a beginner-friendly way while still giving experienced crocheters room to adjust the size. The exact number of stitches may vary slightly depending on yarn thickness, hook size, tension, and how wide you want the cutlery pocket to be. For that reason, the most important part of the pattern is understanding the shape and placement of the increases. A finished holder measuring approximately 11 to 13 inches (28 to 33 cm) long and about 5 to 6 inches (13 to 15 cm) across the widest point works well for standard flatware. Before beginning several matching holders, complete one sample and test it with the utensils you plan to use. This simple preparation will help you create a balanced and professional-looking table accessory.
Materials, Crochet Stitches, and Measurements
For this Crochet Cutlery Holder Pattern, choose a medium-weight cotton or cotton-blend yarn that provides enough structure for the tree to keep its shape. Approximately 45 to 70 yards of green yarn should be enough for one holder, depending on your gauge and finished dimensions. You will also need a small amount of brown, tan, or golden yarn for the trunk. A 4.0 mm to 4.5 mm crochet hook is a practical starting point for medium-weight yarn. You will also need a yarn needle, scissors, and optional stitch markers.
The main stitches used are straightforward. Ch means chain, sl st means slip stitch, sc means single crochet, hdc means half double crochet, and dc means double crochet. A shell or fan is created by working several tall stitches into the same stitch or chain space. These grouped stitches naturally spread outward, producing the rounded sections that form the branches of the tree. If your fans feel too tight, move up one hook size; if they seem loose and floppy, try a slightly smaller hook.
Gauge does not have to be exact for a decorative cutlery holder, but consistent tension is important. As a general reference, aim for approximately 15 to 17 double crochet stitches across 4 inches (10 cm). The fabric should feel flexible without becoming excessively open. When you hold the finished tree vertically, it should maintain its silhouette instead of collapsing. Cotton yarn is especially suitable because it normally produces defined stitches and a crisp edge.
The tree is created from several semicircular crochet fan sections. Think of each section as a small half-circle that begins narrow and becomes wider through increases. These sections are positioned one above another, with the smallest section forming the top and the largest forming the base. The overlapping arrangement is what gives the design its full Christmas-tree appearance. You can make approximately five fan sections for a medium-sized holder.
The suggested finished width of the largest fan is about 5 to 6 inches (13 to 15 cm). The upper fans gradually become narrower, with the smallest top section measuring approximately 2½ to 3½ inches (6.5 to 9 cm) wide. These numbers are flexible because the visual proportion matters more than an exact measurement. Lay the pieces together during construction so you can decide whether another row is needed.
Before beginning, remember that the Crochet Cutlery Holder Pattern needs an opening or pocket where the utensils can rest securely. The layered tree itself can serve as the decorative front, while a simple crocheted back panel or strategically joined lower sections can provide support. The utensils should slide in easily without stretching the stitches excessively. Testing the holder with a fork and spoon during assembly is the easiest way to determine the ideal pocket depth.
Step-by-Step Crochet Tree Construction
Begin with the smallest fan that will form the top of the tree. Make a short foundation chain of approximately 5 chains. Work several double crochet stitches into the first usable chain or into a small chain space so the stitches spread outward like a fan. A useful starting combination is 3 to 5 double crochets worked into one central space. Turn your work and begin the next row with the appropriate turning chains.
On the second row, increase across the fan so that the semicircle becomes wider. Work one or two double crochet stitches into selected stitches while maintaining a smooth curved edge. The objective is not to create a perfect circle but a broad fan with a slightly pointed center. At the beginning and end of the row, use shorter stitches such as single crochet or half double crochet if you want the edges to transition more smoothly into the curve.
Continue for another row if necessary. Your first fan should remain relatively small because it represents the upper branches of the Christmas tree. You can finish the outer edge with a combination such as sl st, sc, hdc, dc, hdc, sc, sl st across repeated groups. This creates the slightly scalloped appearance visible in decorative crochet trees. Fasten off only if you plan to sew the pieces together later.
For the second fan, repeat the same general construction but add another increase row. Begin with a similar center foundation, create the first shell, and then expand it across two or three rows. The second fan should be approximately ½ to 1 inch (1.3 to 2.5 cm) wider than the first. When placed underneath the top section, its upper center should disappear slightly behind the first fan, leaving the rounded lower edge visible.
Make the third, fourth, and fifth fans using the same principle. Each new section should contain additional stitches or an additional increase row so it becomes progressively wider. For example, your middle fan might contain approximately 20 to 24 stitches across its final row, while the lower fans may contain 26, 30, or more stitches depending on your yarn and tension. Rather than focusing only on stitch counts, regularly place the fans together and evaluate the shape.
The bottom fan is the widest part of the Crochet Cutlery Holder Pattern and gives the tree its stable triangular silhouette. Make this fan one row larger than the previous section if necessary. The finished edge can be gently scalloped by alternating shorter and taller stitches or by making small shells. Keep the points symmetrical on both sides. Once all the green sections are completed, arrange them vertically before joining them permanently.
Joining the Fans and Creating the Cutlery Pocket
Place the largest fan on a flat surface and position the next smaller fan approximately 1 to 1½ inches (2.5 to 4 cm) above its lower edge. Continue stacking the sections until the smallest fan forms the top of the tree. Adjust each piece until both sides form a relatively even triangular outline. Pinning the layers temporarily with stitch markers can help keep everything aligned while you work.
You can join the fan sections with a yarn needle and matching green yarn. Use small whip stitches or mattress-style stitches through the back loops so the joins remain discreet. Another option is to crochet the pieces together using slip stitches. Avoid stitching across the entire width of every fan because some flexibility between the layers helps create the dimensional branch effect.
To turn the decorative tree into a functional crochet cutlery holder, create a simple back support. Chain enough stitches to measure approximately 2½ to 3½ inches (6.5 to 9 cm) wide. Work rows of single crochet or half double crochet until the panel reaches approximately two-thirds of the tree’s length. A dense stitch is preferable for this piece because forks and knife handles can pass through fabric with very large openings.
Position the back panel behind the tree. Align its bottom edge slightly above the trunk location and center it behind the green motifs. Sew or slip stitch the sides of the panel to the tree while leaving the upper edge open. This creates a pocket where your utensils can be inserted. Do not make the opening too narrow; place your fork and spoon inside before completing the second side.
An alternative construction is to use the overlapping crochet fans themselves as the pocket. In this version, the upper layers are secured along the sides but remain partially open through the center. The handles of the utensils slide between the crochet layers. This approach creates a lighter project and keeps the tree entirely decorative, although it may offer slightly less support than a separate back panel.
After assembling the pocket, test the Crochet Cutlery Holder Pattern on a table. Insert a standard fork, spoon, and optional knife. The utensils should stand securely without causing the tree to curl excessively. If the opening is too large, add a few hidden stitches along the sides. If it is too tight, remove several joining stitches and widen the opening before completing the finishing work.
Crochet Trunk, Finishing Details, and Customization
To make the trunk, use brown, caramel, tan, or golden yarn. Chain approximately 8 to 12 stitches, depending on the width of your lower tree section. Work single crochet across the chain, turn, and continue for several rows until you have a small rectangular piece measuring about 1½ to 2 inches (4 to 5 cm) wide and 1 to 1½ inches (2.5 to 4 cm) tall. Keep the stitches relatively tight so the trunk stays firm.
Position the trunk behind the center of the largest green fan. Approximately half of the rectangle can remain visible below the tree. Sew it securely along its top and side edges using matching yarn. A slightly rounded trunk can also be created by working a final row of single crochet around the rectangle. This small contrasting detail visually completes the Christmas tree.
Next, weave in every loose yarn end using a yarn needle. Pass each tail through several stitches in one direction and then back through neighboring stitches before trimming it. Properly securing the ends is especially important for a functional project because the cutlery will repeatedly slide against the crochet fabric. Loose ends can gradually work themselves free if they are trimmed too close.
Blocking can make a noticeable difference in the final appearance. If you are using cotton yarn, lightly dampen the tree and arrange it on a flat towel or blocking mat. Gently shape each fan so that the scallops are symmetrical and the tree remains centered. Allow it to dry completely before inserting the utensils. Follow the yarn manufacturer’s care recommendations if you are using acrylic or another fiber.
You can decorate the finished Crochet Cutlery Holder Pattern in many ways. Tiny crochet berries, miniature stars, small bows, embroidered dots, or contrasting surface stitches can imitate Christmas ornaments. For a more sophisticated table setting, consider deep forest green yarn with a cream or gold-toned trunk. For a rustic look, combine muted green with warm brown. For a winter theme that can be used beyond Christmas, make the entire tree in ivory, soft gray, or icy blue.
If you plan to make a complete set, crochet the first holder from beginning to end before starting the others. Record the number of rows used for each fan, the final width, and the hook size. Once you are satisfied with the proportions, repeat those measurements for the remaining pieces. This simple method makes it much easier to produce six, eight, or twelve matching crochet cutlery holders for a coordinated holiday table.
Frequently Asked Questions About the Crochet Cutlery Holder Pattern
What yarn is best for a Crochet Cutlery Holder Pattern? Medium-weight cotton is one of the most practical options because it offers good stitch definition and enough structure for the tree shape. Cotton blends can also work very well. Acrylic yarn may be used, but choose one that does not feel excessively soft or stretchy.
Can beginners make this crochet cutlery holder? Yes. A beginner who already understands chains, single crochet, double crochet, slip stitches, and basic increases should be able to complete the project. The most important technique is learning how to increase gradually to create the semicircular fan shapes.
How large should a crochet cutlery holder be? A practical finished size is approximately 11 to 13 inches (28 to 33 cm) long and 5 to 6 inches (13 to 15 cm) across the widest area. However, always measure your actual cutlery before final assembly because flatware sizes vary.
Can I make the tree smaller? Yes. Simply reduce the number of fan sections or remove the final increase row from each motif. A smaller version can hold dessert spoons or small flatware, while a larger version can accommodate several utensils and even a folded napkin.
Why is my crochet tree curling? Curling usually occurs when there are too few increases, when the hook is too small, or when your tension is very tight. If the fabric forms a bowl shape, add a few extra stitches evenly across the next row. Light blocking can also correct mild curling.
Why is my crochet tree becoming wavy? Excessive ruffling generally means there are too many increases. Reduce the number of double crochet increases in the next section. A gentle scallop is attractive, but the central portion of each fan should still lie reasonably flat.
Can I use different colors for every fan section? Absolutely. Each layer can be crocheted in a different green shade, or you can create a colorful scrap-yarn version. Alternating dark and light green produces extra depth while preserving the appearance of a Christmas tree.
Can a napkin be placed inside the holder? Yes. If you create a slightly wider back pocket, a narrow folded napkin can be inserted along with a fork and spoon. When making the holder for this purpose, test the complete combination before finishing the side seams.
How can I make several holders the same size? Write down the stitch and row count immediately after completing the first successful piece. Use the same yarn type, hook size, and tension for every holder. Measuring each completed fan before assembly can also help maintain consistency.
Is this pattern only for Christmas? The tree silhouette naturally suits Christmas and winter décor, but the construction technique can inspire many other designs. Changing the colors and decorative details can give the project a more general woodland or seasonal appearance.
Can the finished cutlery holder be washed? Washability depends primarily on the yarn used. Cotton is often a practical choice for table accessories because many cotton yarns can be gently washed. Always follow the care instructions for your specific yarn and allow the holder to dry in its correct shape.
Do I need to starch the crochet tree? Starch is optional. A firm cotton yarn worked at a reasonably tight gauge may provide enough structure without additional treatment. If your finished holder feels too soft, gentle blocking or a suitable fabric stiffening method can help improve its shape.
Conclusion
The Crochet Cutlery Holder Pattern combines practical table décor with the warmth of handmade crochet. By creating several increasing fan motifs, arranging them from smallest to largest, and joining them into a Christmas-tree silhouette, you can produce an attractive holder without relying on complicated crochet techniques. The project mainly uses chains, single crochet, double crochet, slip stitches, shells, and basic increases, making it approachable for many skill levels.
During this tutorial, you learned how to choose suitable yarn and hook sizes, build the individual crochet branches, control the increases, assemble the tree, create a functional pocket, crochet the brown trunk, block the finished project, and customize it with different colors or decorative details. The same method can be repeated to create an entire matching set for Christmas dinner, family gatherings, parties, or handmade seasonal gifts.
Most importantly, treat the measurements as a helpful starting point rather than an unchangeable rule. Crochet tension and cutlery dimensions can vary, so testing the first Crochet Cutlery Holder Pattern before producing a full set will give you the most consistent results. Small adjustments to the number of stitches, rows, or fan sizes can easily personalize the finished holder.