
The Crochet Christmas Tree Pattern is a festive handmade project that combines textured crochet, layered ruffles, decorative edging, and classic Christmas details in one beautiful tabletop decoration. Inspired by the dimensional tree shown in the reference image, this design is built from several progressively larger green tiers that overlap to create the recognizable shape of a Christmas tree. White scalloped accents, pearl-style ornaments, a decorative bow, and a small topper give the finished project an elegant holiday appearance. Although the tree looks detailed, the construction becomes much easier when it is divided into individual crochet sections. Crocheters who are comfortable with basic stitches can work through the pattern gradually while practicing increases, ruffles, edging, and simple assembly techniques.
One of the most attractive features of this Crochet Christmas Tree Pattern is its three-dimensional shape. Instead of working one flat triangle, the tree uses circular or cone-shaped sections with generous increases near the outer edge. These increases cause the fabric to flare naturally and create the soft folds visible around every tier. The white borders provide contrast and emphasize each layer, while small beads can imitate miniature Christmas ornaments. Because the project is decorative rather than wearable, the exact gauge is flexible, making this an enjoyable pattern for experimenting with yarn thickness, hook size, colors, and embellishments. You can create a traditional green and white tree or personalize the same construction using red, gold, cream, silver, or other seasonal shades.
The instructions below use U.S. crochet terminology and explain the essential stitches as they appear in the project. A medium-weight yarn is an excellent starting choice because it creates enough structure for the tree while remaining easy to manipulate. Cotton or cotton-blend yarn gives particularly defined stitches, although acrylic yarn can also work well. A 3.5 mm to 4.5 mm crochet hook, yarn needle, stitch markers, scissors, optional fiberfill, pearl beads, ribbon, and a stable internal cone or handmade crochet base can be used to complete the decoration. When adding beads, bows, or other small decorations, attach them securely and keep the finished tree away from very young children if detachable pieces are used.
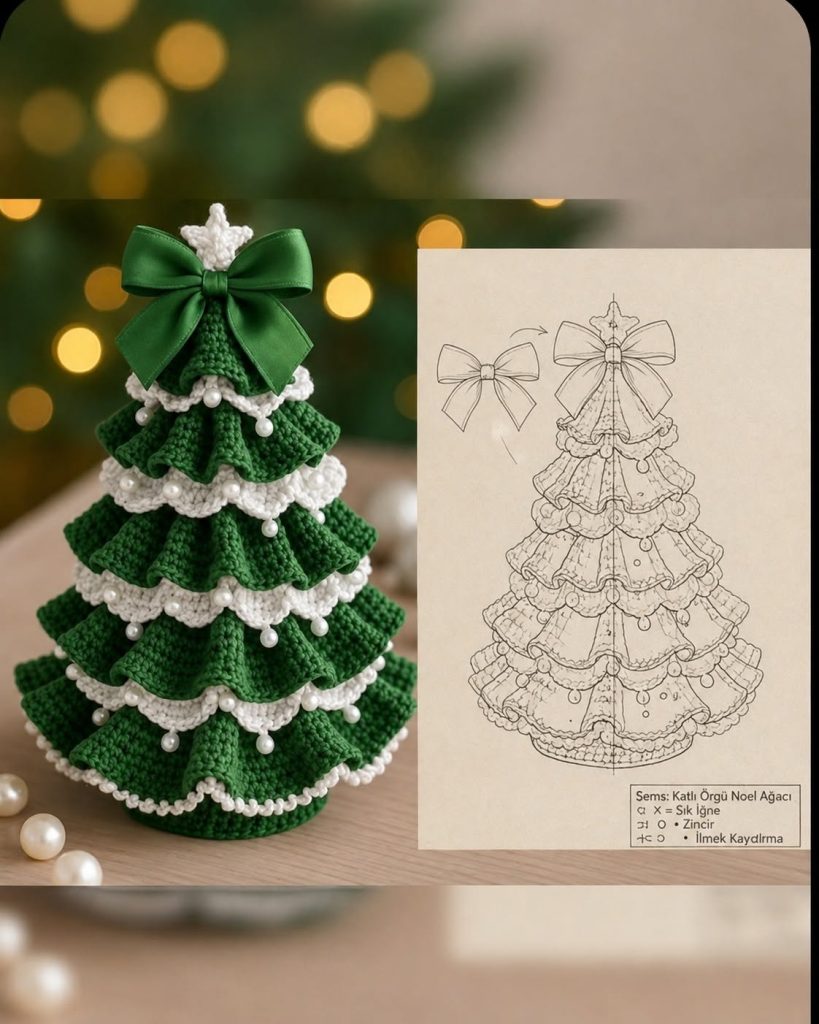
Materials, Crochet Stitch Key, and Project Preparation
For a medium tabletop version of the Crochet Christmas Tree Pattern, prepare approximately 250–350 yards of green medium-weight yarn and 70–120 yards of white yarn. The actual amount depends on the number of tiers and the fullness of the ruffles. You will also need a compatible crochet hook, usually around 4.0 mm, a tapestry needle, scissors, removable stitch markers, ribbon for the bow, and optional pearl beads. A small amount of white yarn may also be reserved for crocheting the topper instead of using a separate ornament.
The first crochet abbreviation to understand is ch, meaning chain. A chain is created by yarning over and pulling the yarn through the loop already on the hook. Chains are used when beginning circular sections, creating turning chains, forming decorative spaces, and making small loops. Keep chain stitches relaxed because chains that are too tight can pull the finished fabric inward and distort the shape of the ruffles.
The abbreviation sc means single crochet in U.S. terminology. Insert the hook into the indicated stitch, yarn over, pull up a loop, yarn over again, and pull through both loops on the hook. Single crochet creates a dense, firm texture and works especially well for the upper cone, structural sections, and neat borders. It is also useful when attaching two crochet pieces together because it produces a strong seam without excessive bulk.
The abbreviation hdc means half double crochet. Yarn over, insert the hook into the stitch, yarn over and pull up a loop, then yarn over and pull through all three loops. A half double crochet is taller than single crochet but shorter than double crochet. It provides flexibility while still producing enough body to support the layered shape of the tree.
The abbreviation dc means double crochet. Yarn over before inserting the hook, pull up a loop, yarn over and pull through two loops, then yarn over and pull through the remaining two loops. Double crochet stitches are particularly useful for creating the dramatic flared layers. When several double crochets are worked into one stitch, the fabric expands rapidly and forms the attractive waves seen along the lower portions of each tier.
Other useful abbreviations include sl st for slip stitch, st/sts for stitch or stitches, inc for increase, rep for repeat, and BLO for back loop only. An increase means working two or more stitches into one stitch from the previous round. In this crochet Christmas tree, controlled increases are extremely important because they determine how much each layer spreads and how pronounced the ruffles become.
Crocheting the Cone and Building the Layered Tree
Begin the top of the tree with green yarn. Make a magic ring, or chain 3 and join with a slip stitch to create a small ring. Round 1: work 6 sc into the ring and join if you prefer joined rounds. Round 2: work 2 sc in each stitch around, giving 12 stitches. This small circular beginning will become the narrow top of the tree and establish the center from which the remaining structure develops.
Continue increasing gradually instead of doubling every round. For example, Round 3 can be worked as [sc in next st, 2 sc in next st] around. On the next increase round, work [sc in next 2 sts, 2 sc in next st] around. Continue extending the number of regular stitches between increases. This produces a smooth cone rather than a completely flat circle. Add several rounds without increases whenever you want the tree to gain height before becoming wider.
Once the upper cone reaches approximately 3–4 inches (7.5–10 cm) in height, begin preparing for the first flared branch layer. Work one round of sc evenly around. On the following round, increase much more frequently by working 2 dc in each stitch or alternating 1 dc, 2 dc in next st depending on the fullness you prefer. The larger number of stitches will force the fabric outward and start producing the first ruffle.
For a particularly full tier, work another round as 2 dc in each st around. If the ruffle begins curling too tightly, reduce the increase frequency by working [dc in next 2 sts, 2 dc in next st] around instead. There is no need for every fold to look identical. Natural variations make the finished tree look rich and dimensional. Finish the green portion of the tier with one even round of single crochet.
To begin the next tier, return to a structural round slightly above the completed ruffle. Working into unused loops is one useful technique. If you previously crocheted a round in BLO, the unused front loops remain visible and can provide an attachment line for the next section. Alternatively, the tiers may be crocheted separately as circular ruffled pieces and sewn around a central cone. Separate tiers are especially practical when you want maximum control over the size of every layer.
Repeat the same construction for additional layers, increasing the diameter each time. A medium tree may contain four or five main green ruffles. The smallest upper layer might measure around 4–5 inches (10–13 cm) across, while the largest lower ruffle may reach approximately 8–10 inches (20–25 cm) across. Continue checking proportions as you crochet. The lower layers should overlap the tiers beneath them slightly so the interior structure does not show.
Creating the White Scalloped Borders and Decorative Details
The white edging gives this Crochet Christmas Tree Pattern its distinctive festive character. Join white yarn to the outer edge of a completed green layer. Work one round of sc around the edge first if you need a stable foundation. For a simple scallop, use the repeat [skip 1 st, 5 dc in next st, skip 1 st, sl st in next st]. Repeat around the entire edge while adjusting the final repeat as necessary.
For smaller, tighter scallops, try [sl st in next st, 4 dc in next st, sl st in next st]. For larger decorative shells, work 6 or 7 dc into the central stitch of each shell. The purpose of the white edging is not simply decoration; the contrasting border also makes each tier visually separate from the others. Maintain fairly even tension so the scallops remain soft rather than stiff.
Pearl-style beads can be added after crocheting. Thread a strong sewing needle with matching thread or yarn and stitch each bead securely through the crochet fabric. Position beads along the white scallops, at the points between ruffles, or scattered across the green sections. A symmetrical arrangement gives the tree a formal appearance, while slightly irregular placement produces a more natural handmade effect.
The bow can be created with wide satin ribbon and attached near the top of the tree. A deep green bow gives a sophisticated monochromatic look, but red ribbon, gold ribbon, white ribbon, or plaid Christmas ribbon can completely change the character of the decoration. Form two loops, secure the center tightly, and allow two tails to fall diagonally across the upper tier. Sew the bow securely instead of relying only on temporary adhesive.
A crocheted star or snowflake can be added above the bow. To make a simple star, begin with a small ring and work five evenly spaced points. Each point can be formed by chaining several stitches, working back down the chain with sl st and sc, and returning to the center. Starch or fabric stiffener is optional if you want the topper to remain upright. A small felt backing may also be sewn behind it for additional stability.
Continue inspecting the tree from all sides as decorations are attached. Because this is a three-dimensional centerpiece, balance is important. Make sure the beads do not pull one section downward, and arrange the ruffles so they spread evenly around the cone. The finished crochet Christmas decoration should look attractive from the front, sides, and back, particularly if it will be displayed in the center of a table.
Assembly, Shaping, Finishing, and Customization
When all the crochet sections are complete, weave in yarn tails using a tapestry needle. Pass each tail through several stitches on the wrong side, reverse direction, and weave through another group of stitches before trimming. This prevents ends from working loose. Pay special attention to areas supporting beads or the bow because these portions may experience additional pulling during handling and storage.
If the tree was made from separate tiers, stack them from largest to smallest over the central body. Place the largest ruffle near the base and position each smaller section slightly higher. Sew each tier to the central cone at several evenly spaced points. Avoid sewing through the entire ruffle because the outer edge should remain free to move and form attractive waves.
A soft tree can be lightly filled with polyester fiberfill. Add only enough stuffing to maintain the shape because excessive filling may stretch the stitches and make the structure look rounded instead of tapered. For a firmer decorative tree, insert a lightweight craft cone or create a stiff crocheted inner cone. If using a solid support, ensure that no sharp edges can damage the yarn.
The bottom can be closed with a crochet circle. Begin with 6 sc in a magic ring and increase evenly in the traditional flat-circle sequence: 2 sc in each st, then [sc 1, inc], [sc 2, inc], [sc 3, inc], and so on until the circle matches the base diameter. Sew or single crochet the circle to the lower edge after the internal support has been inserted.
Blocking can improve the final appearance. Lightly mist the ruffled sections with water and arrange the folds with your fingers. Allow the project to dry completely while maintaining the desired shape. Do not aggressively flatten the ruffles because their three-dimensional movement is an essential feature of this Crochet Christmas Tree Pattern. If the yarn label allows steam blocking, keep the heat source safely above the fabric rather than pressing it directly.
Customization is one of the biggest advantages of this pattern. Traditional green and white creates a classic Christmas tree, while green and gold offers a warmer style. A completely white tree can resemble a snowy winter decoration, and red with white edging produces a bold holiday centerpiece. You can also make miniature versions for shelves, table settings, office decorations, or handmade gifts simply by using lighter yarn and a smaller hook.
Frequently Asked Questions
What skill level is recommended for this Crochet Christmas Tree Pattern?
An adventurous beginner or intermediate crocheter should be comfortable with this project. The basic stitches are simple, but the pattern uses increases, circular construction, ruffles, shell edging, and assembly. Crocheters who already understand single crochet, double crochet, and working in rounds will probably find the instructions straightforward.
What does “increase” mean in crochet?
An increase means working more than one stitch into the same stitch from the previous round. For example, 2 sc in next st means placing two single crochet stitches into one stitch. In this tree pattern, increases gradually widen the cone and create dramatic ruffles when worked frequently.
Which yarn is best for a crochet Christmas tree?
Medium-weight cotton, cotton blend, or acrylic yarn works well. Cotton provides strong stitch definition and usually creates firm ruffles. Acrylic yarn is widely available and can produce a softer tree. Choose a yarn with enough body to hold the dimensional layers.
How can I make the tree larger?
Continue adding rounds to the central cone and create additional ruffled tiers. You can also use a thicker yarn and larger crochet hook. When increasing the size, remember that the bottom tiers must become proportionally wider to maintain the recognizable Christmas tree silhouette.
How can I make a miniature version?
Use lightweight yarn, such as sport or fingering weight, and a smaller hook. Reduce the number of rounds in each section and make three tiers instead of four or five. The same crochet stitch pattern can therefore create both tiny ornaments and larger tabletop decorations.
Why are my ruffles not wavy enough?
The most common reason is insufficient increases. Try placing two double crochets into more stitches during the ruffle round. The greater the stitch count compared with the previous round, the more the fabric will wave. If the ruffle becomes excessively curled, reduce the number of increases.
Can I crochet the entire tree as one piece?
Yes. The upper cone and tiered sections can be worked continuously by creating structural rounds followed by heavily increased ruffle rounds. However, crocheting the tiers separately is often easier for beginners because every layer can be adjusted before assembly.
Do I have to use beads?
No. Beads are entirely optional. You can replace them with embroidered French knots, small crochet circles, tiny pompoms, miniature bows, sequins, or contrasting yarn details. Leaving the tree without ornaments also creates a beautiful minimalist decoration.
How do I make the tree stand upright?
A firm central cone is the easiest solution. You can create a densely crocheted cone and add light stuffing, or insert a lightweight internal support. A flat circular base also helps stabilize the project. Avoid making the upper decorations too heavy, as this may cause the finished tree to lean.
Can the white edging be replaced with another color?
Absolutely. The white scallops can be changed to gold, cream, red, silver, pale green, or any color that suits your Christmas décor. The edging method remains the same regardless of color.
What is the approximate finished size?
Using medium-weight yarn and a 4.0 mm hook, a decorative version can measure approximately 10–14 inches (25–36 cm) tall and 8–10 inches (20–25 cm) across the base. Exact measurements depend on your yarn, tension, hook, number of rounds, and ruffle fullness.
Can this pattern be made without a ribbon bow?
Yes. The bow is decorative rather than structural. You can replace it with a crocheted bow, star, snowflake, flower, miniature ornament, or simply leave the upper section undecorated.
How should the finished crochet tree be stored?
Store it in a clean, dry container where the ruffled layers are not heavily compressed. If the project becomes flattened, gently reshape the ruffles by hand before displaying it again. Removable bows can also be stored separately to prevent creasing.
Conclusion
The Crochet Christmas Tree Pattern combines basic crochet techniques with creative shaping to produce an elegant three-dimensional holiday decoration. Throughout this tutorial, you learned how to begin the central cone, use crochet increases to control the shape, create dramatically flared green tiers, add contrasting white scalloped edging, assemble multiple layers, construct a stable base, and finish the tree with pearls, ribbon, and a decorative topper.
The key to this project is understanding how stitch increases affect crochet fabric. Gentle increases create the tapered body, while frequent increases transform ordinary rounds into beautiful ruffles. Once that concept becomes familiar, you can easily adjust the size, fullness, number of tiers, edging style, and decorative details to create your own version of the Crochet Christmas Tree Pattern.
Whether you choose classic green and white, traditional Christmas red and green, sophisticated gold and cream, or a completely personalized palette, this pattern offers plenty of opportunities for creativity. Take your time during assembly, shape every tier carefully, and make sure your decorations are securely attached. The finished tree can become a charming handmade centerpiece, shelf decoration, seasonal gift, or special piece that returns to your Christmas décor year after year.