
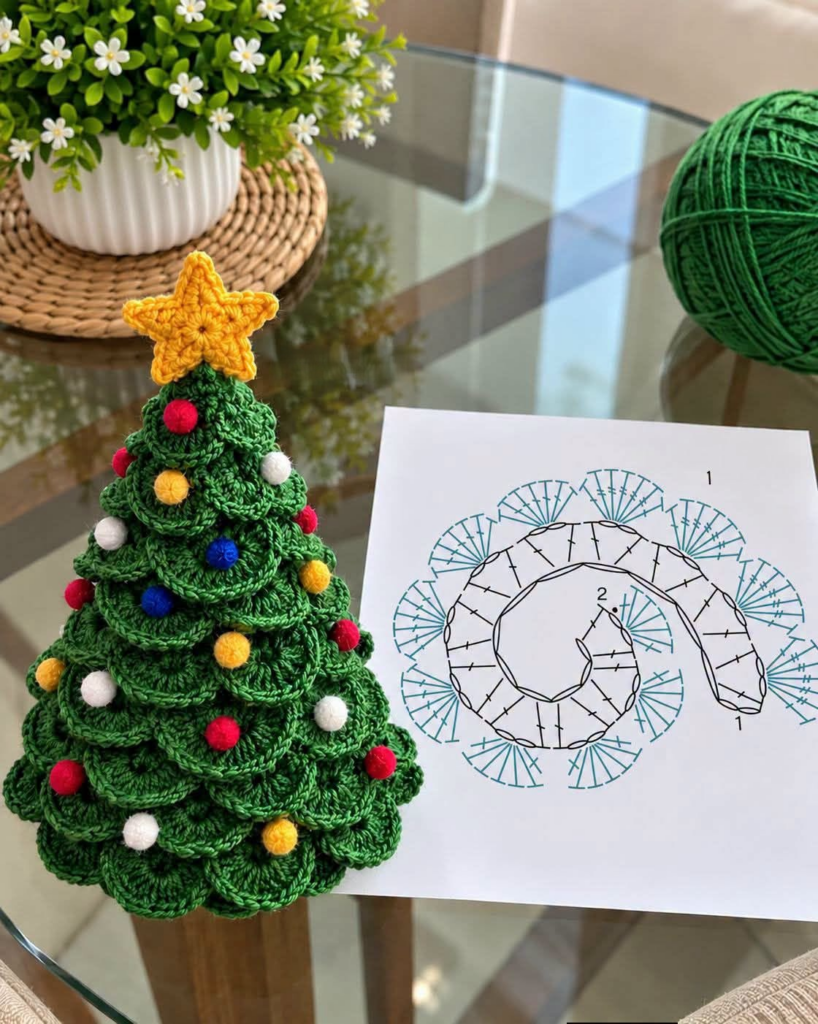
Crochet Christmas Tree Pattern is a beautiful holiday project for anyone who wants to create a handmade Christmas decoration with rich texture, dimensional branches, colorful ornaments, and a classic star at the top. Inspired by the project shown in the reference image, this version is more elaborate than a simple flat crochet tree. The finished design has a three-dimensional cone-shaped structure covered with overlapping crochet scallops that resemble layers of evergreen branches. Small colorful decorations are distributed across the surface, while a bright yellow crochet star completes the traditional Christmas look.
The most distinctive feature of this crochet Christmas tree pattern is the layered construction. Instead of crocheting one plain cone and leaving the surface smooth, decorative shell-like sections are worked in repeating rounds. These scalloped layers overlap one another from the bottom toward the top, creating the impression of dense branches. The technique gives the tree a full appearance without requiring dozens of separately crocheted leaves. As the tree becomes narrower, the number and size of the decorative sections are gradually reduced, naturally producing the familiar triangular silhouette of an evergreen tree.
Although this 3D crochet Christmas tree looks detailed, it can be divided into manageable stages. You will first prepare the basic structure, then create the layered green branch effect, add the colorful ornaments, crochet the star, and complete the final shaping. Because yarn thickness, hook size, tension, and desired tree dimensions vary, the instructions focus on the construction principles rather than one rigid stitch count. This makes it easier to recreate the appearance of the photographed project while adapting the tree to the materials you already have.
Materials and Creating the Base of the Crochet Christmas Tree
To make this Crochet Christmas Tree Pattern, choose a medium or dark green yarn for the main tree. Cotton yarn provides excellent stitch definition and works especially well for the visible scalloped layers, while acrylic or blended yarn can also be used. The important consideration is choosing yarn with enough structure to prevent the branches from becoming excessively soft or floppy.
You will also need small amounts of red, yellow, white, and blue yarn for the ornaments. Prepare yellow or gold-colored yarn for the star. Other useful supplies include an appropriately sized crochet hook, scissors, a yarn needle, stitch markers, and suitable filling if you want the finished tree to be soft and freestanding. A lightweight internal cone-shaped support can also be used if you prefer a firmer decorative piece.
The basic structure can be crocheted as a cone. Begin at the bottom if you want to control the final diameter easily, or work from the top downward if that construction feels more natural. For a bottom-up version, create a circular foundation and establish enough stitches to produce the width you want at the base. The photographed tree has a relatively broad bottom compared with its height, which contributes to its traditional Christmas tree proportions.
After establishing the base circumference, begin working upward in rounds. Gradually decrease stitches as the tree grows taller. Do not remove too many stitches at once; evenly spaced decreases produce a smooth cone rather than sudden narrow sections. Place a marker at the beginning of each round so you can monitor the shaping and distribute decreases consistently.
Try to maintain firm, even tension throughout the crochet cone. A dense fabric provides better support for the decorative layers that will eventually cover the surface. If your stitches are extremely loose, the cone may stretch under the weight of the branches and ornaments. If they are excessively tight, however, shaping and assembly can become unnecessarily difficult.
Continue decreasing until the cone reaches the desired height and narrows to a small point. Before closing the top completely, check the shape. If you are using filling, add it gradually and distribute it evenly. Avoid overstuffing because excessive pressure can distort the stitches and make the tree wider than intended.
Crocheting the Layered Evergreen Branches
The beautiful texture in the reference crochet Christmas tree comes from repeating scalloped or shell-shaped branch sections around the tree. These can be created directly onto designated rounds of the cone or prepared as decorative circular layers that are attached afterward. Working directly onto the structure reduces the amount of sewing required.
Begin near the lower portion of the tree, where the branches should be largest. Join the green yarn and establish a foundation round around the cone. Then create repeating crochet shell stitches. A basic shell can consist of several taller stitches worked into the same stitch or space, producing a fan shape that naturally curves outward.
For fuller branches similar to those shown in the image, work a combination of double crochet stitches and carefully positioned chains. Several double crochets worked into one space create the rounded fan, while a shorter stitch between the fans anchors each section. Continue the sequence around the circumference until the first branch layer is complete.
Move upward and create another branch layer. Position the second row so its scallops overlap the spaces between those below whenever possible. This staggered arrangement produces a fuller appearance and prevents obvious vertical gaps. The lower layers should extend farther outward, while upper layers gradually become smaller as the tree narrows.
Continue adding decorative rounds toward the top. Because the cone circumference becomes smaller, each new level naturally contains fewer shell motifs. Keep comparing the tree from different angles to make sure the branch distribution appears balanced. If one area seems sparse, an additional small scallop can sometimes be added without altering the entire pattern.
Near the top, reduce the size of the shells so they remain proportional to the narrowing tree. The final green layers should gather neatly beneath the star. Once the branch construction is complete, gently arrange each crochet scallop with your fingers so the layers overlap naturally and create the dense evergreen texture visible in the reference project.
Adding Colorful Ornaments and the Crochet Star
The colorful decorations are what transform the textured green cone into a recognizable Christmas crochet decoration. In the reference design, small round ornaments appear in red, yellow, white, and blue. You can reproduce this look using tiny crocheted circles, miniature bobbles, small yarn pom-poms, or compact embroidered knots.
To crochet a miniature ornament, create a small magic ring and work several compact stitches into it. Pull the center closed tightly and join the round. Depending on the yarn thickness, one small round may be enough. Leave a long tail so the ornament can be securely sewn onto the tree.
Make ornaments in several colors and distribute them across the branches before permanently attaching them. Avoid placing all ornaments in straight vertical or horizontal lines. A slightly irregular arrangement resembles a naturally decorated Christmas tree and creates better visual movement across the layered crochet branches.
Once you are satisfied with the arrangement, sew each ornament firmly into place. Pass the yarn through the underlying green fabric several times and weave the tail into the interior or surrounding stitches. If the decoration will be displayed around young children or pets, yarn-based decorations securely stitched to the tree are preferable to loose miniature embellishments.
For the star, begin with yellow yarn and create a compact center ring. Build five crochet star points around that center. Each point can be shaped by working progressively taller stitches and then progressively shorter stitches, or by using chains and slip stitches to establish sharp tips. The goal is to create five reasonably symmetrical points.
Finish the crochet Christmas star by weaving in the yarn ends and gently shaping each point. Position it securely at the top of the tree. Sew through the bottom portion of the star several times so it remains upright. If the star tends to lean, reinforce the attachment over a slightly wider area rather than fastening it at only one tiny point.
Finishing and Customizing Your 3D Christmas Tree
Once all the decorations are attached, inspect the entire Crochet Christmas Tree Pattern from every side. Rearrange the scalloped branches gently so they overlap evenly. Because this is a dimensional decoration, areas that appear balanced from the front may look different when the tree is rotated.
Check the bottom as well. A flat base is important if the tree will stand on a table, shelf, or mantel. If the bottom has become rounded, gently redistribute the filling. You can also create a separate flat crocheted circle and sew it to the base to provide additional structure.
The color palette can easily be customized. Traditional red, white, yellow, and blue ornaments create a cheerful appearance, but you might prefer gold and cream decorations for an elegant tree. Pink and white can create a playful modern version, while red and gold produce a more classic Christmas tree decoration.
You can also change the size. Thicker yarn and a larger hook create a bigger tree more quickly, while fine yarn and a small hook can produce miniature versions suitable for ornaments or tabletop displays. When changing the size substantially, adjust the ornaments and star proportionally so the finished design remains visually balanced.
Another option is to create several crochet Christmas trees in different heights. A collection of three trees can form a charming handmade holiday display. Use the same green yarn for all of them while varying the ornament colors, or crochet each tree in a different shade of green for a woodland-inspired arrangement.
Finally, keep notes about your hook size, yarn, starting circumference, decrease placement, number of branch layers, and finished dimensions. These notes become your personalized Crochet Christmas Tree Pattern and make it much easier to reproduce the design later, especially if you want to make a matching set.
FAQ About the Crochet Christmas Tree Pattern
Is this Crochet Christmas Tree Pattern suitable for beginners?
It is suitable for confident beginners who understand basic stitches and working in rounds. The construction uses techniques such as single crochet, double crochet, slip stitches, increases, decreases, shells, and joining. Beginners may find it helpful to practice the shell stitch separately before working the decorative layers.
What yarn is best for a 3D crochet Christmas tree?
Cotton is an excellent option when you want defined stitches and structured branches. Acrylic and blended yarns can also work well. Choose a yarn that provides enough body for the scalloped layers to remain visible.
How do I make the crochet tree stand upright?
Use firm tension when making the cone and avoid excessive stuffing. Distribute the filling evenly and keep the bottom flat. For additional structure, you can use a suitable internal support or reinforce the base with a separate crocheted circle.
How do I create the layered branch effect?
The layered appearance is produced with repeated crochet shell or fan motifs. Work several taller stitches into the same space to create each fan, anchor it with shorter stitches, and repeat around the tree. Position subsequent layers above and between the previous scallops.
Can I make the Christmas ornaments entirely from yarn?
Yes. Small crocheted circles, bobbles, knots, or miniature yarn pom-poms work beautifully. Yarn decorations also maintain the fully handmade appearance of the project.
How many branch layers should a crochet Christmas tree have?
There is no universal number. It depends on the height of the tree, yarn thickness, and size of your shell motifs. Continue adding layers until the cone is adequately covered, making the upper layers progressively smaller.
Can I make this Christmas tree without stuffing?
Yes. You can place the crocheted exterior over a suitable cone-shaped internal form instead. Alternatively, a sufficiently structured crochet construction may hold its shape with minimal internal support, depending on the yarn and tension.
Why are my crochet branches curling?
Curling can occur because of very tight tension or because the shell contains too many or too few stitches for its foundation space. Adjust the number of stitches gradually until each scallop sits naturally.
How can I make the crochet star firmer?
Use compact stitches and firm tension. Gentle blocking may also help shape the points if appropriate for the yarn. Attaching the star across several stitches at the top of the tree will help it remain upright.
Can I use this Crochet Christmas Tree Pattern as a gift?
Certainly. A handmade 3D crochet Christmas tree can become a thoughtful seasonal decoration. You can personalize the ornament colors to coordinate with the recipient’s holiday décor or make a small collection in different sizes.
Conclusion
The Crochet Christmas Tree Pattern shown in this style demonstrates how basic crochet techniques can be combined to create an impressive three-dimensional holiday decoration. The secret to its appearance is the combination of a structured cone, overlapping crochet shell branches, colorful miniature ornaments, and a five-point star at the top.
Throughout this tutorial, you learned how to build the basic tree shape, gradually decrease the cone, crochet layered evergreen branches, create miniature decorations, make a crochet Christmas star, and assemble everything into a balanced freestanding design. Working from the bottom upward also makes it easier to control the proportions and gradually reduce the size of the branches.