
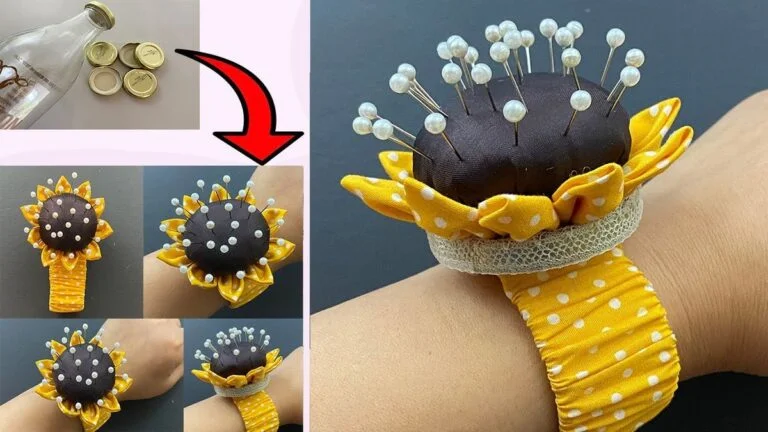
There’s nothing quite like adding a touch of sunshine to your sewing space! If you love sewing, quilting, or any kind of creative handwork, this adorable sunflower wrist pincushion is the perfect accessory. Not only does it keep your pins within easy reach while you work on your favorite quilting pattern, but it also brings joy and brightness to your workspace.
This simple tutorial will guide you through making your own “Pincushion Shining Like the Sun” using basic materials you probably already have at home. Whether you’re a beginner quilter or an experienced crafter, you’ll find this project quick, practical, and deeply satisfying. Let’s get started and make your sewing time a little sunnier!
Materials You’ll Need
Before we begin, let’s gather everything you’ll need to create this cute sunflower pincushion. Most of these materials are likely already in your craft supplies. Feel free to substitute fabrics or colors according to your personal style.
- Fabric: Yellow cotton fabric (for the petals) and brown fabric (for the cushion center)
- Elastic band: About 20 cm long for the wrist strap
- A small bottle cap: Metal or plastic, for the pincushion base
- Stuffing: Cotton, fiberfill, or fabric scraps
- Thread and needle: Matching colors for your fabric
- Hot glue gun or fabric glue
- Scissors and ruler
- Pins or decorative beads (optional)
- Lace or ribbon (optional for decoration)
Now that your materials are ready, clear your workspace and prepare to enjoy a relaxing crafting session. This project is quick and easy—perfect for a cozy afternoon of creative quilting fun.
Step 1: Preparing the Base
Start by cleaning and drying your bottle cap. This will serve as the foundation for your pincushion. Choose a cap that fits comfortably on your wrist—not too large, but big enough to hold your pins securely.
Next, cut a small piece of brown fabric about 8–10 cm in diameter. This will become the cushion part of your sunflower. Using a simple running stitch around the edge, gently pull the thread to form a small pouch. Fill it with your chosen stuffing until it’s plump and soft. Once filled, pull the thread tight and secure it with a knot.
Finally, attach the brown fabric cushion to the bottle cap using hot glue or strong fabric glue. Press it firmly and let it dry. You now have the sturdy base of your pincushion—the center of your sunflower is ready to shine!
Step 2: Making the Sunflower Petals
Now it’s time to give your pincushion its bright and cheerful personality! Cut several small rectangles of yellow fabric (about 5 x 7 cm each). These will become the sunflower petals. Fold each piece in half lengthwise with the right sides facing each other, then sew or glue along one edge to form a small tube.
Turn each tube right-side out and press it flat with your fingers or a warm iron. Shape one end of each petal into a gentle point or curve, depending on the style you like. You can experiment—some petals can be longer or wider for a more natural look.
Once all petals are ready, start gluing or sewing them around the base of your brown cushion, overlapping slightly to form a full sunflower. Continue until the circle is complete, and admire how your pincushion begins to resemble a bright flower blooming in the sun.
Step 3: Creating the Wristband
This is the part that makes your pincushion not only pretty but also practical! Measure your wrist and cut a piece of elastic that fits comfortably—snug enough to stay in place, but not too tight.
Cut a strip of yellow fabric about 6 cm wide and long enough to wrap around your elastic with a bit of extra length. Fold the fabric in half lengthwise with the right sides facing in, sew along the edge, and turn it right side out to create a fabric tube. Insert the elastic inside the tube and sew both ends securely to keep it in place.

You can now glue or sew the elastic band to the underside of your sunflower pincushion. If you’d like, add a small piece of lace or ribbon where the band meets the flower for a charming touch. Congratulations—your sunflower wrist pincushion is almost complete!
Step 4: Assembling and Decorating
Before finishing, take a moment to check all your connections. Make sure the glue is firm and the petals are evenly spaced. If you want to add a little sparkle, you can decorate the petals with small beads, pearls, or tiny buttons.
You might also choose to wrap a lace band around the base of the pincushion for a more vintage quilting style. The combination of textures—soft cotton, shiny beads, and delicate lace—creates a beautiful balance that reflects your unique creativity.
Once you’re happy with the look, insert a few pins or needles into the cushion and test it on your wrist. You’ll immediately see how practical and beautiful this little creation is!
Step 5: Tips for Customization
The beauty of this project lies in its versatility. You can adapt the same design to match your personality, your sewing room décor, or even your quilting projects.
Try using different colors: for example, red and pink fabrics for a daisy-inspired look, or blue tones to create a peaceful, ocean-inspired flower. You can also experiment with printed fabrics—polka dots, stripes, or tiny florals all look delightful.
For quilters, this pincushion can even become part of your creative journey. Match the fabric of your pincushion to your current quilting pattern so everything feels connected. You can even make one for each season—bright yellow for summer, orange for autumn, and soft pastels for spring!
Step 6: A Quilter’s Best Friend
Every quilter knows how important it is to keep pins organized and accessible. This sunflower pincushion not only makes your work more efficient but also adds beauty and warmth to your quilting routine.
Imagine working on a new quilt block, reaching for a pin, and being greeted by this sunny little flower on your wrist. It’s small touches like this that make quilting even more enjoyable—a combination of practicality and art.
Whether you’re hand-piecing a new quilting pattern or machine stitching a patchwork project, this wrist pincushion will quickly become one of your favorite handmade tools.
Step 7: Sharing the Sunshine
Now that you’ve created your very own “Pincushion Shining Like the Sun,” don’t keep it to yourself! Share photos of your project on social media or in your favorite quilting group. Use hashtags like #QuiltCraft, #QuiltingPattern, or #HandmadeSewing to inspire others.
If you have quilting friends or sewing buddies, this project also makes a wonderful handmade gift. You can create sets of pincushions in different colors and give them as thoughtful presents to brighten someone’s day.
And remember—each time you look at your sunflower pincushion, you’ll see a symbol of creativity, patience, and joy. Handmade with love, it’s a small reminder that even the simplest projects can bring light into your creative world.
Final Thoughts
Crafting your own pincushion is not just about sewing; it’s about expressing your love for creativity and adding beauty to everyday tasks. The “Pincushion Shining Like the Sun” is the perfect blend of functionality and charm, ideal for anyone passionate about quilting or handmade crafts.
So, grab your fabrics, turn up your favorite playlist, and let your imagination bloom. As you pin, stitch, and quilt, may your workspace always shine as brightly as your sunflower pincushion.
Now it’s your turn—make it, share it, and let your sunshine shine through your quilting!