Adorable Felt Easter Chicks –
These adorable felt Easter chicks are the perfect handmade decoration for spring and Easter celebrations. Bright, colorful, and incredibly cute, they can be used as ornaments, table decorations, gift toppers, or even small toys for children.
The best part about this project is that it is beginner-friendly and requires only simple materials. If you love felt crafts, sewing projects, or Easter decorations, this tutorial is a fun and creative idea to try at home.
Materials Needed
Before starting, gather the following materials:
- Yellow felt
- Colored felt (purple, pink, orange, blue, green)
- White felt
- Orange felt scraps
- Polyester fiberfill or cotton stuffing
- Black safety eyes or black beads
- Embroidery thread
- Sewing needle
- Fabric scissors
- Hot glue gun or fabric glue
- Pins or clips
- Fabric marker or chalk
- Ribbon bows or handmade felt bows
- Printable chick template (optional)
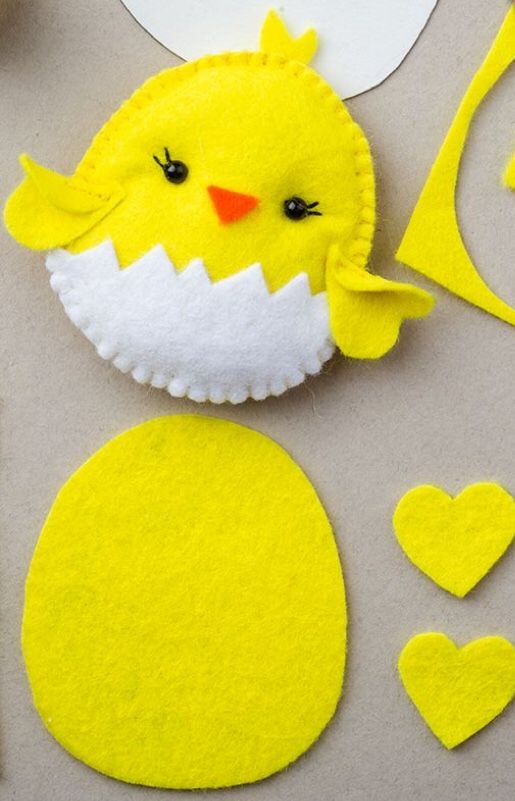
Step 1 – Cut the Felt Pieces
Using your template, cut all the necessary felt pieces:
For Each Chick You Will Need:
- 2 yellow chick body pieces
- 2 wing pieces
- 1 cracked egg bottom piece
- 1 bow
- 2 white eye circles
- 2 small black eye circles
- 1 orange beak
Cut carefully to keep the edges smooth and clean.
Step 2 – Prepare the Face
Place the eyes on the front body piece.
Sew or glue:
- White eye circles
- Black pupils
- Small orange beak
Make sure the face looks centered and balanced.
You can also add tiny white dots to the eyes using fabric paint to create a shiny effect.
Step 3 – Attach the Wings
Position the wings on both sides of the chick.
Sew around the edges with small stitches or glue them carefully using fabric glue.
This gives the chick a soft and dimensional appearance.
Step 4 – Create the Egg Shell
Cut the cracked egg shape from colorful felt.
Decorate it with:
- Polka dot ribbon
- Felt bow
- Small beads
- Decorative stitching
Attach the egg shell piece to the lower front section of the chick.
Step 5 – Sew the Body
Place the back body piece behind the front piece.
Sew around the edges using blanket stitch or whip stitch.
Leave a small opening at the bottom.
Stuff lightly with fiberfill to make the chick soft and puffy.
Close the opening with small stitches.
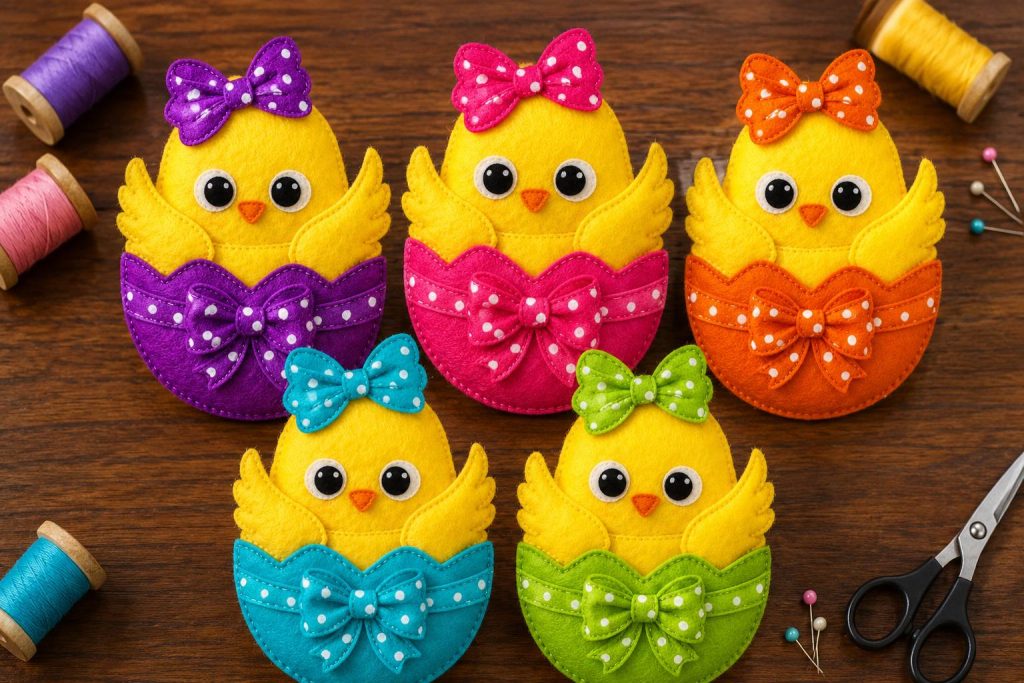
Step 6 – Add the Bow
Attach the bow to the top of the chick’s head.
You can use:
- Felt bows
- Ribbon bows
- Polka dot fabric bows
This final detail makes the project extra cute and colorful.
Step 7 – Final Details
Add decorative touches like:
- Tiny blush cheeks
- Decorative embroidery
- Glitter accents
- Hanging loop for ornaments
Your felt Easter chick is now finished and ready to display.
Creative Ideas for Using Felt Chicks
These cute chicks can be used in many different ways:
- Easter basket decorations
- Nursery decor
- Keychains
- Gift toppers
- Refrigerator magnets
- Party favors
- Spring garlands
- Handmade toys
They also sell very well at craft fairs and online handmade shops.
Tips for Beginners
- Use stiff felt for better structure
- Cut slowly for cleaner edges
- Use matching thread colors
- Do not overstuff the chick
- Hot glue works well for quick assembly
Even beginners can complete this project in a short time.
Why People Love Felt Easter Crafts
Felt crafts are:
- Affordable
- Easy to make
- Beginner-friendly
- Great for kids and adults
- Perfect for seasonal decorations
Colorful Easter projects like these felt chicks are especially popular on Pinterest, Etsy, and Facebook crafting groups during springtime.
Final Thoughts
These handmade felt Easter chicks are cheerful, colorful, and incredibly fun to create. Whether you make them for your home, gifts, or to sell online, they are sure to bring smiles and brighten any Easter celebration.
With just a few simple materials and a little creativity, you can create a beautiful collection of adorable spring decorations that everyone will love.