
The world of crochet offers endless opportunities to explore your creativity, and the Amigurumi Rooster is one of the most vibrant projects you can undertake. Whether you’re a seasoned crafter or a curious beginner, this project allows you to bring a colorful, cheerful rooster to life using only yarn, a hook, and a touch of imagination.
As part of the broader universe of crochet patterns, amigurumi projects are especially beloved for their playful designs and emotional appeal. The rooster, with its bold feathers and proud stance, is a popular figure in many cultures, symbolizing courage and awakening.
In this article, you’ll find a FREE crochet pattern for a delightful amigurumi rooster, complete with detailed instructions, a list of materials, and a step-by-step breakdown. You’ll learn how to create this charming farmyard friend from scratch using basic crochet techniques.
Materials You’ll Need
Before diving into the pattern, it’s important to gather all necessary materials. For this amigurumi project, quality yarn and a few standard tools are key to achieving a polished finish.
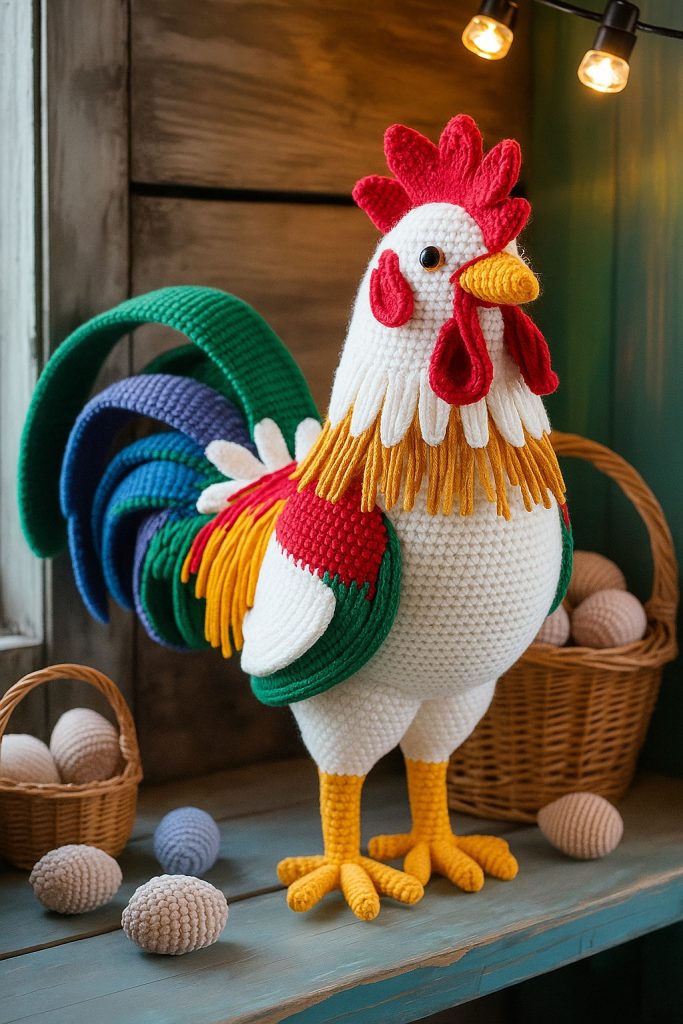
You’ll need worsted weight cotton yarn in a variety of rooster-friendly colors: red for the comb, yellow for the beak and feet, white or brown for the body, and any vibrant hues for the tail and wings. Using bold colors is encouraged, as it enhances the visual appeal of your rooster.
Other essential materials include a 2.5mm or 3.0mm crochet hook (depending on your tension), safety eyes or black embroidery thread, fiberfill stuffing, a yarn needle for sewing, and scissors. These basic items are staples in most crochet projects and will help you build the rooster step by step.
Understanding Amigurumi Techniques
To make this Amigurumi Rooster, you’ll use a few foundational crochet patterns and techniques common in amigurumi. These include the magic ring (also called a magic circle), single crochet (sc), increase (inc), and decrease (dec).
The magic ring is the best way to start most amigurumi shapes because it ensures a tight, hole-free starting point. Single crochet stitches create the dense fabric typical of amigurumi, making the toy durable and firm.
Learning to shape your rooster involves increasing and decreasing strategically to form curves for the head, body, wings, and tail. These basic techniques are repeated throughout the pattern, so once you master them, you’ll be ready to take on more complex amigurumi crochet patterns in the future.
Step 1: Crochet the Rooster’s Head and Body
Start with the head, using your main yarn color. Create a magic ring and work 6 single crochets into it. From there, increase each round until the shape forms a sphere. Once the desired width is reached, maintain the stitch count for several rounds to give height to the head.
Without fastening off, continue working the body from the head downward. Gradually increase the stitch count to make the torso wider, then begin to decrease as you reach the bottom to give the body a pear shape.
Stuff the head and body firmly with fiberfill as you go. This ensures the rooster maintains its shape and feels soft but solid. Once the body is complete, fasten off and leave a long tail for sewing.
Step 2: Make the Wings and Tail Feathers
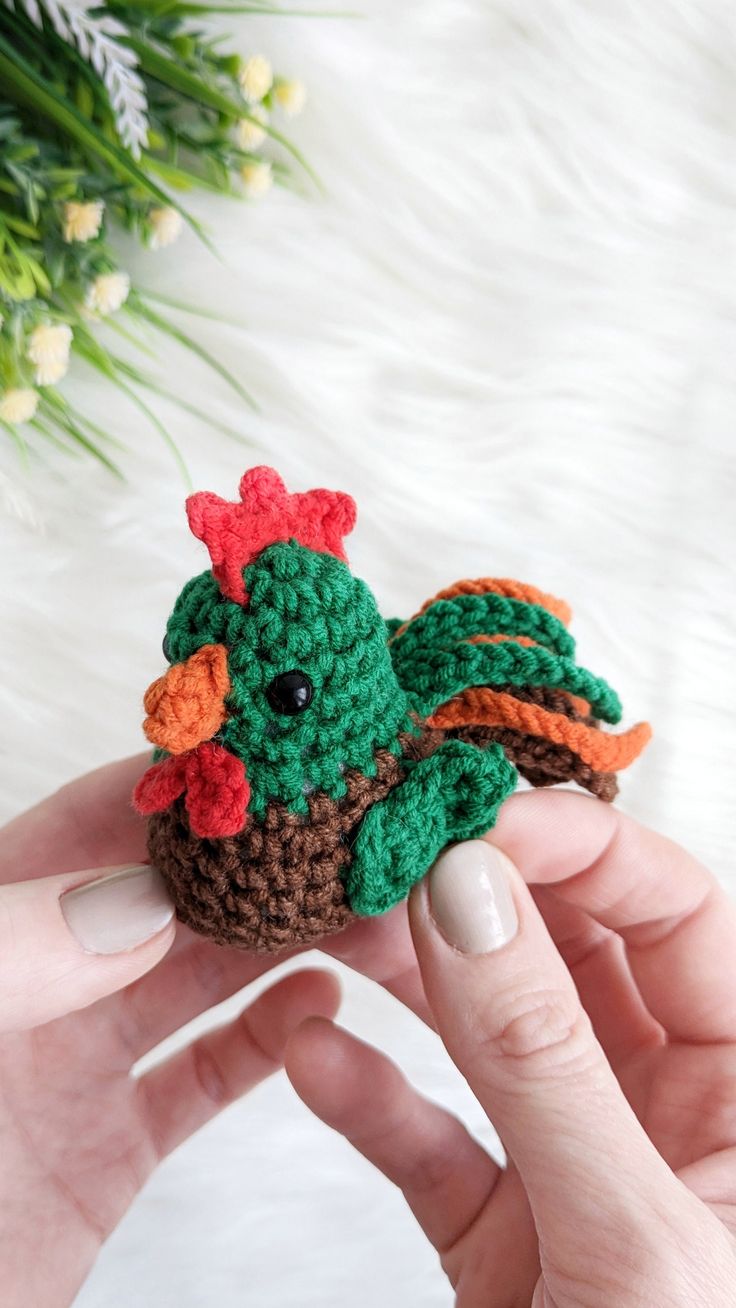
The wings are made separately and attached to each side of the rooster. Begin with a magic ring and work in rounds to create a small oval shape. You can use a contrasting color here to add visual interest.
Make two identical wings, and lightly stuff them before sewing them onto the body. Position them slightly back so they sit naturally when the rooster is upright.
The tail feathers are the most fun part. Use a mix of colors to crochet small, curved feather shapes. These are usually crocheted flat and then sewn together in a fan shape at the back of the rooster. This step allows you to play with color and texture, bringing your rooster to life with flair.
Step 3: Add the Comb, Beak, and Wattle
The comb is a small red piece that sits on top of the rooster’s head. Crochet it in rows or rounds, forming small rounded “bumps” that imitate the rooster’s crown. You can make it slightly oversized for a more cartoonish effect.
The beak is crocheted in yellow, starting from a magic ring and decreasing quickly to form a short, pointed triangle. Stitch it securely to the center of the face.
Below the beak, make a wattle using red yarn. This is usually a tiny chain or flat piece that dangles under the beak. Combined, the comb, beak, and wattle give your amigurumi a realistic and playful appearance.
Step 4: Craft the Legs and Feet
The legs and feet are crucial for helping your rooster stand or sit with balance. Use yellow yarn and crochet two long tubes for the legs. For the feet, work out three toes for each foot and attach them securely to the bottom of the legs.
You can either stuff the legs lightly or leave them unstuffed, depending on whether you want flexibility or a firm structure. Attach the legs at the base of the body, ensuring they are symmetrical.
If you’d like your rooster to sit, angle the legs slightly forward when attaching. If you prefer a standing pose, consider placing a small weight inside the base to help the rooster remain upright.
Step 5: Attach Safety Eyes and Embroider Details
Now it’s time to give your rooster a personality! Use safety eyes if you’re making the toy for children over 3 years old. Place them evenly spaced on the head, between rows 8 and 10. If you prefer, embroider small black eyes using thread for a softer look.
You can add little eyebrows, a smile, or other facial expressions with embroidery thread. These small details help personalize your crochet project and make it even more endearing.
Adding blush with a touch of pink yarn or even a dab of fabric-safe paint can also bring your rooster to life. These finishing touches take your amigurumi from a basic shape to a full character.
Customizing Your Amigurumi Rooster
One of the joys of working with crochet patterns is the freedom to customize. You can choose any color palette for your rooster, from realistic browns and reds to fantasy rainbows or even metallic threads.
Consider making a series of roosters, each with a different personality. You can vary the size by using thinner or thicker yarn and adjusting your hook size accordingly. Tiny keychain roosters or large decorative ones—there’s no limit to what you can create.
Adding accessories like a bandana, hat, or even tiny crochet eggs can make your rooster part of a themed display. It’s a great way to celebrate holidays, birthdays, or even cultural traditions through crafting.
Why Crochet Roosters Make Great Gifts
Amigurumi roosters make fantastic handmade gifts. They are perfect for farmhouse décor, nursery accents, or simply to make someone smile. Their cheerful presence is uplifting and suitable for all ages.
Because this is a FREE crochet pattern, it’s accessible to anyone with basic crochet skills and a bit of time. Creating a handmade toy also adds sentimental value, making it much more meaningful than a store-bought item.
Whether for Easter, New Year (roosters are zodiac animals), or as a symbol of good luck, this crochet rooster is a timeless piece. Personal touches make it even more special for the recipient.
Download and Save This FREE Crochet Pattern
To ensure you don’t lose this pattern, bookmark this page or copy the instructions into your crochet journal. You can also download and print a PDF version for offline use.
Many crochet patterns for amigurumi are shared online for free, thanks to generous designers and communities. Supporting them by sharing, commenting, or linking back helps keep this tradition alive.
If you enjoyed making this Amigurumi Rooster, consider exploring other crochet animal patterns. From pigs to cows and beyond, a whole farmyard of creations awaits your hook!
Conclusion
This Amigurumi Rooster – FREE Crochet Pattern combines simplicity, charm, and endless potential for customization. With just a few materials and basic crochet techniques, you can create a cheerful rooster that will brighten any space.
PATTERN HERE
Crochet – Tutorial
FULL PATTERN ACCESS
You will be redirected to another site
As part of your growing collection of crochet patterns, this rooster offers not just a fun crafting experience but also the joy of creating something from scratch. Handmade toys carry love and care in every stitch.
Don’t wait—grab your hook, choose your favorite yarn colors, and let your creativity take flight with this delightful Amigurumi Rooster!