
Crochet lovers around the world have fallen in love with amigurumi—those adorable, handmade plush toys full of personality and charm. One of the most beloved characters to recreate in yarn form is Stitch, the mischievous alien from Disney’s Lilo & Stitch. In this post, we’ll walk you through a detailed crochet pattern to create your own Amigurumi Stitch from start to finish.
This tutorial is perfect for crafters who are comfortable with basic crochet skills and want to try something a little more ambitious. Whether you’re making a gift for a Disney fan or just adding to your own amigurumi collection, this pattern is guaranteed to make you smile.
Materials You’ll Need
Before diving into the stitches and shaping, gather your materials. These tools and yarns will ensure you have everything necessary to complete your Amigurumi Stitch crochet pattern.
Crochet Essentials:
- Worsted weight yarn in:
- Blue (main body)
- Light blue (belly, face)
- Purple (inner ears)
- Black and white (eyes)
- Pink (tongue)
- Crochet hook (size 2.5 mm to 3.5 mm recommended)
- Stitch markers
- Yarn needle (for sewing parts together)
- Safety eyes (10-12 mm recommended)
- Polyester fiberfill stuffing
- Scissors
- Optional: embroidery thread for nose and smile
Tip: Don’t forget to experiment with different yarn textures and colors to give Stitch a unique twist. Glittery yarn for the ears? Why not!
Understanding the Basics of Amigurumi
What is Amigurumi?
Amigurumi is the Japanese art of crocheting small, stuffed yarn creatures. The term combines “ami” (crocheted or knitted) and “nuigurumi” (stuffed doll). Typically, amigurumi toys are worked in the round, using single crochet stitches and increasing/decreasing to shape the body.
In this pattern, you’ll be using simple techniques to sculpt Stitch’s round head, big eyes, large ears, and tiny paws. This makes for a fun and satisfying crochet project—and once you get the hang of it, you’ll want to make more!
Stitches Used in This Pattern
- Magic Ring
- Single Crochet (sc)
- Increase (inc)
- Decrease (dec)
- Slip Stitch (sl st)
- Chain (ch)
Make sure you’re comfortable with these basic stitches before starting. If not, don’t worry—there are plenty of quick tutorials online that can help you master them.
Working in the Round
Unlike traditional crochet patterns that are worked in rows, amigurumi is typically made in a spiral. Always use a stitch marker to mark the first stitch of each round to avoid losing your place.
Step-by-Step: Crochet the Head
Start With the Magic Ring
Begin by crocheting a magic ring with your blue yarn. This allows you to pull the center tight, avoiding a hole at the top of Stitch’s head. From there, work single crochets in a spiral to increase and form a rounded head shape.
Remember to count your stitches carefully, especially in the early rounds. Consistency here ensures your head remains symmetrical and smooth.
As you build the shape, stuff the head firmly with fiberfill. It should feel squishy, but not loose. The firmness will help the head hold its shape and support the ears and eyes later.
Create the Body and Limbs
Shaping the Body
Using the same blue yarn, create the body as a rounded oval slightly smaller than the head. This helps Stitch maintain his cute, cartoonish proportions. You’ll increase to form the base, then keep the rounds even before tapering off near the neck.
Lightly stuff the body and sew it closed. Leave a long yarn tail for sewing the head to the body later on.
Making the Arms and Legs
Each limb is crocheted separately, beginning with a magic ring. Create four stubby shapes and stuff them lightly. Make sure to leave long tails for attaching them to the body.
Once the limbs are sewn in place, your Stitch will begin to take shape—and the excitement really builds!
Tip:
Stuffing lightly helps maintain softness while still keeping the limbs posable. You can add pipe cleaners inside the arms if you want them to be bendable.
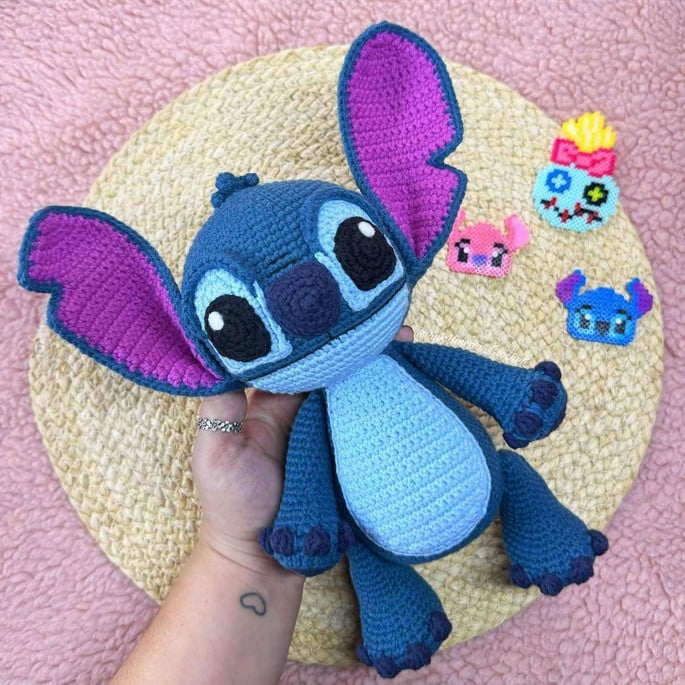
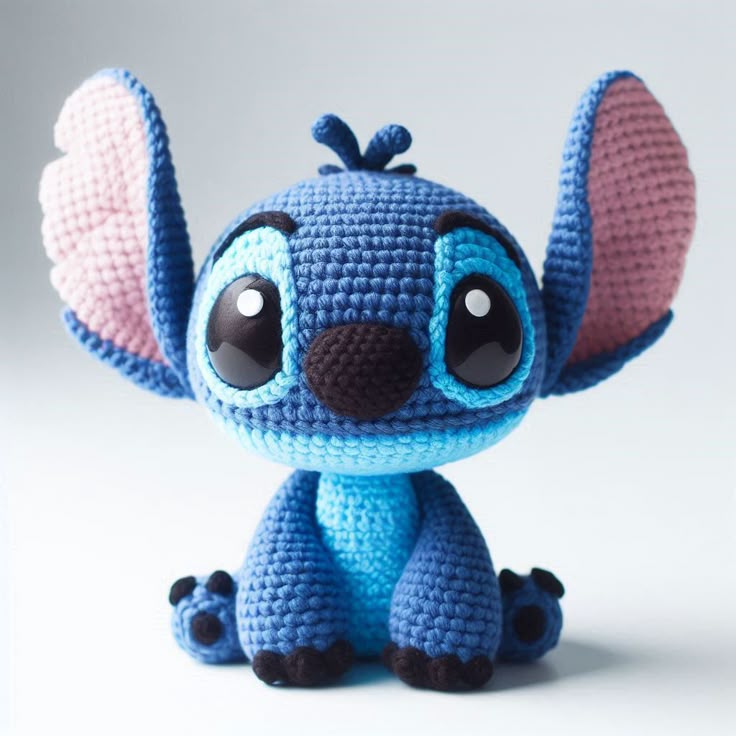
Stitch’s Iconic Ears and Face
Crocheting the Ears
The ears are a defining feature of Stitch and are what give him that recognizable silhouette. Each ear is worked in rows, with shaping on both ends. Use blue for the outside and purple or pink for the inside.
You’ll need to make four pieces total—two inner and two outer—and sew each pair together before attaching them to the head.
Bend them slightly as you sew to create that droopy, animated look Stitch is known for.
Adding the Face
Use safety eyes or crochet white and black circles to make Stitch’s large eyes. Position them close together above the nose area. You can embroider the nose directly onto the face using black yarn or thread.
Don’t forget the smile! A small curve of black thread under the eyes gives Stitch his adorable, mischievous expression.
Embellishments
To complete the face, crochet or embroider details like eyebrows and a tiny pink tongue. These finishing touches bring your amigurumi to life.
Assembly and Final Touches
Putting It All Together
Start by sewing the head to the body, ensuring it’s centered and secure. Then attach the arms and legs symmetrically to give balance to your plush.
Add the ears last to maintain symmetry. You might want to pin them in place first to test positioning.
Take your time with assembly—it’s what turns your separate crochet pieces into a cohesive and adorable plush toy.
Final Adjustments
Check for any loose ends and weave them in securely. Fluff and shape the body and limbs, adjusting stuffing as needed to maintain shape.
If you’d like to personalize your Stitch, consider adding a small outfit, a backpack, or even a tiny lei to reference his Hawaiian origins!
Happy Crochet!
Once everything is sewn, take a step back and admire your work. Congratulations—you’ve just completed your own Amigurumi Stitch crochet pattern!
Ideas for Gifting and Display
Great for Gifts
This plush makes a wonderful handmade gift for birthdays, baby showers, or holidays. Wrap it in tissue and place it in a handmade gift box for an extra-special touch.
Add to a Collection
Display your Stitch alongside other amigurumi characters or Disney-themed crochet creations. It’s a great conversation starter and makes your space more personal and crafty.
Sell Your Creation
If you’re comfortable, you might even consider selling your Stitch plush at craft fairs or online marketplaces. Just make sure to credit the original pattern if you followed one.
Conclusion: Explore More Crochet Patterns
Creating your own Amigurumi Stitch is not only fun, but also incredibly rewarding. From the first loop to the final stitch, every moment is filled with creativity and joy. Whether you’re keeping it for yourself or gifting it to someone special, your plush is sure to be loved.
PATTERN HERE
Crochet – Tutorial
FULL PATTERN ACCESS
You will be redirected to another site
Don’t stop here—there are so many more crochet patterns to explore. Try making Lilo to accompany your Stitch, or browse free amigurumi patterns online for your next project.
Happy crochet! And remember, don’t be afraid to try bold color choices or unique textures. Perfeito para adicionar um toque floral ao seu próximo projeto!