
The Bannard Hills Block is a timeless addition to any quilt. With its elegant geometry and traditional aesthetic, this quilt block is ideal for both beginners and experienced quilters. Whether you’re updating your home décor or making a gift, the Bannard Hills Block adds charm to your quilt.
Quilt patterns like the Bannard Hills Block are great for practicing precision and mastering fabric alignment. This block consists of squares, rectangles, and half-square triangles, which makes it a perfect project to refine your piecing skills. The result is a bold and clean visual impact in your quilt layout.
In this tutorial, you’ll learn how to create a Bannard Hills Block step by step. From fabric selection to sewing the final seam, this guide covers everything. All fabric cuts and measurements are included to help you follow along with ease and confidence.
Choosing Fabrics for the Bannard Hills Block
When planning your Bannard Hills quilt block, start by selecting three coordinating fabrics: one dark, one light, and one medium tone. The contrast between these fabrics brings the geometric lines of the block to life. Use quilting cotton for best results.
A well-balanced color palette enhances the overall quilt pattern. Consider using solid colors for a classic finish or printed fabrics for added visual interest. Remember that fabric placement affects how the block appears within the final quilt.
Using a design wall or digital quilt app can help you visualize how the block will look when repeated. This is especially useful if you’re planning to create an entire quilt using the Bannard Hills pattern. Audition your fabrics before cutting to avoid waste.
Fabric Cuts and Measurements
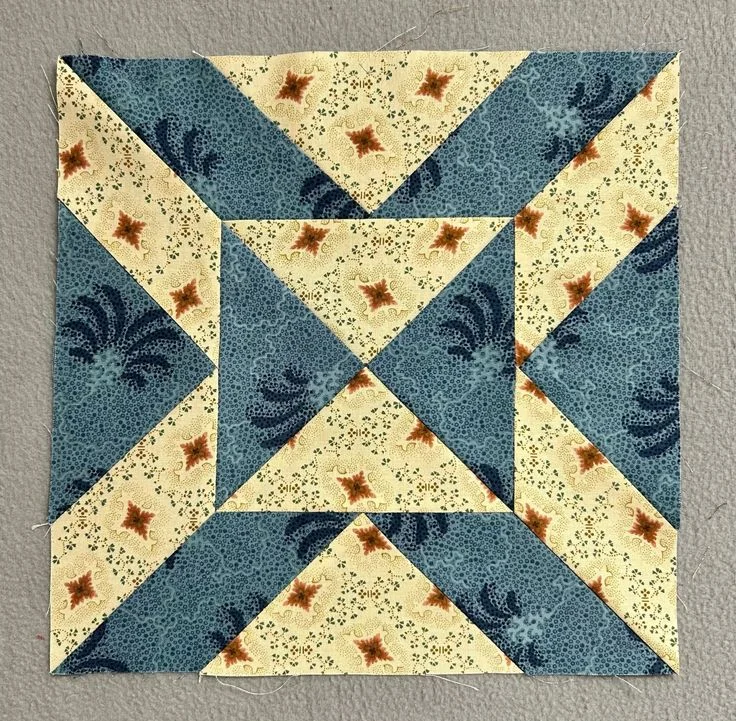
To make one Bannard Hills Block (finished size: 12″ x 12″), you’ll need to cut the following fabric pieces:
From Fabric A (dark):
- 2 rectangles, 2.5″ x 6.5″
- 4 squares, 2.5″ x 2.5″
From Fabric B (medium):
- 2 rectangles, 2.5″ x 6.5″
- 4 squares, 2.5″ x 2.5″
From Fabric C (light):
- 1 square, 4.5″ x 4.5″
- 2 squares, 5″ x 5″ (for half-square triangles)
These measurements create a block with excellent proportions and symmetry. Adjust fabric quantities if you’re making multiple blocks. Use a rotary cutter, quilting ruler, and self-healing mat for precision cuts.
Assembling the Half-Square Triangles (HSTs)
Start by making two half-square triangles using the 5″ x 5″ squares from Fabric B and Fabric C. Place one of each fabric right sides together, draw a diagonal line across the lighter square, and stitch 1/4″ on each side of the line.
Cut along the diagonal line to create two HSTs. Press seams open or to the darker side, depending on your preference. Trim each HST to 4.5″ x 4.5″ using a square ruler to ensure accuracy.
Repeat this process with the remaining 5″ x 5″ pair. You will now have four HSTs, which will form the corners of your Bannard Hills Block. Proper alignment here ensures that the quilt block remains symmetrical and clean.
Piecing the Center of the Block
At the heart of the Bannard Hills Block lies a strong central square, measuring 4.5″ x 4.5″. Place this square in the middle of your layout. It acts as the anchor for the entire quilt block design.
Next, sew the 2.5″ x 6.5″ rectangles (from Fabric A and B) to either side of the center square, creating a horizontal strip. Press seams toward the center. This forms the central row of the block.
Now, piece together the top and bottom rows of the block using your HSTs and 2.5″ x 2.5″ squares. Sew them in this order: square – HST – square – HST. Match seams carefully for a neat finish.
Final Block Assembly
Once you have your top, center, and bottom rows assembled, it’s time to join them together. Start by sewing the top row to the center strip, then attach the bottom row. Align the seams carefully to keep your quilt block square.
Press all final seams flat and check that your Bannard Hills Block measures 12.5″ x 12.5″ unfinished. This allows for a 1/4″ seam allowance on all sides when you join it to other blocks in your quilt.
Repeat this process for as many blocks as needed for your quilt size. The consistency of your seams and accurate trimming will make joining multiple blocks much easier.
Design Ideas Using the Bannard Hills Block
One of the advantages of the Bannard Hills Block is its adaptability. By rotating the blocks or alternating color schemes, you can create stunning visual effects throughout your quilt. The classic structure offers endless layout possibilities.
Try combining four Bannard Hills Blocks into a larger unit with a secondary pattern. This can create beautiful starbursts or pinwheels depending on how the half-square triangles are oriented. Use a digital quilt app to test different arrangements.
If you’re making a quilt for a baby, a lap quilt, or a queen-sized bed, you can adjust the number of blocks accordingly. Use sashing or borders to add extra spacing or to showcase each block individually.
Quilting and Finishing Tips
Once your quilt top is assembled, it’s time to think about quilting. A simple grid or straight-line quilting pattern enhances the clean lines of the Bannard Hills Block. You could also echo the triangle shapes with diagonal quilting lines.
Choose a backing fabric that complements your quilt top. This is a great chance to add a surprise pop of color or a soft flannel for comfort. Batting thickness will also influence the final texture of your quilt.
Finish with a strong binding, either matching one of your fabrics or using a contrasting color for emphasis. Make sure the edges are securely stitched, especially if the quilt will be heavily used or gifted.
Why Bannard Hills is Perfect for All Skill Levels
The Bannard Hills Block combines traditional aesthetics with a beginner-friendly construction. Its straightforward structure makes it a great quilt pattern for learning and improving piecing techniques.
For advanced quilters, the block offers opportunities to experiment with color theory, symmetry, and secondary designs. It’s a satisfying building block for a larger, more complex quilt layout.
Whether you’re sewing your first quilt or your fiftieth, this block is a joy to create. It’s versatile, striking, and deeply rooted in the rich history of quilt patterns across generations.
Final Thoughts: Add the Bannard Hills Block to Your Quilt Patterns
The Bannard Hills Block is a must-have for anyone building their library of quilt patterns. Its balance of simplicity and sophistication makes it a go-to choice for a wide range of quilting projects.
Use this tutorial as your guide to create your own Bannard Hills masterpiece. Keep your measurements accurate, your seams straight, and your creativity flowing. Each block you finish brings you one step closer to a beautiful completed quilt.
Ready to try more quilt patterns like this? Bookmark this page, share it with your quilting community, and download your favorite quilt app to organize your designs and ideas in one place.