
The Bear Paw quilt block is a timeless design that brings warmth, tradition, and structure to any quilt. Recognized for its geometric paw-like shapes, this quilt pattern is both charming and versatile. It’s the perfect choice for beginner quilters who want to explore a classic motif without feeling overwhelmed.
With just a few simple shapes—half-square triangles, squares, and rectangles—the Bear Paw quilt block comes together beautifully. Whether you’re creating a single block for a sampler quilt or an entire quilt top from repeated paws, this design offers endless opportunities for creativity. Plus, it works well with a variety of fabric styles, from traditional florals to bold modern prints.
In this tutorial, you’ll learn everything you need to make your own Bear Paw quilt block. We’ll cover a complete step-by-step guide, a detailed materials list, personalization ideas, and some helpful tips to ensure your quilting journey is as enjoyable as it is successful.
Materials You Will Need
Before diving into the stitching process, let’s gather the supplies you’ll need to create one Bear Paw quilt block. These materials are easy to find at most craft stores or online.
- Fabric:
- Main fabric (for the “paw”): Fat quarter or two 10″x10″ squares
- Background fabric (for contrast): Fat quarter
- Cutting Tools:
- Rotary cutter
- Quilting ruler
- Cutting mat
- Sewing Tools:
- Sewing machine
- Thread (cotton works best)
- Iron and ironing board
- Pins or fabric clips
This quilt pattern is ideal for using up scraps or coordinating a few key fabrics from your stash. Remember to pre-wash your fabrics if they are prone to shrinking or bleeding color.
Cutting Instructions
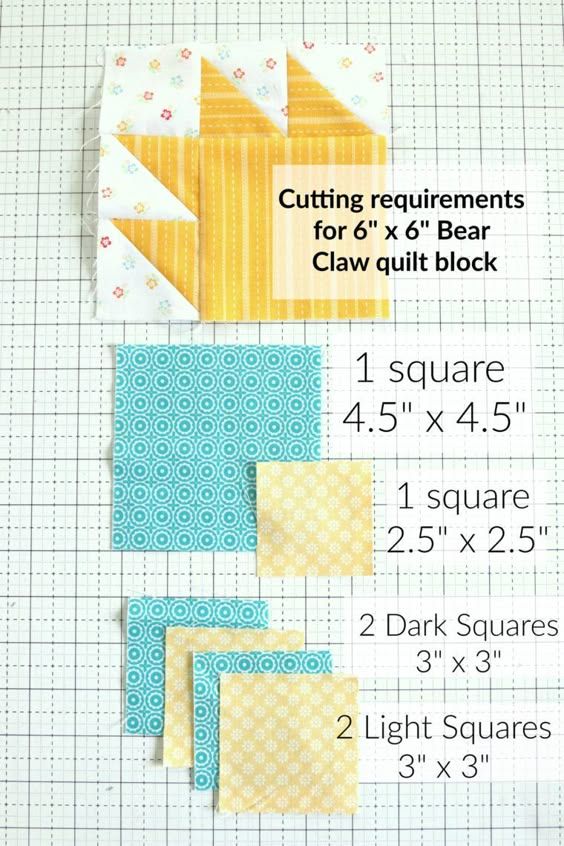
Precise cutting is essential to achieving clean and sharp points in your quilt block. Below are the cutting measurements for one 10.5” x 10.5” (unfinished) Bear Paw quilt block.
From the main fabric, cut:
- 4 squares at 2.5″ x 2.5″
- 4 squares at 3″ x 3″ (for half-square triangles)
From the background fabric, cut:
- 4 squares at 2.5″ x 2.5″
- 4 squares at 3″ x 3″ (for half-square triangles)
- 1 square at 4.5″ x 4.5″
Label each piece or group them in piles as you cut to keep things organized. Keeping the quilt pieces separated by size and purpose can make sewing smoother and quicker.
Step-by-Step Guide to Assembly
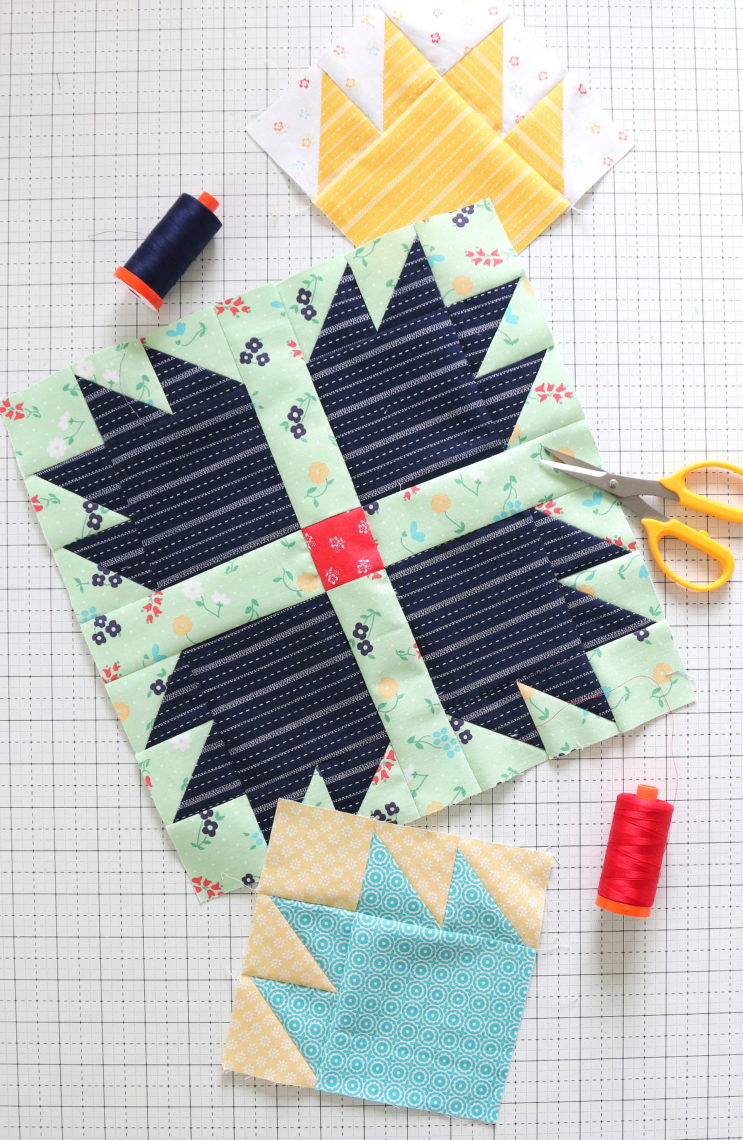
1. Make the Half-Square Triangles (HSTs):
Pair each 3″ main fabric square with a 3″ background square. Draw a diagonal line on the wrong side of the lighter fabric. Sew 1/4″ on both sides of the drawn line. Cut along the line and press the seams open. You’ll have 8 HST units. Trim each to 2.5″ square.
2. Assemble the Bear Paw Units:
Each “paw” is made up of 4 half-square triangles and one 2.5″ square of the main fabric, sewn together in a 3×3 grid. Use the HSTs to form a diagonal claw shape in each corner. Add background 2.5″ squares as needed to complete each unit. Make 4 of these paw units.
3. Put the Block Together:
Place the 4 paw units around the 4.5″ background square, one on each side, so the “claws” point outward. Sew each paw unit to the center square using 1/4″ seams. Then sew the top and bottom rows to the center strip. Press seams flat to finish your Bear Paw block.
Personalization and Design Ideas
One of the best things about the Bear Paw quilt pattern is its adaptability. Whether you’re working on a baby quilt, a throw blanket, or a decorative wall hanging, this block can be customized to suit your style.
- Color Play: Experiment with bold color palettes or soft pastels to create unique effects. Monochromatic schemes give a modern touch, while traditional reds, browns, and tans evoke a rustic, cozy vibe.
- Scrappy Style: Instead of using one main fabric, try a scrappy look using different prints in the paw areas. This approach is ideal for using leftover fabric and adds lots of visual interest.
- Scaling the Block: Adjust the measurements to create larger or smaller blocks depending on your project. A larger Bear Paw block makes a striking centerpiece, while smaller ones can be repeated to form a full quilt top.
You can also alternate Bear Paw blocks with solid blocks or sashing for a more dynamic layout. This quilt pattern is incredibly flexible, making it a fun and forgiving choice for beginners and experienced quilters alike.
Tips for Success
To make your quilting journey smoother, here are a few helpful tips:
- Accurate Seam Allowances: Stick to a consistent 1/4″ seam allowance throughout. This ensures all your blocks finish at the same size and line up correctly.
- Pressing Matters: Always press your seams after each step—preferably open or to the dark side of the fabric. It reduces bulk and keeps everything flat.
- Chain Piecing: Save time by sewing similar pieces together in one continuous line without lifting the presser foot. This is especially useful when making multiple blocks.
Don’t worry about perfection—quilting is as much about joy as it is about precision. Over time, your accuracy will naturally improve.
Expanding the Project
Once you’ve mastered the Bear Paw quilt block, think about ways to expand your project:
- Make a Table Runner: Combine 3 to 5 blocks in a row and add borders for a seasonal runner.
- Create a Quilt Top: Repeat the block in a 3×3 or 4×4 layout for a stunning throw quilt.
- Try a Mini Quilt: Use just one block with a wide border as a mini wall hanging or pillow cover.
Each finished block is a mini piece of art that contributes to a larger story when joined together. Whether you’re quilting for a gift or a personal heirloom, your creativity can shine through every stitch.
Conclusion: Share Your Quilt Journey!
Congratulations—you’ve completed your Bear Paw quilt block! Whether this is your first block or one of many, you’ve added a beautiful, timeless design to your quilting repertoire. With its simple construction and endless design possibilities, this quilt pattern is a true favorite among quilters of all levels.
Now it’s time to celebrate your success. Share your finished block on social media or with your local quilting group. Use hashtags like #BearPawQuilt and #QuiltPatternLove to connect with other passionate quilters. You never know who you might inspire!
Happy quilting—and remember, every stitch is a step forward on your creative journey.