
If you’re passionate about quilting and love playful, creative designs, the Bee in a Mug free pattern will absolutely delight you. This charming project is ideal for quilters who enjoy mixing whimsy with traditional techniques. Whether you’re creating a wall hanging, mug rug, or simply looking to expand your collection of quilt patterns, this project is the perfect addition to your sewing table.
In this tutorial, you’ll learn how to make your own Bee in a Mug quilt block using easy-to-follow steps, detailed fabric cuts, and clear guidance. Let’s dive into this buzz-worthy project and stitch something truly adorable!
Why Choose the Bee in a Mug Pattern?
The Bee in a Mug quilt block stands out because of its creativity and charm. It combines two cute motifs — a bee and a mug — into one cohesive and delightful design. This pattern is perfect for those who want to explore novelty quilt patterns while practicing essential piecing skills.
This pattern also offers flexibility. You can use it as a block in a larger quilt or turn it into a small project like a placemat, pillow cover, or mini wall hanging. It’s great for experimenting with color and fabric combinations, and the theme works wonderfully for kitchen decor, bee-lovers, or anyone who enjoys unique quilt blocks.
Additionally, this free pattern is beginner-friendly but engaging enough for experienced quilters to enjoy. It’s a great way to use up fabric scraps, test new quilt techniques, and add a cheerful twist to your quilting collection.
Materials You Will Need
Before you begin, gather the necessary materials. Having everything ready will make the quilting process smoother and more enjoyable. Here’s what you’ll need for one Bee in a Mug block:
- Assorted cotton fabrics (yellows, blacks, white, blue, background prints)
- Lightweight fusible web (for applique details)
- Batting (if making a mini quilt or mug rug)
- Backing fabric
- Coordinating thread
- Rotary cutter, ruler, and cutting mat
- Sewing machine and iron
Choosing vibrant fabrics will help your bee stand out, while a soft or neutral background fabric will balance the design. You can mix solids and prints for added texture and interest.
Cutting the Fabric – Quilt Block Measurements
Precise fabric cutting is crucial for achieving a clean and professional look. Below are the recommended fabric cuts for a 10″ x 10″ finished quilt block:
- Bee body (yellow/black stripes):
- 2” x 1” (x2 yellow), 2” x 0.5” (x2 black)
- Bee wings (white):
- 1.5” x 1.5” (x2)
- Bee head (black):
- 1.5” x 1”
- Mug (blue or printed):
- 4” x 3.5” (body), 1” x 2” (handle)
- Background (light solid or neutral print):
- Various filler pieces to frame and size the block to 10”
Using a rotary cutter and clear acrylic ruler ensures crisp edges. Lay out the pieces before sewing to get a feel for the layout and proportions.
Piecing the Bee Section
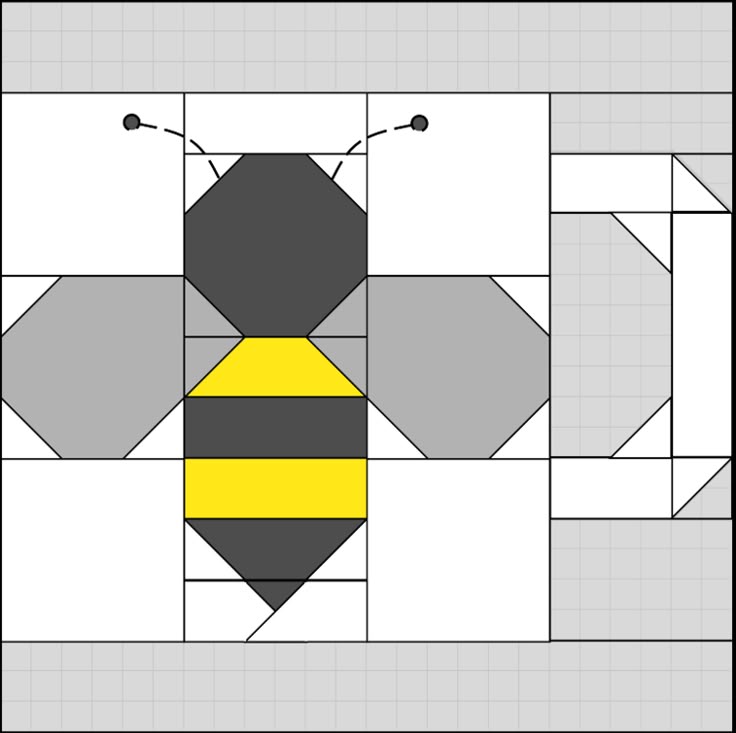
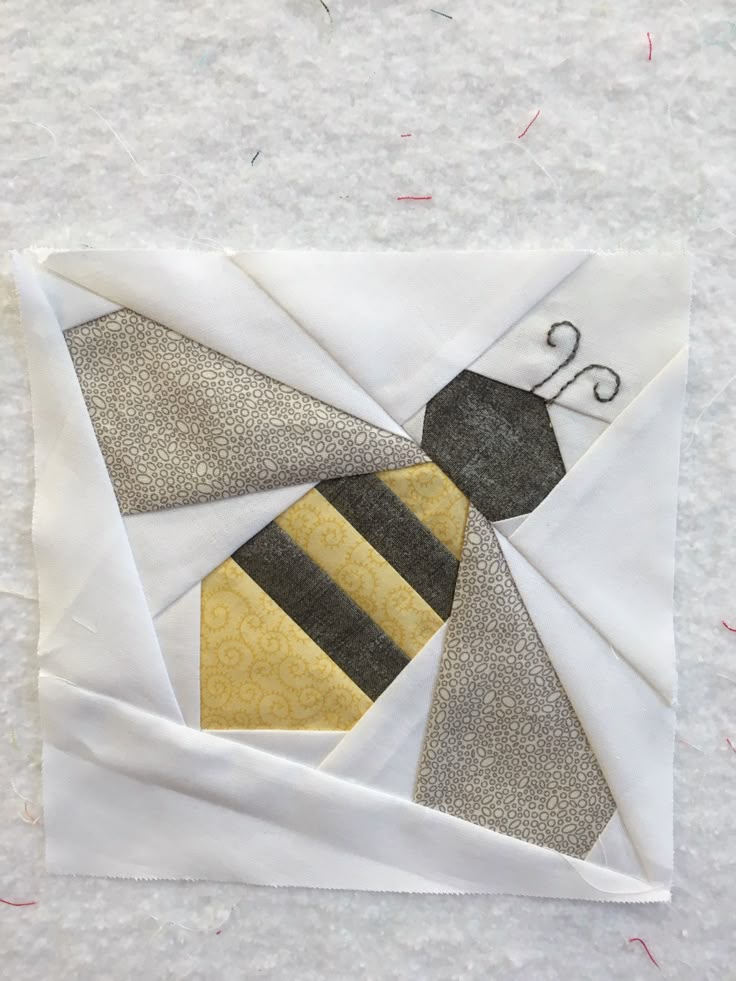
Start by assembling the bee. Sew the yellow and black stripe pieces together to form the bee’s body. Attach the head to one end and the wings above the body, aligning carefully to keep everything balanced.
Next, press all seams flat to reduce bulk and enhance the final look. The bee section should measure approximately 3.5” x 2.5” once sewn together. Make sure the wings are symmetrical and the stripes are evenly spaced.
You may also choose to applique the wings instead of piecing, depending on your skill level and preference. Applique allows for smoother curves and adds a layered look that’s visually appealing.
Constructing the Mug Block
The mug block is the anchor of this design and adds a cozy, familiar touch. Begin by stitching together the 4” x 3.5” fabric to form the mug’s body. For the handle, you can either applique a curved shape or piece a small rectangle and round the edges manually.
Position the mug on your background fabric and place the bee above or slightly to the side as if it’s floating near the mug. This playful positioning is what gives the design its unique personality.
Using fusible web can help secure the mug handle or small elements like steam swirls above the mug. Feel free to customize with tiny hearts or hexagons to reflect your personal style or the quilt’s theme.
Adding Background and Borders
After assembling the bee and mug sections, it’s time to complete the block with background fabric. Use neutral tones that let your bee and mug shine — soft creams, pale blues, or subtle prints work beautifully.
Fill in the block with strips or squares until you reach the desired 10” x 10” measurement. Be mindful of the seam allowances, and keep everything square and aligned. You can also add sashing or cornerstones if you’re planning to include the block in a larger quilt.
At this stage, press all seams once more and square up the block using a ruler and rotary cutter. Your Bee in a Mug block is almost ready to quilt!
Quilting and Finishing
Now that your block is assembled, layer it with batting and backing if you’re turning it into a mini quilt or mug rug. Use spray adhesive or safety pins to keep the layers secure. Then, choose a quilting design that enhances the block without overwhelming it.
A simple echo quilt around the mug and bee will give a clean, modern look. Alternatively, try free-motion quilting to add whimsy and movement — swirls, loops, or honeycomb patterns fit the theme nicely.
Finish by trimming the edges, adding binding, and securing it with a topstitch. Your Bee in a Mug quilt block is now complete and ready to brighten any space!
Tips for Personalizing Your Quilt Block
While the base pattern is charming on its own, adding personalized touches can make your quilt truly one-of-a-kind. Embroider tiny flowers, a steam swirl from the mug, or a stitched message like “Bee Happy” to make it special.
Try experimenting with fabric texture — mix cottons with linen or flannel for dimension. You could even use metallic thread or fabric paint for details like bee wings or mug steam.
This is also a wonderful gift project. Make several blocks and turn them into coasters, a table runner, or a small baby quilt with cheerful bee motifs throughout.
Where to Find More Quilt Patterns Like This
If you loved creating the Bee in a Mug free pattern, you’re likely hungry for more creative quilt ideas. Many designers and quilting communities online offer seasonal, whimsical, and animal-themed quilt patterns that match this vibe.
Check platforms like Pinterest, Etsy, or quilt blogs for patterns that align with your style. Apps and websites dedicated to quilting are great tools for downloading PDF quilt patterns, tracking progress, and finding community support.
Don’t forget to sign up for free newsletters from your favorite quilt pattern designers — they often send exclusive free patterns, including blocks similar to this one.
Final Thoughts
The Bee in a Mug FREE PATTERN brings together creativity, joy, and the soothing process of quilting. Whether you’re a beginner looking for a fun project or a seasoned quilter building a collection of adorable quilt blocks, this pattern checks every box.
It’s a beautiful blend of applique and piecing, allowing for freedom of expression and endless variations. Let your imagination fly as high as the bee in this delightful quilt pattern, and don’t forget to share your creations with fellow quilters!