
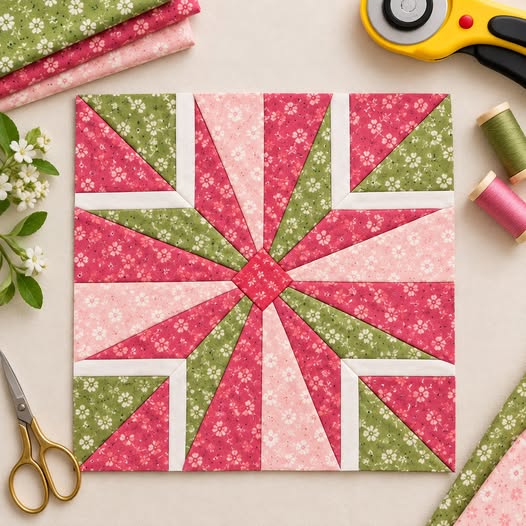
Betty’s Bloom Quilt Block Pattern is a beautiful patchwork design inspired by the cheerful movement of flower petals opening from a central point. The block shown in the photo combines navy blue, light blue, lime green, white, and red fabrics to create a lively geometric composition.
Even though the design looks detailed, it can be approached one section at a time, making it much easier to understand and assemble. This quilt block pattern is especially interesting because the visual effect comes from carefully arranged fabric shapes rather than complicated embellishments. The center red diamond creates a strong focal point, while the surrounding blue and green sections radiate outward like petals. The white strips help separate the sections and make each color stand out clearly.
If you enjoy patchwork quilting, this project is also a wonderful opportunity to practice accurate cutting, matching points, sewing angled pieces, and working with contrasting fabrics. The instructions below explain how to recreate the look of the photo step by step, while allowing you to adapt the measurements to the final size you want for your own quilt block.
Understanding the Betty’s Bloom Quilt Block Pattern
The Betty’s Bloom Quilt Block Pattern can be understood as a collection of sections arranged around a small central diamond. Looking at the photograph, the block has a strong radial appearance, with several elongated triangular pieces pointing toward the center. This arrangement gives the impression of a flower in bloom.
For the color palette, choose one dark blue fabric, one light blue fabric, one green floral fabric, a small amount of red fabric, and a white background fabric. The dark blue provides depth, while the lighter blue and green create contrast. Floral prints can make the finished block feel especially cheerful and dimensional.
Before cutting anything, decide on the finished size of your block. The measurements can be scaled according to your project, but accuracy is important because the pieces meet at several points. A practical approach is to sketch the block on paper first and divide it into manageable sections rather than trying to calculate every piece immediately.
The central red shape is one of the easiest visual references in the design. It appears as a small diamond positioned exactly in the middle of the block. You can create this center from a square turned on point, making sure its edges align neatly with the surrounding sections.
The white strips are another important part of the composition. They separate the larger colored areas and create small framed sections near the corners. When choosing your white fabric, a solid or very subtle print works well because it keeps the focus on the colorful quilt block design.
One of the most attractive characteristics of this Betty’s Bloom quilt idea is that the same basic structure can be interpreted in many color combinations. You could use warm colors for a traditional flower effect, soft pastels for a delicate version, or scraps from your fabric collection for a more playful and unique result.
Materials and Step-by-Step Cutting
To begin your Betty’s Bloom Quilt Block Pattern, gather a rotary cutter, cutting mat, quilting ruler, sewing machine, iron, thread, fabric scissors, pins or clips, and your selected cotton quilting fabrics. Accurate tools make a noticeable difference when working with the angled pieces visible in the photograph.
Start by preparing the background fabric. Cut the white strips and corner pieces according to the finished dimensions you have chosen. Because the white areas act as visual separators, try to keep their widths consistent throughout the block. Even a small variation can become noticeable once all the pieces are joined.
Next, prepare the dark blue fabric pieces. These form many of the larger sections surrounding the center. Several pieces have an angled appearance, so mark the direction of each piece before sewing. Keeping the orientation correct is essential for maintaining the flower-like movement of the design.
Cut the light blue pieces next. In the photographed block, the lighter blue creates a beautiful contrast against the dark navy fabric. When cutting patterned fabric, pay attention to the direction of the print if you want the flowers or decorative elements to appear consistently.
Now prepare the green floral pieces. These act almost like bright petals between the blue sections. Because the green fabric has a floral print, you do not necessarily need to match every flower across a seam, but you should make sure the larger pieces are oriented consistently for a polished appearance.
For the center, cut a small red square and position it diagonally to create the red diamond center seen in the photograph. The exact size should be based on the proportions of your chosen block. Press the center carefully after stitching so it remains flat and crisp.
Once all the pieces are cut, lay them on a flat surface in the same arrangement as the photograph. Do not start sewing immediately. This layout stage is extremely useful because it allows you to check the color placement, fabric direction, and orientation of the triangular sections before anything becomes permanent.
Sewing and Assembling the Quilt Block
Begin assembling the Betty’s Bloom quilt block by working with small sections rather than attempting to sew the entire design at once. Pair each angled blue or green piece with its corresponding fabric piece, placing right sides together and aligning the edges carefully before stitching.
Use a consistent seam allowance throughout the project. For traditional quilting, a quarter-inch seam allowance is commonly used, but the most important thing is consistency. If your chosen measurements require another allowance, use it throughout the entire block so the sections remain compatible.
After sewing each seam, press it carefully with an iron. You can press seams open or toward one side depending on your preference, but avoid stretching the fabric while pressing. Angled pieces can easily become distorted if they are pulled or handled too aggressively.
Continue building the sections that point toward the center. The goal is to create several visual rays that meet around the red diamond. Take your time with these intersections because accurate points will make the finished patchwork block look much cleaner.
Once the individual sections are complete, sew them together gradually. It can help to divide the block into four larger areas and join those areas before connecting everything around the center. Pin or clip the important intersections so the seams remain aligned as you sew.
The final assembly should result in a square block with the central red diamond, colorful radial sections, white accent strips, and four defined corner areas. After the block is completely sewn, give it a final press and check the edges. If necessary, square the block carefully using a quilting ruler before incorporating it into a larger project.
Finishing Ideas, Variations, and FAQ
The completed Betty’s Bloom Quilt Block Pattern can become much more than a single decorative square. Several blocks can be joined together to create a larger quilt, table runner, wall hanging, pillow cover, or other patchwork project. Repeating the block creates an interesting sense of movement across the finished piece.
For a scrappy version, consider replacing the coordinated fabrics with different blue and green scraps. Keeping the white fabric consistent will help visually connect the individual blocks, even when the prints are different. This is a practical way to use small amounts of fabric from previous quilting projects.
You can also change the center color. The red diamond in the photo provides a strong focal point, but yellow, orange, pink, purple, or even a contrasting floral print could create a completely different mood. The center is a small area, so it is an easy place to experiment.
Is the Betty’s Bloom Quilt Block Pattern suitable for beginners?
It can be approachable for a confident beginner who already understands basic sewing and quilting techniques. The main challenge is the accurate cutting and assembly of angled pieces. Beginners may want to make a small practice section before completing the full block.
What type of fabric should I use?
Quilting cotton is a practical choice because it is stable, easy to cut, and easy to sew. For a design similar to the photograph, combine a dark blue, light blue, green floral, white, and red cotton. Using fabrics with different values will help the geometric shapes remain visible.
How do I keep the points aligned?
Accurate cutting and a consistent seam allowance are the most important factors. When sewing two angled pieces, place the pieces carefully, pin the matching points, and sew slowly. Pressing after each seam also helps keep the sections flat and easier to align.
Can I make the block larger or smaller?
Yes. The design can be adapted to different finished dimensions by proportionally adjusting the individual pieces. When changing the size, maintain the relationships between the center, radial sections, white strips, and corner units so the overall appearance remains balanced.
What can I make with this quilt block?
A single block can be used as a decorative wall piece, pillow front, placemat, or small quilted panel. Multiple blocks can be arranged into a larger quilt, runner, or coordinated home décor project. The final use depends on the size and number of blocks you create.
How can I make my finished block look like the photo?
Focus on the color contrast and the radial arrangement. Use a bright green floral fabric, two shades of blue, clean white accents, and a small red center. Most importantly, take your time matching the angled seams so the sections appear to flow naturally toward the center.
Video Tutorial
The Betty’s Bloom Quilt Block Pattern is a wonderful example of how thoughtful fabric placement can transform simple geometric pieces into a design that resembles a blooming flower. By preparing the fabrics carefully, cutting the angled sections accurately, organizing the pieces before sewing, and pressing each seam as you work, you can recreate the beautiful movement seen in the photograph.
This project also leaves plenty of room for creativity. You can follow the blue, green, white, and red palette shown here, experiment with your own fabric collection, or create several variations for a scrappy quilt. The most important part is maintaining accurate proportions and keeping the central sections aligned.
I hope this Betty’s Bloom Quilt Block Pattern inspires you to bring your favorite fabrics together and create your own version of this cheerful patchwork design. If you make this project, leave your honest opinion in the comments and tell me what colors you would choose. Your suggestions and ideas can also inspire other quilting enthusiasts who want to try this beautiful quilt block pattern.