
Quilting is a beautiful way to bring creativity, color, and storytelling into fabric art. Among the many designs you can create, the Bird Quilt Block stands out as a charming and versatile piece. Whether you are new to quilting or have some experience, this block is a wonderful addition to your collection. Birds symbolize freedom, joy, and beauty, making this quilt pattern a delightful choice for both beginners and seasoned quilters.
In this tutorial, we’ll walk through everything you need to know to create your own Bird Quilt Block. From the materials list to the cutting instructions and final assembly, you’ll find each step broken down in a simple, easy-to-follow way. The goal is to help you feel confident as you bring your quilt to life. Along the way, we’ll also share personalization ideas to make your quilt block uniquely yours.
So, grab your favorite fabrics and sewing machine, and let’s start stitching together a project that will brighten your quilting journey. By the end of this guide, you’ll have a Bird Quilt Block ready to join your other creations or even stand out as the star of a mini quilt project.
Materials You Will Need
Before you begin, it’s important to gather all the supplies to ensure a smooth quilting process. For this quilt block, you’ll need fabric in different colors, ideally cotton quilting fabric, which is durable and easy to work with. A variety of colors will help bring your bird design to life, with contrasting tones for the wings, beak, and background.
Here’s a simple list to guide you:
- Fabric in at least 3–5 colors (bird body, wings, beak, background)
- Rotary cutter or fabric scissors
- Quilting ruler and cutting mat
- Sewing machine (or hand stitching supplies if you prefer)
- Thread in matching or contrasting shades
- Iron and ironing board for pressing seams
Having these items ready makes the quilting process easier and more enjoyable. Many quilters also keep a small notebook or sketch to plan their quilt pattern before cutting, which can be helpful when working with blocks that involve shapes like triangles and squares.
Cutting Your Fabric Pieces
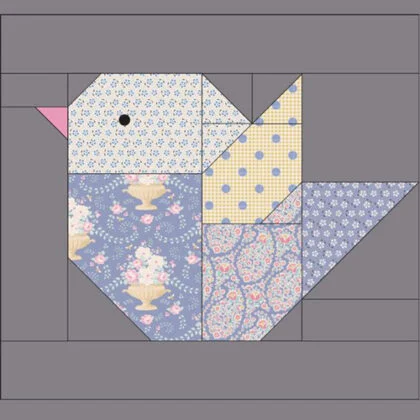
Now that you have your materials ready, it’s time to cut the fabric. The Bird Quilt Block typically uses half-square triangles, rectangles, and small squares to create the bird shape. Accuracy in cutting is essential for clean seams and a neat quilt block.
Here’s a suggested cutting guide for a 12-inch finished quilt block:
- Bird Body: 1 square (4 ½” x 4 ½”)
- Bird Wing: 2 half-square triangles (3 ½” x 3 ½” each)
- Bird Beak: 1 small square (2” x 2”) cut into a triangle
- Background: 4 squares (4 ½” x 4 ½”) + filler rectangles as needed
- Tail Accent: 2 half-square triangles (3 ½” x 3 ½” each)
Take your time with cutting to ensure precision. Use a rotary cutter with a quilting ruler for the best results. Each piece will come together like a puzzle, so organizing your fabric pieces in labeled piles can save time later.
Assembling the Bird Body
The first step in sewing is piecing together the bird’s body. Start by working with the large body square and attaching the wing pieces on one side. This will create the recognizable shape of a bird when viewed from the block’s perspective.
Sew one half-square triangle to the side of the body square, pressing the seams flat as you go. Quilting is all about precision, so don’t rush this step. When both wing triangles are attached, you’ll see your quilt pattern beginning to take shape.
The body block serves as the foundation of the design, so take a moment to admire the progress. Even at this stage, you’ll get a sense of the bird’s silhouette, and it’s encouraging to see your quilt evolve from small pieces into a meaningful design.
Adding the Beak and Tail
Next, focus on the smaller details: the beak and tail. These elements are created with small triangles and squares, and although they are minor compared to the body, they add character and charm to your Bird Quilt Block.
To form the beak, take your 2-inch square and cut it diagonally. Sew one of the triangles onto the bird’s body square at the corner, creating a beak that points outward. Press it carefully to keep it sharp and neat.
For the tail, use the half-square triangles cut earlier. Position them on the opposite side of the body, ensuring they angle outward to mimic tail feathers. Once stitched, you’ll notice the bird design coming together beautifully.
Creating the Background
A quilt block doesn’t feel complete without its background. The background fabric frames the bird, giving it space to stand out and helping balance the overall quilt pattern. Neutral tones like white, cream, or soft pastels often work best, but you can choose bold colors for a more striking look.
Sew the background squares around your bird design, aligning edges carefully to maintain symmetry. The bird should now appear centered within the block, almost like a painting inside a frame.
Background pieces also help adjust the size of the block to fit standard quilt dimensions. Once sewn, press all the seams flat and square the block to ensure it measures 12 ½ inches unfinished (12 inches finished when joined with other blocks).
Pressing and Finishing the Block
After piecing together all the parts, give your quilt block a final press. Use a hot iron and press the seams to one side or open, depending on your preference. This step makes your Bird Quilt Block crisp and professional-looking.
Check the edges with a quilting ruler to confirm the block is square. Trimming any excess ensures easy joining with other blocks in your quilt. Precision at this stage saves time and frustration during final quilt assembly.
Now, step back and admire your completed block. The bird’s shape should be clear, with its beak, body, wing, and tail framed against the background. It’s a small but satisfying accomplishment that can lead to larger projects.
Personalization Ideas
One of the joys of quilting is personalizing your quilt patterns. The Bird Quilt Block is perfect for experimenting with color, print, and texture. Try using bright, patterned fabrics for the wings or a soft pastel for the body to give each bird its own personality.
You can also play with backgrounds. A dark background makes the bird pop, while a light background gives a fresh, airy look. Adding embroidered details, like small eyes or feathers, can make your quilt even more unique.
Consider creating multiple bird blocks in different colors to represent a flock. Together, they create a lively quilt that symbolizes diversity, freedom, and creativity. The possibilities are endless when you let your imagination guide you.
Bringing It All Together
The Bird Quilt Block can be used as a standalone piece or incorporated into a larger quilt. Combine it with floral blocks, geometric blocks, or other animal designs to tell a story within your quilt. The versatility of this quilt pattern makes it a favorite among quilters of all levels.
Once your block is complete, you can turn it into a pillow cover, a wall hanging, or part of a baby quilt. Small projects are especially rewarding for beginners, as they offer a chance to practice without the pressure of making a full-sized quilt.
Every quilt block you create is a step forward in your quilting journey. The Bird Quilt Block, with its balance of simplicity and creativity, is a perfect way to expand your skills while enjoying the process.
Share Your Bird Quilt Block
Quilting is even more rewarding when shared with others. Once you’ve finished your Bird Quilt Block, consider sharing your work with quilting communities online or with friends and family. Seeing different interpretations of the same quilt pattern is inspiring and encourages creativity.
Take photos of your finished block and post them on quilting forums, social media, or even a personal blog. Sharing not only celebrates your accomplishment but also connects you with a wider network of quilters.
Now that you’ve mastered the Bird Quilt Block, it’s time to spread your wings and try new patterns. Don’t forget to share your creation—you never know who you might inspire with your quilt.