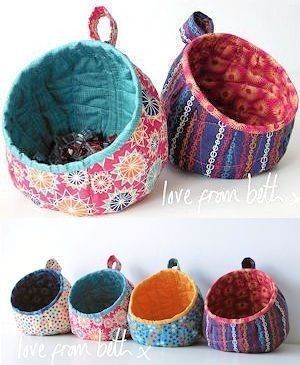
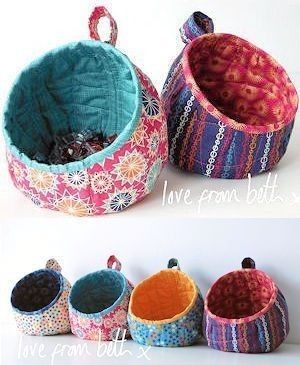
If you love creative quilting projects that bring together texture, fun shapes, and a modern twist, then the Bubble Pod Container Quilt is perfect for you. This quilt pattern combines playful curves and a contemporary design, making it ideal for both beginners and seasoned quilters looking for something new. In this tutorial, we’ll walk you through everything you need—from the materials list to step-by-step instructions—to help you complete this charming quilt. By the end, you’ll not only have a beautiful quilt but also the confidence to experiment with new patterns and ideas.
Why Choose the Bubble Pod Container Quilt Pattern?
The Bubble Pod Container Quilt stands out because of its unique circular elements that create a bubbly, textured look. Unlike traditional square block quilts, this design incorporates rounded pod shapes that are appliquéd or pieced into the background, giving your quilt a soft and whimsical feel. If you want a break from straight lines and love the idea of adding dimension to your project, this is a fantastic choice.
Another reason to try this pattern is its flexibility. You can use a variety of fabrics—solids, prints, or even scraps—to create pods of different sizes and colors. This freedom allows you to personalize the design according to your taste, whether you prefer vibrant, high-contrast looks or calming, monochromatic tones.
Lastly, this quilt is beginner-friendly but still offers a satisfying challenge. You’ll learn or practice techniques like curved piecing or raw-edge appliqué, which can boost your quilting skills. Plus, it’s a great project to make in small sections, so you can work at your own pace without feeling overwhelmed.
Materials Needed for Your Quilt
Before diving into the steps, gather all the materials you need. Having everything prepared will make the process smoother and more enjoyable. Here’s a complete list for a throw-size Bubble Pod Container Quilt:
- Fabric for the Background: 2 ½ yards of solid or subtle print cotton
- Fabric for Pods: Assorted scraps or fat quarters (8–10 different prints)
- Batting: 60” x 70” cotton batting
- Backing Fabric: 2 ½ yards
- Binding Fabric: ½ yard
- Template Material: Plastic template sheets or thick cardstock
- Thread: 100% cotton thread matching your fabrics
- Tools: Rotary cutter, cutting mat, quilting ruler, pins, or fabric glue
- Optional: Fusible web for appliqué technique
Using high-quality quilting cotton is recommended for durability and ease of sewing. If you plan to use appliqué instead of curved piecing, fusible web will help secure your pods before stitching them down.
Step 1: Preparing the Templates and Fabrics
Start by creating your pod templates. These will be oval or circular shapes of different sizes, which will form the “bubbles” on your quilt. Draw or print circles in varying diameters—between 4” and 8”—onto template plastic or sturdy cardstock. Cut them out carefully, as these will guide your fabric cutting.
Once your templates are ready, trace them onto the wrong side of your chosen pod fabrics. Cut out the pod shapes with a ¼” seam allowance if you plan to piece them in, or with no seam allowance if you’re using appliqué. Press your pod pieces to ensure they are smooth and ready for placement.
For the background fabric, cut it into squares or rectangles that match the final quilt size you want. For example, for a 60” x 70” throw, you can work with one large piece or divide it into sections that will later be sewn together. Having your background prepared will make arranging your pods much easier.
Step 2: Arranging the Pods on the Background
The beauty of this quilt pattern lies in its playful layout. Lay your background fabric on a large surface or design wall. Start arranging the pod shapes in a random or organized pattern, depending on your preference. You can cluster some pods together for a bubbly effect or space them evenly for a clean, modern look.
Take a step back occasionally to evaluate your design. Consider color distribution—spread out bold colors so they don’t clump together, and balance lights and darks across the quilt. Once satisfied with the arrangement, secure the pods temporarily with fabric glue, fusible web, or pins. This will keep them in place while you sew.
This step allows for a lot of creativity. Don’t be afraid to rotate, overlap slightly, or even crop pods at the edges of the quilt. These small design choices will give your quilt a dynamic, professional finish.
Step 3: Sewing the Pods to the Background
There are two popular methods for attaching the pods: raw-edge appliqué and curved piecing. Choose the one that suits your skill level and desired finish.
For raw-edge appliqué, stitch around each pod close to the edge using a straight stitch or a decorative stitch like a blanket stitch. This method is quicker and perfect for beginners. The edges will fray slightly over time, adding a soft texture to your quilt.

If you prefer a cleaner look, try curved piecing. To do this, cut corresponding holes in your background fabric and piece the pods in using a ¼” seam allowance. This method takes more time and precision but results in a smooth, integrated design.
Once all pods are sewn, press the quilt top carefully. This step sets the seams and ensures your quilt looks neat before moving on to layering.
Step 4: Layering and Quilting
Now it’s time to turn your quilt top into a finished quilt. Create a quilt sandwich by layering the backing fabric (right side down), batting, and the quilt top (right side up). Smooth out any wrinkles and secure the layers with basting pins or spray adhesive.
When it comes to quilting, you can keep it simple or get creative. Straight-line quilting in a grid pattern works well for beginners and adds a modern touch. Alternatively, free-motion quilting around each pod enhances the bubbly look and gives extra dimension. Use thread that complements your fabrics for a polished finish.
Quilt the entire piece carefully, starting from the center and working outward to prevent puckering. Take your time—this step not only secures your quilt but also adds texture and personality.
Step 5: Binding and Finishing Touches
Finally, it’s time to bind your quilt. Cut strips from your binding fabric, usually 2 ½” wide, and join them to create one long strip. Fold it in half lengthwise and press. Attach the binding to the quilt’s edge using a ¼” seam, then fold it over to the back and hand-stitch or machine-stitch it down.
Give your quilt a final press and inspect for any loose threads. Congratulations! You’ve completed your Bubble Pod Container Quilt. This project combines playful design with practical techniques, making it a joy to create and a treasure to keep or gift.
Customization Ideas for Your Quilt Pattern
One of the best aspects of this quilt pattern is how customizable it is. You can experiment with different color schemes, from vibrant rainbow pods to soft pastels for a baby quilt. Try incorporating novelty prints for a fun, themed design—think animals, flowers, or geometric patterns.
You can also play with the background fabric. A solid neutral background makes the pods pop, while a bold print adds complexity and depth. For an extra twist, add hand embroidery or embellishments around the pods to give your quilt a unique touch.
Finally, consider making matching accessories like pillow covers or a mini wall hanging using the same pattern. These smaller projects are great for using up leftover fabric and practicing your technique.
Share Your Creation!
We hope this tutorial has inspired you to try the Bubble Pod Container Quilt. Quilting is a journey of creativity and patience, and each piece you make tells a story. We’d love to see your finished quilts! Share your photos on social media and tag them with #BubblePodQuilt so the quilting community can admire your work.
Ready to dive into your next quilt project? Gather your fabrics, follow this guide, and let your creativity shine. Happy quilting!

