
There’s something timeless and fun about a bucket hat. Whether you’re heading to the beach, strolling through the park, or simply want to add a stylish accessory to your outfit, this classic hat never goes out of style. The best part? You can make one yourself at home with just a few basic materials, even if you’re new to sewing. By using this Bucket Hat Free Pattern Tutorial, you’ll learn the entire process step by step.
Sewing your own bucket hat is not only rewarding but also practical. Unlike store-bought versions, you can pick your favorite fabrics, create reversible designs, or even use scraps from a Quilt project to give your hat a unique patchwork look. Many sewists find that using a Quilting pattern as inspiration allows them to experiment with color, shape, and texture in ways that make each hat a one-of-a-kind piece.
In this tutorial, we’ll go through everything you need: the list of materials, how to cut your fabric, step-by-step sewing instructions, and creative ideas for personalization. By the end, you’ll have a comfortable, stylish, and handmade bucket hat to wear or gift.
Materials You Will Need
Before jumping into the fun part of sewing, let’s gather all the supplies. The great thing about a bucket hat is that it doesn’t require expensive tools or large amounts of fabric. In fact, many crafters like to repurpose leftover fabric from Quilt projects, making this an eco-friendly project as well.
Here’s what you’ll need:
- Free bucket hat pattern (downloadable or hand-drawn template)
- Fabric: Two coordinating cotton fabrics (½ yard each) for a reversible option
- Interfacing: Medium-weight fusible interfacing for structure
- Thread: All-purpose thread in a matching or contrasting color
- Pins or clips: To hold your fabric pieces together
- Scissors or rotary cutter: For precise cutting
- Sewing machine: A basic machine works perfectly
- Iron and ironing board: For pressing seams and fusing interfacing
If you’re familiar with quilting, you’ll recognize many of these supplies already. Cotton fabric works wonderfully, especially if you choose pieces with a quilting pattern or patchwork effect. Not only does it add charm, but it also gives your bucket hat that cozy, handmade appeal.
Cutting the Fabric Pieces
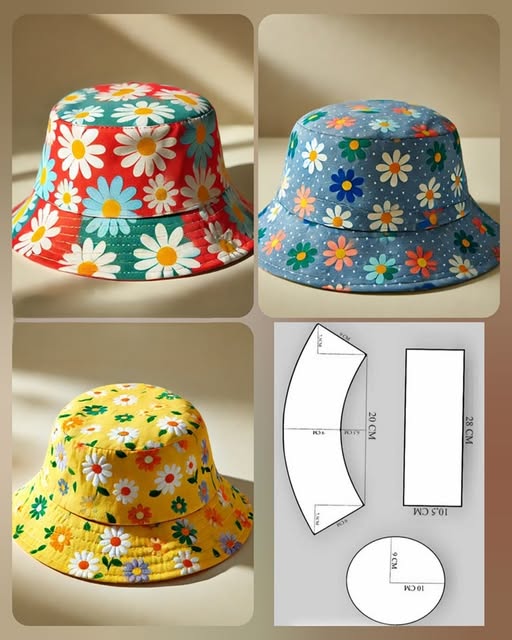
Once you’ve gathered your materials, the next step is cutting your fabric pieces. Most bucket hat patterns consist of three main parts: the crown (the top), the side band (the middle), and the brim (the bottom). You will cut each piece twice — once for the outer fabric and once for the lining.
Start by printing or drafting your free bucket hat pattern. If you’re a beginner, many patterns are available online that can be adjusted for different head sizes. Lay your pattern on your chosen fabric, making sure to align with the grain line for best results. Pin or clip it in place, and carefully cut out your pieces. Repeat the same for your lining fabric and interfacing.
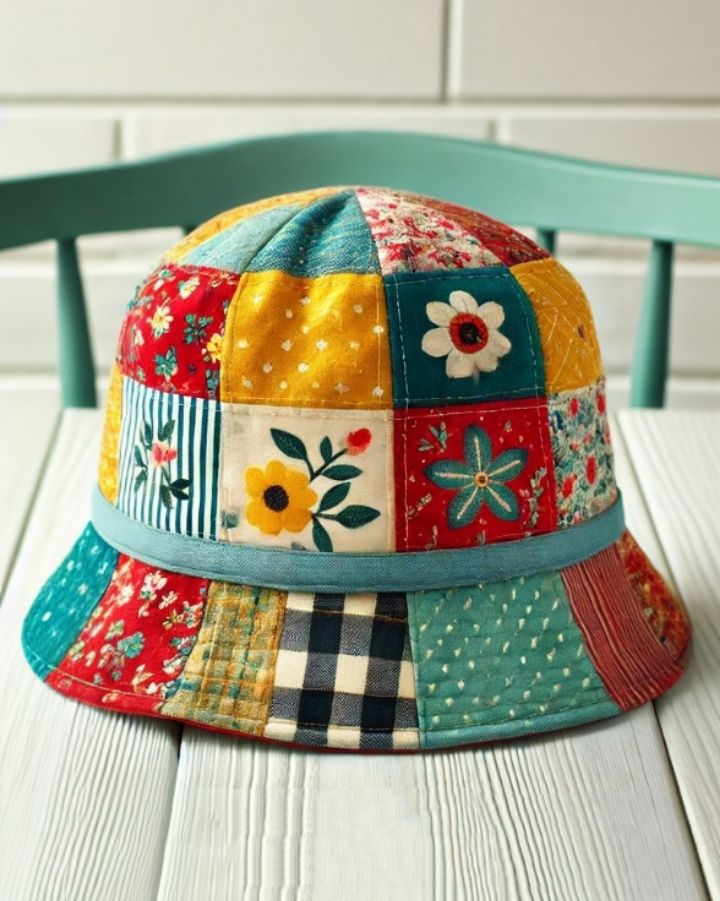
For a playful twist, consider mixing fabrics. For example, you might use a floral quilting pattern for the brim and a solid color for the crown. If you have leftover quilt blocks, this is the perfect chance to incorporate them into your design. Imagine wearing a bucket hat that not only shades your face but also carries the beauty of your quilting work wherever you go.
Assembling the Crown and Side Band
Now that your pieces are ready, let’s start sewing. Begin with the crown (the circle piece) and the side band (the rectangular strip). Attach the short edges of the side band together, right sides facing, and sew a seam. This will form a loop that wraps around the crown.
Next, pin the side band to the crown, right sides together. Because the crown is a circle and the band is a loop, you’ll need to ease the fabric gently as you pin. Use plenty of clips or pins to make sure it stays in place. Once secured, stitch carefully around the circle. After sewing, clip the seam allowance slightly to help the curve lie flat. Press with an iron for a clean finish.
This step is crucial because it gives your hat its shape. If you’re inspired by quilting, you might even add topstitching around the crown seam. This not only strengthens the hat but also allows you to showcase decorative stitching that mirrors your favorite quilt designs.
Creating and Attaching the Brim
The brim is what makes a bucket hat so recognizable. To create it, sew the short ends of your brim pieces together to form a loop, just as you did with the side band. Then, pin the brim to the bottom edge of the side band, right sides facing. Stitch around the edge carefully.
Once the brim is attached, repeat the process with your lining fabric so that you have two complete hat structures — one outer fabric and one lining. Press the seams flat after sewing. You’ll already see your hat taking shape, which is always an exciting moment in the project.
For extra strength and style, topstitch around the brim several times, spacing the rows about ¼ inch apart. Many sewists love this part because it mimics the concentric stitching you see in quilts. It adds texture, stability, and a professional finish to your hat.
Putting the Hat Together
Now that you have both the outer hat and the lining, it’s time to assemble them. Place the two hats right sides together, aligning the brims carefully. Pin or clip all the way around. Sew around the brim edge, leaving a small opening for turning the hat right side out.
Turn the hat through the opening, gently pushing out the seams with a blunt tool like the end of a paintbrush. Press the brim flat with an iron, making sure the edge is crisp and neat. Finally, topstitch around the edge of the brim to close the opening and secure everything in place.
At this stage, you’ll hold in your hands a fully functional, stylish bucket hat. Whether you’ve chosen a simple cotton print or a playful quilt-inspired patchwork, your hat will be as unique as you are.
Personalization Ideas
One of the joys of sewing your own accessories is making them truly personal. A bucket hat offers endless possibilities for customization, especially if you love quilting. For example, you could piece together small fabric scraps into a patchwork brim, creating a hat that feels like a portable quilt.
Consider these fun ideas:
- Patchwork Brim: Use small squares from leftover quilting fabric to make a colorful brim.
- Reversible Hat: Choose two fabrics with contrasting styles, like a bold print on one side and a subtle quilt pattern on the other.
- Embroidery or Appliqué: Add a monogram, floral design, or motif to the side of the hat.
- Decorative Stitching: Try quilting-style topstitching around the brim or crown.
With these touches, your handmade bucket hat becomes more than just an accessory — it becomes a piece of wearable art that reflects your creativity.
Final Thoughts: Share Your Project!
Congratulations! You’ve just learned how to make a bucket hat using this free pattern tutorial. Not only is this a fun and approachable sewing project, but it’s also a fantastic way to experiment with color, fabric, and even quilting techniques. Whether you make one for yourself, as a gift, or to sell at a craft fair, you’ll enjoy both the process and the final product.
Don’t be afraid to get creative with fabrics and patterns. Dive into your quilting stash, play with different quilting patterns, or repurpose fabric scraps into something completely new. The bucket hat is simple enough for beginners but versatile enough to inspire advanced sewists as well.
Now it’s your turn — grab your fabric, follow the steps, and make your own bucket hat today. And once you do, share your project with friends, family, or on social media. You never know who you might inspire to pick up a needle and start their own sewing journey!