
Creating your own bucket hat is a fun and rewarding sewing project, especially if you love working with fabric scraps and exploring creative designs. This tutorial will guide you step by step through making a beautiful bucket hat using a quilt pattern approach. Whether you’re new to sewing or already experimenting with quilt projects, this is a perfect way to combine practicality with creativity. Plus, bucket hats are timeless, stylish, and incredibly customizable.
In this guide, you’ll learn how to create a bucket hat from scratch, using simple techniques and beginner-friendly steps. We’ll also incorporate quilt-inspired ideas to make your hat unique and eye-catching. By the end, you’ll have a wearable piece of art and the confidence to experiment with your own quilt pattern designs in future projects.
Let’s get started on this exciting and creative journey.
Why Make a Bucket Hat with a Quilt Pattern?
A bucket hat is one of the most versatile accessories you can make. It’s functional, providing sun protection, and stylish enough to match different outfits. By incorporating a quilt pattern into your bucket hat, you elevate it from a simple accessory to a handcrafted statement piece. Using small fabric pieces also makes it a great way to use leftover materials from previous quilt projects.
Quilt patterns allow you to play with color, texture, and design. Even a basic patchwork layout can turn a simple hat into something truly special. This makes the project perfect for beginners who want to explore quilting techniques without committing to a large quilt. You’ll learn how to piece fabrics together, press seams, and create a cohesive design.
Another advantage is that this project is quick to complete compared to larger quilt projects. You can finish a bucket hat in a few hours, making it ideal for weekend crafting. It’s also a great handmade gift idea that feels thoughtful and personal.
Materials You Will Need
Before starting your bucket hat quilt pattern project, gather all the necessary materials. Having everything ready will make the process smoother and more enjoyable.
You will need cotton fabric for both the outer layer and lining. Quilting cotton works best because it is easy to sew and holds its shape well. You can choose multiple fabric pieces if you want a patchwork or quilt pattern design. You will also need interfacing to give structure to the hat, especially the brim.
Basic sewing tools are essential. These include scissors or a rotary cutter, pins or clips, a measuring tape, and a sewing machine. If you are working with quilt patterns, a cutting mat and quilting ruler will help ensure accuracy. Matching thread is also important to give your project a clean finish.
Optional materials include decorative elements like embroidery thread, fabric paint, or labels. These can be used later for customization. Choosing high-quality materials will make your hat more durable and professional-looking.
Understanding the Bucket Hat Pattern
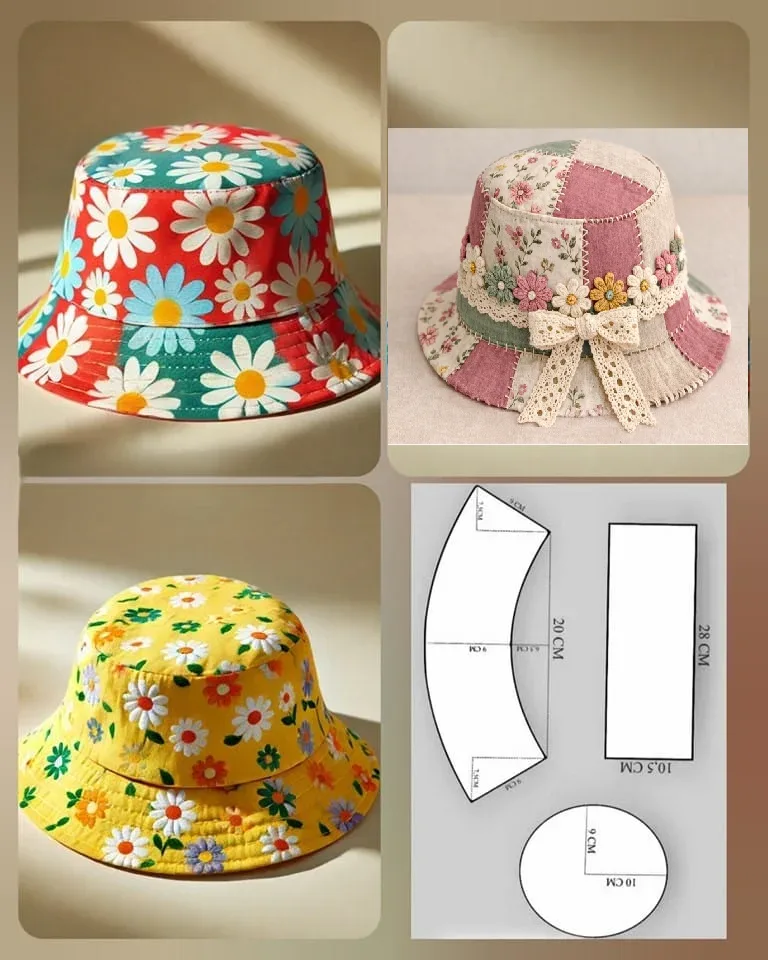
A bucket hat pattern typically consists of three main parts: the crown (top circle), the side band, and the brim. Each piece works together to create the classic bucket shape. Understanding these components will help you assemble the hat correctly and avoid confusion during sewing.
The crown is the top part of the hat and is usually a simple circle. The side band wraps around the head and connects the crown to the brim. The brim extends outward and provides shade. When using a quilt pattern, the side band and brim are the best areas to showcase your design.
If you’re new to sewing patterns, don’t worry. Bucket hat patterns are relatively simple and beginner-friendly. You can either use a printed pattern or draft your own using measurements. Just make sure all pieces align correctly before sewing.
Step-by-Step Instructions
Start by preparing your fabric. If you’re using a quilt pattern, piece together your fabric scraps first. Sew small squares or strips together to create a larger fabric panel. Press the seams flat to ensure a smooth surface. Then, place your pattern pieces on the fabric and cut out the crown, side band, and brim pieces.
Next, attach interfacing to the wrong side of your outer fabric pieces. This step is important because it gives your bucket hat structure. Once that’s done, sew the side band into a loop by stitching the short edges together. Then, pin and sew the crown to the top of the band, easing the fabric as needed.
After assembling the top portion, work on the brim. Sew the brim pieces together and attach them to the bottom of the side band. Repeat the same process for the lining fabric. Finally, join the outer hat and lining together, turn the hat right side out, and topstitch around the brim for a polished finish.
Tips for Beginners
If this is your first time working with a quilt pattern, start simple. Choose basic shapes like squares or strips instead of complex designs. This will help you focus on learning the construction process without feeling overwhelmed. As you gain confidence, you can experiment with more intricate patterns.
Take your time with cutting and measuring. Accuracy is key in both quilting and sewing. Even small mistakes can affect how your pieces fit together. Using a ruler and cutting mat will make a big difference in achieving clean, precise cuts.
Don’t be afraid to make mistakes. Every sewing project is a learning experience. If something doesn’t turn out as expected, treat it as an opportunity to improve your skills. Practice and patience will help you grow as a maker.
Creative Customization Ideas
One of the best parts of making your own bucket hat is the ability to customize it. You can use bold colors, soft pastels, or even themed fabrics to match your personal style. Mixing different prints is a great way to highlight the quilt pattern effect.
You can also add decorative stitching to enhance the design. Try quilting lines on the brim or side band to give your hat extra texture. This not only looks beautiful but also reinforces the structure of the hat.
Other customization ideas include adding pockets, reversible designs, or embellishments like patches and embroidery. You can even create matching accessories using the same quilt pattern, such as bags or scarves.
Caring for Your Handmade Bucket Hat
Once your bucket hat is finished, proper care will help it last longer. Most cotton fabrics can be machine washed, but it’s best to use a gentle cycle and cold water. This prevents shrinking and keeps the colors vibrant.
Avoid using high heat when drying. Air drying is the safest option, especially if your hat includes interfacing or quilted sections. If needed, you can lightly press the hat with an iron to restore its shape.
Storing your hat properly is also important. Keep it in a cool, dry place and avoid crushing it under heavy items. Taking care of your handmade piece ensures you can enjoy it for a long time.
Final Thoughts and Share Your Creation
Making a bucket hat using a quilt pattern is a wonderful way to combine creativity, sustainability, and practicality. It allows you to use fabric scraps, learn new skills, and create something truly unique. Whether you keep it for yourself or gift it to someone special, your handmade hat will always carry a personal touch.
This project is perfect for beginners because it’s simple yet rewarding. You’ll gain confidence in sewing, explore quilt techniques, and end up with a stylish accessory you can wear proudly. Each hat you make will improve your skills and inspire new ideas.
Now it’s your turn. Gather your materials, choose your favorite fabrics, and start creating your own bucket hat. When you’re done, don’t forget to share your project with others. Show your creativity, inspire fellow makers, and celebrate the joy of handmade design.