
Creating handmade details for your table is one of the most charming ways to welcome guests, especially during spring celebrations and family gatherings. The Bunny Cutlery Holder Quilt Pattern is a delightful project that combines the softness of a Quilt with the functionality of a practical cutlery pocket. It’s beginner-friendly, quick to sew, and absolutely adorable.
This tutorial will guide you step by step through the entire process. Even if you’re new to quilting or just starting to explore your first Quilting pattern projects, you’ll find this design approachable and rewarding. The bunny shape adds personality to your table setting, while the quilted layers provide structure and durability.
In this guide, you’ll find a complete materials list, detailed instructions, helpful tips, and creative personalization ideas. By the end, you’ll have a charming bunny cutlery holder ready to brighten your dining table.
Why You’ll Love This Bunny Quilt Project
One of the best things about this project is how accessible it is. Unlike a full-size Quilt that may take weeks to complete, this small Quilting pattern can be finished in just a few hours. It’s ideal for beginners who want to practice layering, stitching curves, and simple quilting techniques without feeling overwhelmed.
This bunny cutlery holder is also a fantastic scrap-busting project. You can use leftover cotton fabrics from previous Quilt projects to create colorful variations. Small prints, polka dots, florals, and soft pastels work beautifully for spring, but the design can easily be adapted for other seasons.
Finally, this project makes a wonderful handmade gift. Whether you’re preparing for Easter, hosting a brunch, or creating items to sell at craft fairs, these bunny holders add warmth and personality to any table setting.
Materials You Will Need
Before starting your Quilting pattern, gather all your supplies. Having everything ready will make the process smooth and enjoyable.
Fabric & Batting:
- 2 pieces of cotton fabric for the bunny body (front and back) – approximately 10” x 12”
- 1 piece of cotton fabric for the pocket – approximately 8” x 9”
- Lightweight quilt batting – 10” x 12”
- Small fabric scrap for pom-pom tail (optional)
Sewing Supplies:
- Coordinating thread
- Fabric scissors or rotary cutter
- Pins or clips
- Fabric marker or chalk
- Sewing machine
- Iron and ironing board
- Paper for pattern template
Using 100% cotton fabric is recommended for best results. Cotton presses well and works beautifully in Quilt projects, helping your finished bunny maintain its shape.
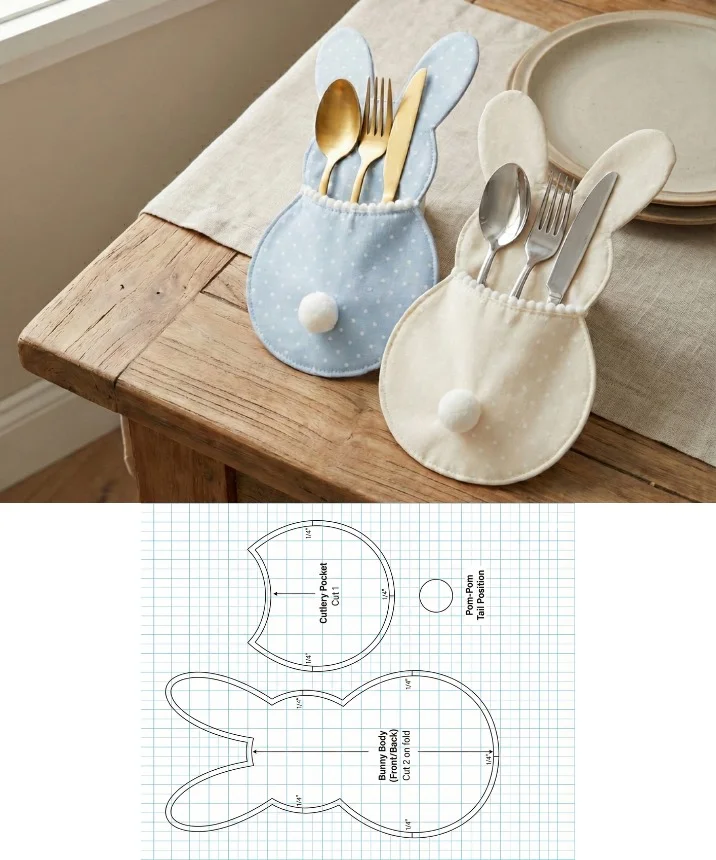
Preparing the Bunny Quilting Pattern Template
To begin, draw or print a bunny template that includes the body with ears and a separate curved pocket piece. The body should be roughly 9–10 inches tall, depending on how large you want your cutlery holder. Make sure the lower half of the bunny is wide enough to comfortably hold a fork, knife, and spoon.
Fold your paper in half vertically before drawing half of the bunny shape. This ensures perfect symmetry when you cut it out. Once cut, unfold the paper to reveal a balanced bunny silhouette. Repeat the process for the curved pocket piece that will sit across the lower half of the bunny.
Place your paper templates on the fabric and trace around them with a fabric marker. Remember to add a ¼-inch seam allowance around all edges if your template does not already include it. Cut two bunny body pieces and one pocket piece.
Step-by-Step Sewing Instructions
Step 1: Layer and Quilt the Body
Place one bunny body piece right side down, then position the batting on top, followed by the second bunny body piece right side up. You should now have a fabric-batting-fabric sandwich, just like a small Quilt.
Pin or clip the layers securely. To prevent shifting, stitch a few straight quilting lines vertically or diagonally across the bunny body. This simple quilting adds texture and keeps the batting in place. Beginners can stick to straight lines spaced about 1 inch apart.
Once quilted, trim any uneven edges so all layers align neatly.
Step 2: Prepare the Pocket
Fold the top curved edge of the pocket piece down by ¼ inch and press. Fold again by another ¼ inch to create a clean hem. Stitch along this folded edge to secure it.
If you’d like, you can lightly quilt the pocket piece as well by adding a few vertical lines. This is optional but adds a more finished look to your Quilting pattern project.
Place the pocket piece on top of the quilted bunny body, aligning the bottom edges. Pin in place.
Step 3: Sew and Shape the Bunny
With the pocket pinned in position, stitch around the entire outer edge of the bunny, using a ¼-inch seam allowance. Leave a small opening along one side if you prefer turning and topstitching for a softer edge. Alternatively, you can bind the edges with bias tape for a more defined finish.
If you sew right sides together, carefully clip small notches around curved areas and between the ears before turning the bunny right side out. This helps the curves lie smoothly.
Press the entire piece carefully, shaping the ears and edges with your fingers. Finally, topstitch around the outer edge for a crisp and professional finish.
Adding the Pom-Pom Tail and Finishing Touches
A bunny wouldn’t be complete without a fluffy tail. You can attach a small white pom-pom to the lower center of the bunny body using hand stitches. Position it slightly below the pocket opening for a balanced look.
If you prefer a flat tail, cut a small fabric circle, lightly stuff it, and hand-stitch it in place. This adds dimension while maintaining a cohesive fabric design.
Give your bunny one final press, and slide your cutlery into the pocket. The holder should comfortably support a fork, knife, and spoon without collapsing.
Creative Personalization Ideas
One of the joys of working with a Quilt project like this is the freedom to customize. Try using pastel solids for a minimalist look, or floral prints for a vintage garden feel. Polka dots and gingham create a playful farmhouse aesthetic.
You can also embroider a small name or initial onto the pocket before assembling. This makes each bunny holder personalized for guests at special events. Metallic thread stitching along the ears can add subtle elegance.
For seasonal variations, experiment with different color palettes. Soft pinks and blues work beautifully for spring, while earth tones or even red and green fabrics can transform this Quilting pattern into a winter holiday version.
Tips for Beginners
If this is your first time attempting a Quilt-style project, take your time with pressing. Proper pressing between steps makes a noticeable difference in the final result. Smooth seams help everything align perfectly.
When sewing curves, go slowly and pivot slightly as you stitch. Keeping the needle down while adjusting the fabric will give you better control around the ears and rounded edges.
Most importantly, don’t worry about perfection. Small handmade details are what give Quilt projects their charm. Every bunny will have its own personality, and that’s part of the beauty of quilting.
Make a Full Set for a Stunning Table Display
Once you’ve completed one bunny cutlery holder, you may find it hard to stop. Creating a full set of four, six, or even eight makes your table look cohesive and thoughtfully styled.
You can mix coordinating fabrics within the same color family for a coordinated yet varied look. Using the same Quilting pattern in different prints creates visual interest while maintaining harmony.
Pair your bunny holders with a matching table runner or placemats made from the same fabric collection. This transforms a simple meal into a warm and inviting handmade experience.
Share Your Bunny Quilt Creation
The Bunny Cutlery Holder Quilt Pattern is more than just a quick sewing project — it’s a sweet way to bring handmade joy into your home. Whether you’re preparing for a holiday, hosting brunch, or simply practicing your quilting skills, this project offers creativity and satisfaction in every stitch.
Don’t forget to experiment with colors, textures, and small details that reflect your personality. Each Quilting pattern you complete builds confidence and skill, helping you grow as a maker.
When you finish your bunny cutlery holders, share your project with friends, family, or your crafting community. Post photos, inspire others, and celebrate your handmade accomplishment. Your table — and your guests — will absolutely love it.