
Creating a beautiful cushion using a butterfly design is a wonderful way to explore the world of quilting. The Butterfly Cushion Quilt Pattern combines delicate shapes, colorful fabrics, and simple sewing techniques to create a charming decorative piece for your home. Whether you are new to quilting or already enjoy working with fabric, this project offers a relaxing and rewarding experience.
Butterflies symbolize transformation, creativity, and lightness, making them a perfect motif for a quilted cushion. This quilting pattern allows you to play with color combinations, experiment with fabric textures, and practice basic quilting skills while making something practical and beautiful.
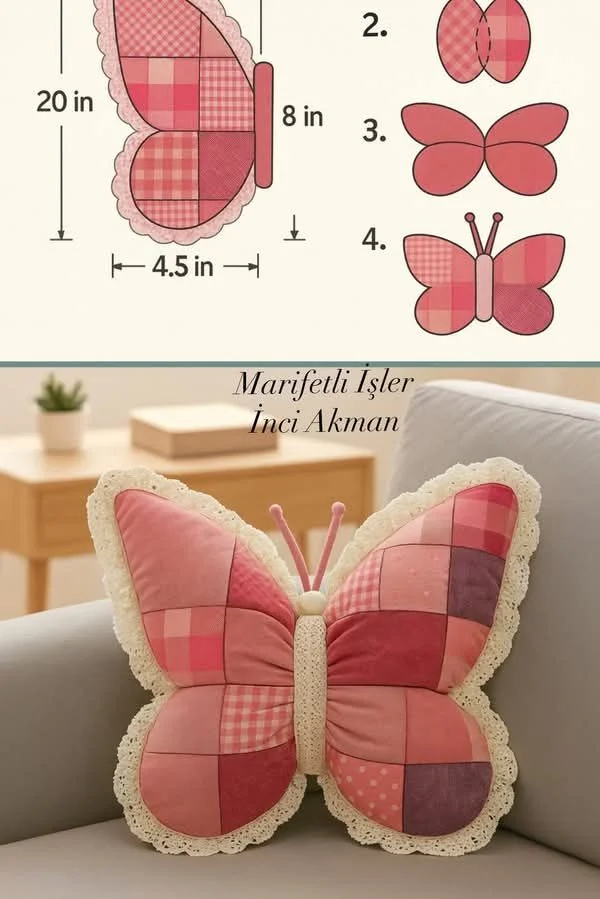
In this tutorial, you will learn everything you need to create your own Butterfly Cushion Quilt Pattern from start to finish. We will cover the materials needed, the preparation process, and a clear step-by-step guide. By the end, you will have a lovely handmade quilted cushion ready to brighten any room.
Why Choose a Butterfly Quilt Design
Butterfly designs are among the most loved motifs in the quilting world. Their graceful wings and soft curves bring a sense of movement and charm to any quilt project. When used in a cushion, a butterfly quilt becomes a small but striking decorative accent.
Another reason this quilting pattern is perfect for beginners is that it can be made using simple shapes. The butterfly wings can be created from triangles, squares, or appliqué pieces, allowing you to choose a technique that suits your sewing skills. Even someone new to quilting can achieve beautiful results.
Additionally, butterfly quilts offer endless color possibilities. You can create bright and cheerful butterflies with vibrant fabrics, or choose soft pastel tones for a calm and elegant look. Each version of the quilt becomes unique depending on your fabric choices.
Materials Needed for the Butterfly Cushion Quilt Pattern
Before starting your project, it is important to gather all the materials you will need. Having everything prepared will make the quilting process smoother and more enjoyable. Most of these supplies are commonly used in many quilt projects.
For this quilt cushion pattern, choose fabrics that complement each other and highlight the butterfly shape. Cotton quilting fabric works best because it is easy to sew, durable, and available in many colors and prints.
Materials list:
- Cotton quilting fabric for the butterfly wings (2–3 different colors)
- Background quilting fabric (about ½ yard)
- Fabric for the cushion backing (½ yard)
- Quilt batting (the same size as the cushion front)
- Rotary cutter and cutting mat
- Quilting ruler
- Sewing machine or needle for hand sewing
- Thread matching your fabrics
- Fabric scissors
- Pins or quilting clips
- Cushion insert (16” x 16” is common)
- Iron and ironing board
Once these materials are ready, you can begin preparing your quilt pieces.
Preparing Your Fabric Pieces
Preparation is an important part of any quilting project. Taking time to measure, cut, and organize your pieces carefully will make sewing much easier later. Start by washing and ironing your fabrics so they are smooth and ready for cutting.
Using a rotary cutter and quilting ruler, cut a square for the cushion front. A common size is 18 x 18 inches, which allows room for seams and quilting. This piece will serve as the background where your butterfly design will be placed.
Next, cut the butterfly pieces. You will need two larger shapes for the top wings and two smaller shapes for the bottom wings. These can be made from squares or triangles depending on the style of the quilting pattern you choose. Lay the pieces on the background fabric to preview the design before sewing.
Creating the Butterfly Quilt Block
The butterfly block is the heart of this project. This is where your quilt pattern begins to take shape and the butterfly design becomes visible. Carefully arranging the wings ensures that the final result looks balanced and attractive.
Start by sewing the wing pieces together if they are made from smaller fabric shapes. Press the seams flat with an iron so the fabric lays smoothly. This step helps keep the quilt block neat and professional looking.
Once the wings are assembled, place them on the background square in the shape of a butterfly. The top wings should sit slightly higher than the bottom wings. Leave a small space in the center where the butterfly body will go. When you are happy with the placement, pin the pieces in place.
Step-by-Step Sewing Instructions
Now it is time to sew the butterfly design onto the quilt background. This part of the project brings all the elements together and transforms the fabric pieces into a finished quilting pattern.
Step 1: Attach the butterfly wings
Using a sewing machine or hand stitching, sew the butterfly wings onto the background fabric. A simple straight stitch close to the edge works well, but you can also use a decorative stitch if you prefer.
Step 2: Add the butterfly body
Cut a narrow strip of fabric for the butterfly body. Place it vertically between the wings and stitch it in place. You can also embroider the body with thread if you prefer a softer look.
Step 3: Create the quilt sandwich
Place the quilt batting behind the butterfly front panel. Then add a backing fabric piece underneath. Pin all three layers together carefully.
Step 4: Quilt the layers
Quilt through all layers using straight lines, gentle curves, or a free-motion design. Simple diagonal lines are perfect for beginners and help highlight the butterfly motif.
Step 5: Trim and prepare the cushion cover
Trim the edges so the quilted panel measures about 17 x 17 inches. This ensures the finished cushion will fit nicely around the insert.
Assembling the Cushion Cover
After quilting the front panel, the next step is turning it into a cushion cover. This process is simple and very similar to finishing many quilted pillow projects.
Cut two rectangles of backing fabric for the envelope-style closure on the back. Each piece should measure approximately 17 x 12 inches. Fold one long edge of each piece over twice and sew it down to create a clean hem.
Place the quilted butterfly panel right side up. Lay the backing pieces on top with the right sides facing down, overlapping them in the center. Pin all the edges to keep the layers from shifting.
Sew around all four sides using a ½ inch seam allowance. After sewing, trim the corners slightly and turn the cushion cover right side out. Push the corners gently so they look sharp and neat.
Creative Personalization Ideas
One of the most enjoyable parts of quilting is the ability to personalize your projects. Even though you are following the same quilting pattern, small changes can create a completely different look.
Try using patterned fabrics for the butterfly wings. Floral prints, polka dots, or even scraps from previous quilts can add character and uniqueness to your cushion. Mixing textures such as linen and cotton can also create interesting visual effects.
Another idea is to add decorative stitching around the wings. Outline quilting helps highlight the butterfly shape and adds dimension to the design. You could also embroider small details like antennae or tiny flowers around the butterfly.
If you want to make a seasonal decoration, choose colors that match the time of year. Soft pastels work beautifully for spring, while warm oranges and reds can give the butterfly quilt a cozy autumn feel.
Tips for Beginner Quilters
If you are new to quilting, projects like this butterfly cushion are a great way to practice essential techniques. Start slowly and focus on accuracy when cutting and sewing your pieces.
Always press your seams as you go. Ironing each seam helps the quilt lay flat and makes the final result look more professional. It also prevents fabric layers from becoming bulky.
Using pins or quilting clips will help keep the layers aligned while sewing. This small step makes a big difference in maintaining the shape of your quilt pattern. With patience and practice, your quilting skills will improve with every project.
Enjoy and Share Your Butterfly Quilt Project
Completing a Butterfly Cushion Quilt Pattern is a joyful accomplishment. From selecting fabrics to stitching the final seams, each step reflects your creativity and personal style. The finished cushion can brighten a living room, bedroom, or reading corner.
Handmade quilted cushions also make thoughtful gifts for friends and family. A butterfly quilt carries a message of beauty and transformation, making it a meaningful handmade present for birthdays, housewarmings, or special occasions.
Once your cushion is finished, take a photo and share your project with other quilting enthusiasts. Posting your quilt online or showing it in crafting communities can inspire others to try this charming quilting pattern as well. Your butterfly quilt might be the idea that encourages someone else to begin their own quilting journey.