
Creating a butterfly patchwork quilt is a wonderful way to add charm and elegance to your home decor. This quilt pattern captures the beauty of butterflies with vibrant fabric choices and intricate stitching techniques. Whether you are a beginner or an experienced quilter, this step-by-step guide will help you craft a stunning butterfly-themed quilt with precision and ease.
Choosing the Right Materials
Selecting high-quality fabric is crucial when making a quilt. For a butterfly patchwork quilt, opt for bright, patterned fabrics that mimic the delicate wings of butterflies. Cotton fabrics are highly recommended due to their durability and ease of handling.
In addition to fabric, you will need batting, backing fabric, and coordinating thread. The batting provides insulation, while the backing fabric gives the quilt a finished look. Choosing a thread color that complements your fabric enhances the overall aesthetic of the quilt.
Lastly, ensure you have essential quilting tools, such as a rotary cutter, quilting ruler, and sewing machine. A cutting mat and fabric markers will also help you achieve accurate measurements and cuts.
Cutting the Fabric Pieces
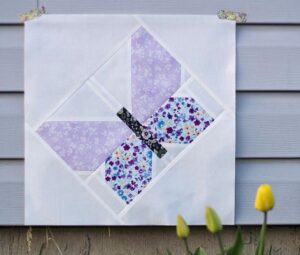
To create the butterfly patchwork design, you will need to cut various shapes from your selected fabrics. A common method is to use half-square triangles and squares to form the wings and body of the butterfly.
For a standard quilt block measuring 12 inches, cut two 6.5-inch squares of different colors to create half-square triangles. These pieces will serve as the butterfly’s wings. For the body, cut a 2.5-inch by 6.5-inch rectangle in a contrasting color.
Arrange the fabric pieces carefully before sewing to ensure symmetry and design consistency. Using fabric clips or pins can help keep the pieces aligned during assembly.
Assembling the Quilt Blocks
Start by stitching the half-square triangles together to form the butterfly wings. Sew along the diagonal and press the seams open to reduce bulk and create a smooth finish.
Next, attach the rectangular fabric piece to the center, forming the butterfly’s body. Ensure that the alignment is precise so that the butterfly design remains clear and distinct.
Once individual blocks are assembled, arrange them in a visually pleasing pattern. You can experiment with different layouts before sewing the blocks together to finalize the quilt top.
Sewing the Quilt Top Together
After arranging your blocks, sew them row by row, making sure the seams align correctly. Pressing the seams after each row will help create a smooth, professional finish.
Once all rows are sewn together, join them to form the completed quilt top. Double-check the alignment of butterfly designs and adjust if necessary before finalizing the assembly.
At this stage, you can add decorative elements such as appliqué details or embroidery to enhance the butterfly motif. These embellishments add depth and character to your quilt.
Adding the Batting and Backing
Layer the quilt top with batting and backing fabric. Spread the layers evenly, ensuring there are no wrinkles or distortions in the fabric.
Secure the layers together using quilting pins or basting spray. This step is essential for keeping everything in place during the quilting process.
Choose a quilting technique that complements the design. Free-motion quilting or stitch-in-the-ditch methods work well for this quilt pattern, highlighting the intricate butterfly shapes.
Binding and Finishing Touches
Trim any excess batting and backing fabric before adding the binding. Cut 2.5-inch-wide strips of fabric to create the binding, then sew them together at an angle to form one continuous strip.
Attach the binding to the edges of the quilt, sewing it on one side first, then folding it over and stitching the other side by hand or machine. This step gives the quilt a polished look and secures the edges.
Finally, inspect the quilt for any loose threads or uneven stitching. A final press with an iron will give your butterfly patchwork quilt a crisp, finished appearance.
Conclusion
Making a butterfly patchwork quilt is a rewarding experience that allows you to express creativity through fabric and design. By carefully selecting materials, cutting precise shapes, and following structured assembly steps, you can create a quilt that is both beautiful and functional.
Whether for personal use or as a heartfelt gift, a butterfly patchwork quilt adds warmth and charm to any space. Experiment with different fabric combinations and quilting techniques to make each creation uniquely yours.