
Creating your own quilt is always a rewarding experience, especially when you’re working with timeless quilt patterns like the Card Trick quilt block. Known for its clever illusion of overlapping cards, this classic design adds visual interest and depth to any quilting project. Whether you’re just starting your quilting journey or looking to explore new patterns, this tutorial will guide you through every step of making a beautiful Card Trick quilt block.
Let’s dive into the creative world of quilting and learn how to piece together this stunning block with ease and confidence.
Introduction to the Card Trick Quilt Block Pattern
The Card Trick quilt block is a popular traditional quilt pattern that plays with geometry and color placement to create the illusion of four interwoven cards. At first glance, it may seem complex, but once broken down into smaller steps, the pattern becomes manageable—even for beginners.
This block is typically made up of squares and triangles, which means that it builds a strong foundation for anyone who wants to master quilting basics like half-square triangles and color arrangement. The final result is a block with a fascinating design that looks far more intricate than it actually is.
Adding the Card Trick block to your quilt projects brings a touch of sophistication and artistry. Whether used in a full quilt or as a feature block in a wall hanging, this pattern is sure to impress.
Materials and Tools You’ll Need
Before you begin, gather all the essential materials and tools. Having everything at your fingertips makes the quilting process smoother and more enjoyable. Here’s what you’ll need:
Materials:
- Four contrasting fabric squares (8″ x 8″) – one for each “card”
- Background fabric square (8″ x 8″)
- Matching thread
- Optional: lightweight batting and backing fabric if assembling a full quilt
Tools:
- Rotary cutter and mat
- Quilting ruler
- Sewing machine
- Iron and ironing board
- Pins or clips
Choosing high-contrast fabrics will help emphasize the “card” illusion in the pattern. Don’t be afraid to experiment with bold colors or even patterned fabrics—just ensure there is enough visual distinction between them.
Cutting Your Fabric
Accurate cutting is crucial in any quilt project, especially one like the Card Trick quilt pattern that relies heavily on clean lines and precise shapes. Begin by pressing all your fabrics to remove any wrinkles or folds, which helps with more accurate cuts.
Cut each of the four colored 8” fabric squares and the background fabric into:
- Two 4″ squares
- Two 4″ x 4″ squares that you will later turn into triangles
Next, you’ll need to make half-square triangles (HSTs) and quarter-square triangles (QSTs) to form the overlapping “cards.” You can mark diagonal lines on the back of some squares to guide your cuts and stitches, especially if you’re still getting comfortable with these techniques.
Taking time with this step will pay off later when assembling the quilt block. Precise cuts ensure everything fits together neatly and helps your quilt pattern come together smoothly.
Sewing the Triangles
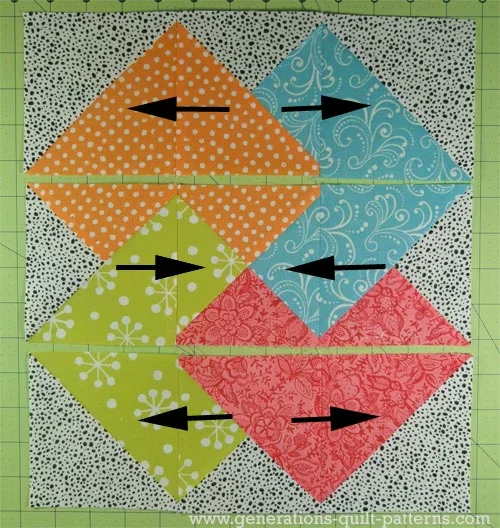
The real magic of the Card Trick quilt block begins when you start sewing the triangles. Start by making half-square triangles (HSTs). To do this, pair two contrasting 4” squares, draw a diagonal line across the back of one, sew ¼” on either side of the line, then cut along the line to create two HST units.
Next, move on to creating quarter-square triangles (QSTs). Take two HSTs made from different fabrics, align them right sides together with the seams perpendicular to each other, then repeat the marking, sewing, and cutting process. You’ll end up with two QST units that show a mix of three colors—perfect for the overlapping card illusion.
After sewing, press all seams open or to the darker side (your preference) and trim all units to the correct size—usually 3½” squares—so that assembling the block is easier. Precision during this step will ensure sharp corners and a polished look for your quilt block.
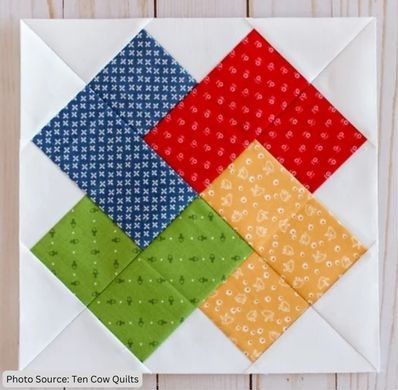
Assembling the Card Trick Quilt Block
Now comes the fun part—seeing the illusion come together. Lay out all your pieces on a flat surface or design board, arranging them according to the Card Trick layout. The goal is to form a 3×3 grid of squares, with the central square made up of a quarter-square triangle unit and the surrounding blocks forming the illusion of layered cards.
You’ll have a mix of HSTs, QSTs, and plain background squares. Carefully check that the colors align in a way that gives the overlapping effect—each “card” should appear to tuck under and over adjacent ones. This might take some rearranging at first, but it’s worth taking the time to get right.
Sew the rows together one at a time, pressing the seams between each step. Then sew the rows together to complete the 9-patch block. With each seam pressed and aligned, your finished Card Trick quilt block should measure about 9½” square (before final trimming or border additions).
Customizing Your Card Trick Quilt Block
Once you’ve mastered the basic Card Trick quilt block, it’s time to have fun with personalization! This block lends itself well to a wide range of color palettes, from soft pastels to vibrant jewel tones. You can even create a rainbow-themed quilt by making each block in a different colorway.
Try using batik or gradient fabrics for a more artistic flair, or lean into classic quilt aesthetics with traditional prints. You can also make a modern version by using solid fabrics and incorporating negative space with extra background fabric between blocks.
If you’re feeling adventurous, consider scaling the block up or down depending on your project. Larger blocks work great for baby quilts or table toppers, while smaller ones add detail to larger quilt compositions.
Project Ideas Using the Card Trick Pattern
The Card Trick quilt block is versatile and can be incorporated into a variety of quilt projects. Here are a few inspiring ideas:
- Wall Hanging – Create a 3×3 layout of Card Trick blocks with a coordinating border and hang it in your sewing room.
- Table Runner – Use three or four Card Trick blocks in a row with sashing to make a stylish table runner.
- Full Quilt – Alternate Card Trick blocks with solid squares or another quilt block pattern for a visually dynamic full-size quilt.
Whatever project you choose, this quilt pattern adds a sense of complexity and charm that will surely stand out. And since each block is self-contained, you can make one at a time and build your quilt at your own pace.
Final Touches and Finishing
After completing your blocks, join them together with sashing and borders if desired. Add batting and backing, then quilt as you like—straight-line quilting works well to highlight the geometry, or you can experiment with free-motion designs that follow the “card” shapes.
Once quilted, bind the edges to complete your masterpiece. Stand back and admire how the overlapping shapes form a seamless illusion that tricks the eye and delights the viewer.
Don’t forget to label your quilt with your name and date—it’s a piece of art worth remembering.
Share Your Work!
Quilting is more than a hobby—it’s a form of creative expression and community. If you’ve followed this tutorial and made your own Card Trick quilt block or project, we’d love to see it! Share your finished quilt on social media using the hashtags #CardTrickQuilt and #QuiltPatternLove.
Tag fellow quilters, post your progress, and inspire others to give this pattern a try. Whether you’re quilting solo or with a group, your creativity deserves to be celebrated.
Happy quilting, and may your next quilt pattern be as magical as this one!