Creating a Cardinal Quilt Pattern is a wonderful way to celebrate the beauty of nature through fabric. This pattern is perfect for both beginners and experienced quilters who want to bring the vibrant red hues of cardinals into their quilt designs. In this tutorial, we will walk you through the step-by-step process of making a Cardinal Quilt Pattern Free using accurate fabric measurements and quilt assembly techniques.
Choosing Your Materials
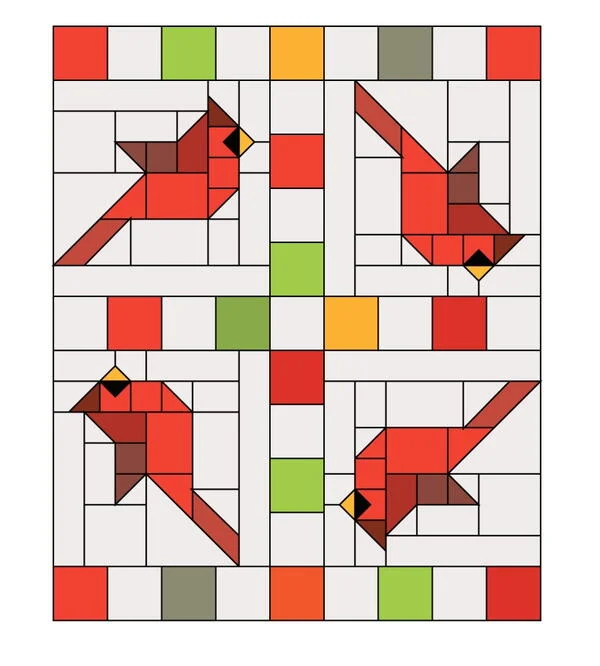
Before you begin, gathering the right materials is essential for achieving the best results. For this quilt pattern, you will need different fabric colors to bring the cardinal design to life. Choose a deep red fabric for the cardinal, white or light gray for the background, and black for the beak and eyes.
Cotton is the preferred fabric choice due to its durability and ease of sewing. Make sure to prewash your fabric to avoid shrinkage later. You will also need a rotary cutter, quilting ruler, and a cutting mat to ensure precise fabric measurements.
For batting, select a medium-weight cotton or polyester blend to give your quilt the perfect balance of warmth and flexibility. Finally, choose a coordinating thread color that blends well with your fabric selections to ensure a seamless finish.
Cutting Your Fabric Pieces
Accurate fabric cutting is crucial to achieving a well-structured quilt pattern. Below are the required cuts for a standard-sized Cardinal Quilt block measuring 12″ x 12″.
- Red fabric (for the cardinal): Cut (4) 4″ x 4″ squares, (2) 3″ x 3″ squares, and (2) 2″ x 2″ squares.
- White fabric (background): Cut (6) 4″ x 4″ squares and (4) 2″ x 2″ squares.
- Black fabric (beak and eyes): Cut (1) 2″ x 2″ square and (1) 1″ x 1″ square.
Using a rotary cutter and ruler, make precise cuts and organize the pieces according to their section in the quilt pattern. Label each piece with fabric chalk to avoid confusion during assembly.
Piecing the Cardinal Quilt Block
To create the Cardinal Quilt Pattern, start by assembling the cardinal’s body. Take the red fabric pieces and arrange them in a shape resembling the bird. Use a ¼-inch seam allowance to sew each piece together.
For the background, attach the white fabric squares around the cardinal shape to create contrast. Ensure that seams are pressed flat as you sew to keep the block smooth and even.
The black fabric pieces should be sewn last to add details like the beak and eyes. Carefully stitch them in place, ensuring that the design remains symmetrical and proportional.
Assembling the Quilt Top
Once you have completed multiple cardinal blocks, it’s time to arrange them to form the quilt top. Layout the blocks on a flat surface to decide on the final design. You can use a traditional grid layout or staggered placement for a modern look.
Sew the blocks together, row by row, using a consistent seam allowance. Pin the seams as you go to ensure alignment, and press each row before moving on to the next.
After all rows are sewn, stitch them together to complete the quilt top. Make sure to check for even edges and trim any excess fabric if necessary to maintain a clean finish.
Adding the Borders and Batting
Adding a border gives the quilt pattern a finished look and enhances the overall design. Cut border strips that measure 3 inches in width and sew them around the edges of the quilt top.
For batting, place it between the quilt top and the backing fabric. Smooth out any wrinkles and pin the layers together. Basting spray or safety pins can help keep the layers secure during quilting.
Use a walking foot to quilt through all layers, following the cardinal shapes or creating a free-motion quilting design for added texture. This step secures the layers and gives the quilt its finished appearance.
Binding and Finishing Touches
Binding is the final step in completing your Cardinal Quilt Pattern. Cut 2.5-inch-wide strips of fabric and join them to create a long binding strip. Fold the strip in half and attach it around the quilt edges, sewing it in place with a ¼-inch seam.
Hand-stitch or machine-stitch the binding’s edge to give it a neat and durable finish. Trim any excess fabric and press the edges for a polished look.
Once your quilt is complete, wash it gently to remove any chalk markings and to allow the fabric to soften. Your Cardinal Quilt Pattern is now ready to be displayed or gifted as a beautiful handmade creation!
Conclusion
Creating a Cardinal Quilt Pattern Free is a rewarding experience that allows you to combine creativity with quilting techniques. By carefully selecting fabrics, following precise measurements, and assembling your quilt with attention to detail, you can craft a stunning design featuring this beloved bird.
With practice, you can customize this quilt pattern by experimenting with different fabric colors and layouts. Whether you choose to make a single wall hanging or an entire bed-sized quilt, this pattern is a timeless project that brings warmth and charm to any space.
Start your Cardinal Quilt today and enjoy the process of quilting a masterpiece inspired by nature!